belfuse.com/power-solutions
USER MANUAL
12
4 INSTALLATION
Warning: In order to avoid potentially hazardous situations including fire hazard, safety recommendations must be followed. Only
authorized staff can install the unit.
4.1 CONNECTING THE INPUT TO THE POWER SUPPLY
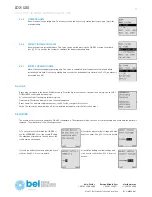
The LDX-U20 must be connected to a DC power supply rated between 12VDC and 28VDC with a maximum output current of 20A. Use only
60/75 Class I copper 1.5…2.5mm2 wires stripped 6...7.5mm. The tightening torque must be 0.5…0.6Nm.
Please respect the wiring polarity!
Note:
The input current is equal to the load current plus the current needed by the battery charger to recharge the battery.
Caution: This input is designed to be connected ONLY to a short circuit protected power supply; connecting a battery to this input or
other DC sources with not defined current limitation may seriously damage the unit or the load and even result in fire hazard.
4.2 CONNECTING THE LOAD
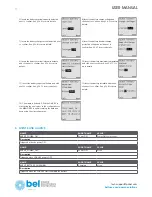
The LDX-U20 must be connected to a DC load rated between 12VDC and 28VDC / maximum 20A. Use only 60/75 Class I copper
1.5…2.5mm2 wires stripped 6...7.5mm. The tightening torque must be 0.5…0.6Nm.
Please respect the wiring polarity! Please check the load and the power supply are rating compliant.
4.3 CONNECTING THE BATTERY
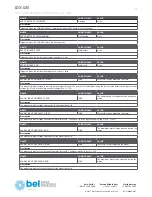
The LDX-U20 must be connected to a battery with nominal voltage between 12VDC and 28VDC with up to 150Ah capacity. Higher capacity
batteries can also be used at the expense of a longer charging time. Use only 60/75 Class I copper 1.5…2.5mm2 wires stripped 6...7.5mm.
The tightening torque must be 0.5…0.6Nm.
Caution: The battery shall be connected to the LDX-U20 through a 30A ATO fuse (or equivalent). Even is the unit is electronically
protected against short circuit it is mandatory to use a fuse for safety reasons.
Please respect the wiring polarity!
Avoid keeping the LDX-U20 connected to the battery for long time when not used. Although the current consumption from the battery when
the unit is OFF is very low (about 30µA) it can discharge the battery in the long time.
4.4 CONNECTING THE TEMPERATURE SENSOR
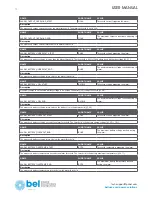
An optional temperature sensor (P/N: WNTC-2MT) can be connected to its input on the front panel. The temperature sensor is provided
with 2m long cables and must be fixed to the battery body to measure its temperature (an adhesive pad can be used). When the sensor is
connected the battery temperature is automatically displayed on the LCD and a temperature compensated charge is activated when charging
Lead-Acid batteries.
4.5 CONNECTING THE INHIBIT INPUT
An opto-isolated digital input is provided. A digital signal between 5VDC and 30VDC must be applied to this input to enable the INHIBIT
function. By default when the signal is 0V (or the INHIBIT input is not connected) the unit will switch the load to the battery as soon as the
input voltage is no more present. Applying a signal to this input inhibits the backup function and the load can be switched OFF as soon at the
input fails with no battery backup. The polarity of this input can be changed as explained in §5.2.15.


