background image


15/EN


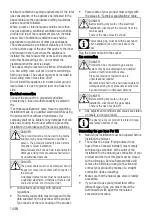
Connecting the gas hose For LPG 


Have your product connected in a way that it will 
be close to the gas connection and not gas 
leakage will exist. 


Plastic hose to be used must not be longer than 
125 cm. 


Install the clamp to the hose. Soak one end of 
the hose (15 mm inner diameter) into boiling 
water for one minute to soften it. 


Than, slip the softened end of the hose 
completely onto the sharp hose tip of your 
product. Finally, tighten the clamp completely 
with a screwdriver. 


Repeat the same procedure for the other end of 
the hose and complete the gas cylinder 
connection. 


Never forget to make the gas leakage control. 

DANGER: 

Risk of explosion and suffocation! 
Do not keep LPG cylinders in home. 


If you need to use your product later with a 
different type of gas, you must consult the 
Authorised Service Agent for the related 
conversion procedure. 


LPG hose tip  

Plastic hose 

Leakage control at the connection point 


Make sure that all knobs on the product are 
turned off. Make sure that the gas supply is open. 
Prepare soapy foam and apply it onto the 
connection point of the hose for gas leakage 
control. 


Soapy part will froth if there is a gas leakage. In 
this case, inspect the gas connection once again. 


Never use a match or lighter to make the gas 
leakage control. 

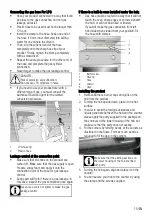
If there is a built-in oven installed under the hob; 


Gas hose must be routed in a way that it will not 
touch the oven, sharp edges or corners beneath 
the hob, or will not be kinked or twisted. 
If you will make the gas connection from left 
hand side when viewed from your position, fix 
the hose with clamps. 


Bottom view 

Hose tip 

Hose 

Clamp 

Oven 

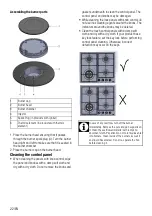
Installing the product 

1.  Remove burners, burner caps and grills on the 

hob from the product. 

2.  Turning the hob upside down, place it on a flat 

surface. 

3.  In order to avoid the foreign substances and 

liquids penetrate between the hob and the counter, 
please apply the putty supplied in the package on 
the contours of the lower housing of the hob but 
make sure that the putty does not overlap. 

4.  Fill the corners by forming bends at the corners as 

illustrated in the figure. Form as much bend as 
required to fill the gap in the corners. 


Make sure that the skirting sections on 
the lower housing of the hob are filled 
with putty. 

5.  Turning the hob again, align and place it on the 

counter. 

6.  You can secure your hob to the counter by using 

the clamp and the screws supplied. 

Summary of Contents for HIYG 64225 SBOP

Page 1: ...HIYG 64225 SXOP HIYG 64225 SBOP EN Built in Hob User Manual 1301801440 Rev 0 19 03 2021 ...

Page 2: ...a reference for future use If you handover the product to someone else give the user manual as well Follow all warnings and information in the user manual Remember that this user manual is also applicable for several other models Differences between models will be identified in the manual Explanation of symbols Throughout this user manual the following symbols are used Important information or use...

Page 3: ...ents 10 Technical specifications 11 Injector table 11 3 Installation 12 Before installation 12 4 Preparation 17 Tips for saving energy 17 Initial use 17 First cleaning of the appliance 17 5 Using the hob 18 General information about cooking 18 Using the hobs 18 6 Maintenance and careError Bookmark not defined General cleaning information Error Bookmark not defined Cleaning the hob Error Bookmark n...

Page 4: ...product is handed over to someone else for personal use or second hand use purposes the user manual product labels and other relevant documents and parts should be also given Installation and repair procedures must always be performed by Authorised Service Agents The manufacturer shall not be held responsible for damages arising from procedures carried out by unauthorised persons which may also vo...

Page 5: ...alled maximum 2 meters away from the product Good combustion is required in gas appliances In case of incomplete combustion carbon monoxide CO might develop Carbon monoxide is a colourless odourless and very toxic gas which has a lethal effect even in very small doses Request information about gas emergency telephone numbers and safety measures in case of gas smell from you local gas provider What...

Page 6: ...ectrical installation according to construction regulations Any work on electrical equipment and systems should only be carried out by authorised and qualified persons In case of any damage switch off the product and disconnect it from the mains To do this turn off the fuse at home Make sure that fuse rating is compatible with the product Product safety WARNING The appliance and its accessible par...

Page 7: ...ded use This product is designed for domestic use Commercial use will void the guarantee CAUTION This appliance is for cooking purposes only It must not be used for other purposes for example room heating The manufacturer shall not be liable for any damage caused by improper use or handling errors Safety for children WARNING Accessible parts may become hot during use Young children should be kept ...

Page 8: ...HS Directive The product you have purchased complies with EU RoHS Directive 2011 65 EU It does not contain harmful and prohibited materials specified in the Directive Package information Packaging materials of the product are manufactured from recyclable materials in accordance with our National Environment Regulations Do not dispose of the packaging materials together with the domestic or other w...

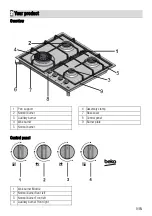
Page 9: ... 2 Normal burner 3 Auxiliary burner 4 Wok burner 5 Normal burner 6 Assembly clamp 7 Base cover 8 Control panel 9 Burner plate Control panel 1 Wok burner Middle 2 Normal burner Rear left 3 Normal burner Front left 4 Auxiliary burner Front right ...

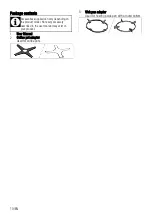
Page 10: ...lied can vary depending on the product model Not every accessory described in the user manual may exist on your product 1 User Manual 2 Coffee pot adaptor Used for coffee pots 3 Wok pan adaptor Used for hosting a wok pan with a round bottom ...

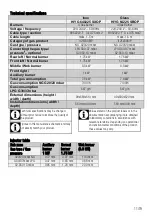
Page 11: ...umption NG G20 20 mbar 744 I h 744 I h Gas consumption LPG G30 37mbar 567 g h 567 g h External dimensions height width depth 99x580x510 mm 99x590x520 mm Installation dimensions width depth 560 mm 490 mm 560 mm 490 mm Technical specifications may be changed without prior notice to improve the quality of the product Figures in this manual are schematic and may not exactly match your product Values s...

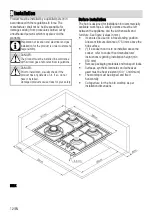
Page 12: ...have it installed Damaged products cause risks for your safety Before installation The hob is designed for installation into commercially available work tops A safety distance must be left between the appliance and the kitchen walls and furniture See figure values in mm It can also be used in a free standing position Allow a minimum distance of 750 mm above the hob surface If a cooker hood is to b...

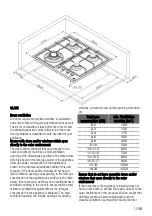
Page 13: ...lation opening corresponding to the total gas consumption of the appliance as specified in the table below then there must definitely be an additional fixed ventilation opening in the room to ensure that the total minimum ventilation requirements for the total gas consumption of the appliance is achieved The fixed ventilation opening can include openings for existing airbricks extraction hood duct...

Page 14: ... or come into contact with hot parts of the product A damaged power cable must be replaced by a qualified electrician Otherwise there is risk of electric shock short circuit or fire Connection must comply with national regulations The mains supply data must correspond to the data specified on the type label of the product Type label is at the rear housing of the product Power cable of your product...

Page 15: ...leakage control Soapy part will froth if there is a gas leakage In this case inspect the gas connection once again Never use a match or lighter to make the gas leakage control If there is a built in oven installed under the hob Gas hose must be routed in a way that it will not touch the oven sharp edges or corners beneath the hob or will not be kinked or twisted If you will make the gas connection...

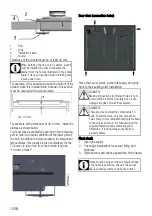
Page 16: ...es this process is also compulsory for the TC burner to take in air from the bottom It can be 100 cm2 at least Rear view connection holes Place the burner plates burner plate caps and grills back to their seating after installation DANGER Making connections to different holes is not a good practice in terms of safety since it can damage the gas and electrical system DANGER There are gas and electr...

Page 17: ...select the correct pot size for your dishes Larger pots require more energy Initial use First cleaning of the appliance The surface might get damaged by some detergents or cleaning materials Do not use aggressive detergents cleaning powders creams or any sharp objects during cleaning Do not use harsh abrasive cleaners or sharp metal scrapers to clean the oven door glass since they can scratch the ...

Page 18: ...ld not be used to keep foods either Use flat bottomed saucepans or vessels only Put appropriate amount of food in saucepans and pans Thus you will not have to make any unnecessary cleaning by preventing the dishes from overflowing Do not put covers of saucepans or pans on cooking zones Place the saucepans in a manner so that they are centered on the cooking zone When you want to move the saucepan ...

Page 19: ... the burner is not ignited within 15 seconds Wait at least 1 minute before trying again There is the risk of gas accumulation and explosion Wok burner Wok burners help you to cook faster Wok which is particularly used in Asian kitchen is a kind of deep and flat fry pan made of sheet metal which is used to cook minced vegetable and meat at strong flame in a short time Since meals are cooked at stro...

Page 20: ...s normal After each operation clean with a detergent suitable for the stainless or inox surface Clean with a soft soapy cloth and liquid non scratching detergent suitable for inox surfaces taking care to wipe in one direction Remove lime oil starch milk and protein stains on the inox stainless and glass surfaces immediately without waiting Stains may rust under long periods of time Glass surfaces ...

Page 21: ...ed surfaces and recommended by the authorized service especially for persistent stains on enamelled burner caps 8 Do not contact burner caps with aggressive detergents such as oven interior cleaning agents descalers while cleaning them this may cause discolouration 9 Clean the pot holders with detergent water and non scratching soft brush after each operation and then dry them 10 When the burner c...

Page 22: ... underneath to clean the control panel The control panel and knobs may be damaged While cleaning the inox panels with knob control do not use inox cleaning agents around the knobs The indicators around the knobs may be deleted Clean the touch control panels with a damp soft cloth and dry with a dry cloth If your product has a key lock feature set the key lock before performing control panel cleani...

Page 23: ...e The pipe has leaned Install the gas pipe properly Burners are not burning properly or at all Burners are dirty Clean the burner components Burners are wet Dry the burner parts Burner cap is not securely positioned Position the burner cap correctly Main gas valve is shut off Turn on the gas valve Gas cylinder is empty when using LPG Replace the gas cylinder The burner knob button has not been hol...

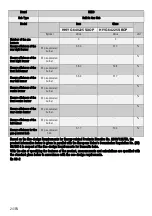
Page 24: ...gy efficiency of the front centre burner EE gas powered burner Energy efficiency of the rear centre burner EE gas powered burner Energy efficiency of the left burner EE gas powered burner Energy efficiency for the gas powered hob EE gas powered hob 61 7 59 4 Based on the Eco design Requirements for Energy related Products Directive No 2009 125 EC the product information below is given in parallel ...

Reviews: