12
4. INSTALLATION
4.1 Location
When installed in a panel enclosure complying with
the requirements for Ex n protection as shown in
section 3.2 of this manual, the BA377NE may be
located in a Zone 2 hazardous area providing that
the operating temperature is between –40°C and
+60°C and the installation complies with the Timer or
Clocks certification requirements.
Certified Ex e
panel enclosures are frequently used as Ex n panel
enclosures as they satisfy the same impact and
ingress protection requirements.
The BA377NE Timer or Clock has a stainless steel
housings with a 7J front of panel impact resistance
incorporating a 10mm thick toughened glass window
which can withstand a 4J impact.
This, together
with a captive silicone gasket which seals the joint
between the instrument and the panel, enclosure
provides IP66 ingress protection.
The BA377NE
has IP20 rear protection which can be increased to
IP66 by an optional A495 rear cover sealing kit.
Although the front of the BA377NE Timer or Clock
has IP66 protection, it should be shielded from
continuous direct sunlight and severe weather
conditions.
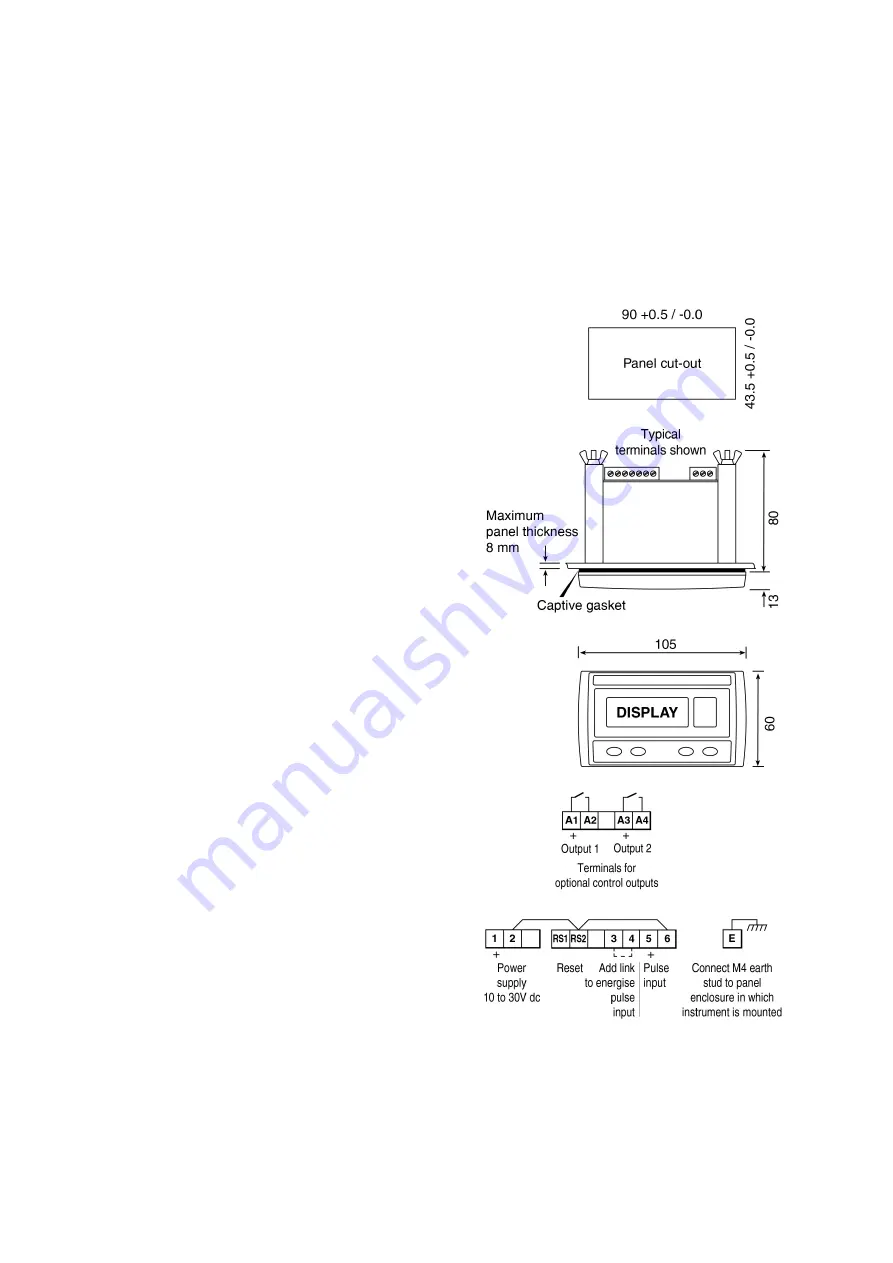
Fig 7 shows the overall dimensions of the BA377NE
together with the recommended panel enclosure
cut-out dimensions and terminals.
4.2 Installation Procedure
a. Cut the aperture specified in Fig 7 in the panel
enclosure. Ensure that the edges of aperture are
de-burred.
b. Inspect the Timer or Clock's captive gasket and
ensure that it is not damaged before inserting it
into the panel enclosure aperture.
c. If the enclosure panel is less than 1.0mm thick,
or is non-metallic, an optional BEKA stainless
steel support plate should be slid over the rear of
the indicator before the panel clamps are fitted to
evenly distribute the clamping force and prevent
the enclosure panel being distorted or creeping.
d. Slide a panel clamp into the two grooves at each
corner of the indicator housing with the M3 stud
protruding through the hole at the rear of the
clamp. Fit the stainless steel spring washer over
the stud and secure with the stainless steel wing
nut.
e. Evenly tighten the four clamps to secure the
instrument.
The
recommended
minimum
tightening torque for each wing nut is 22cNm
(1.95 lbf in).
f. Connect the panel enclosure wiring to the rear
terminal blocks.
To simplify installation, the
terminals are removable so that wiring can be
completed before the instrument is installed.
Wiring should be supported to prevent damage
resulting from vibration.
g. Finally, fit a silicone rubber push-on cap to the
end of each M3 threaded rod.
Support panel wiring to prevent vibration damage
Note:
Optional backlight is internally powered
Fig 7 BA377NE dimensions and terminals
Summary of Contents for BA377NE
Page 1: ...Issue 6 3rd July 2018 BA377NE Rugged one input Ex nA and Ex tc Timer or Clock Issue 6...
Page 4: ...4...
Page 24: ...24...
Page 25: ...25...
Page 36: ...36...


