background image

60

>>>

NAVIGATION MODE

> D

> GB

> F

> I

> E

> P

> NL

> DK

> S

> N

> FIN

> TR

> GR

> PL

> CZ

> H

> SK

Distance to next driving manoeuvre
Display power level / Display TMC

setting
Information box showing compass,

vehicle speed and altitude above sea

level
Estimated time of arrival, remaining

journey time and remaining distance

to destination

By pressing the 

 button or 

 you can

leave the arrow display.

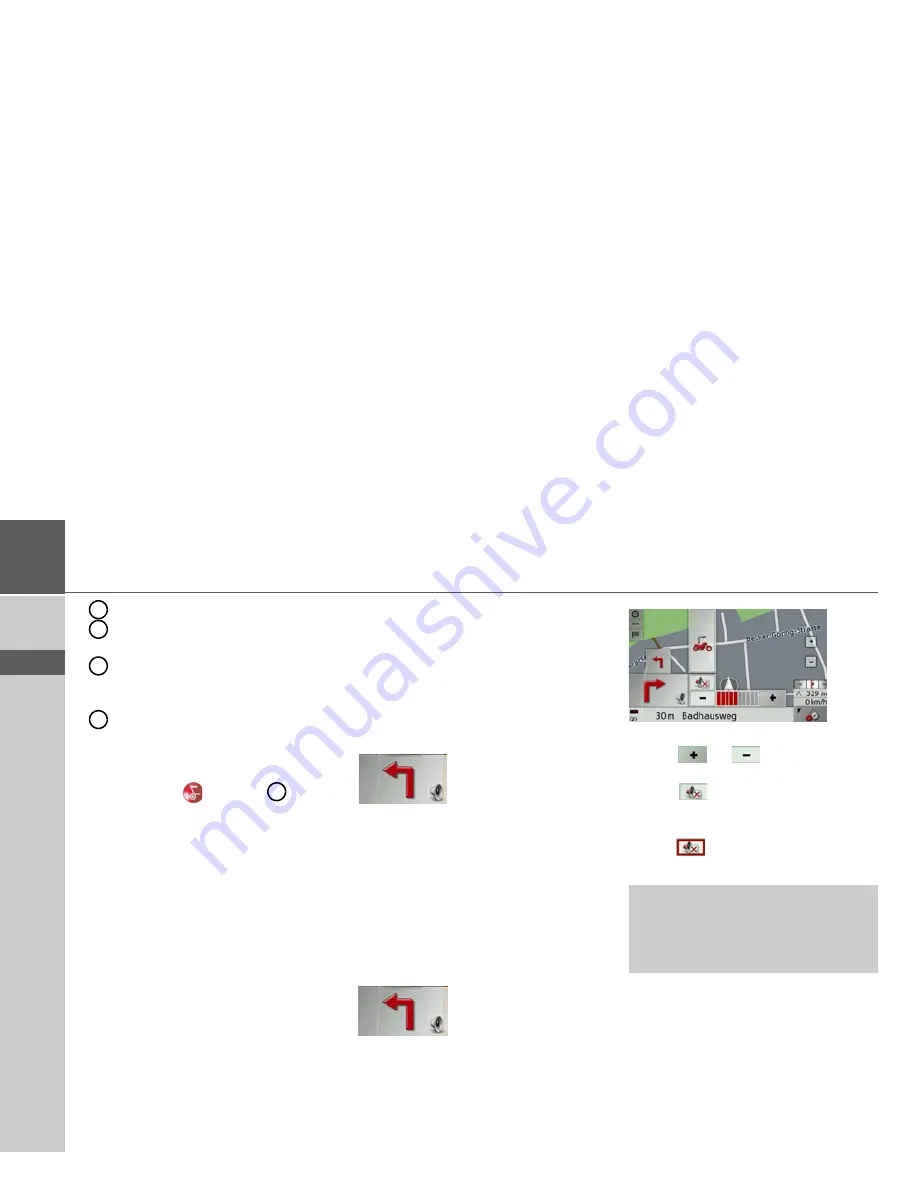
Using the map display

Repeating the last announcement

During route guidance, the system an-
nounces important information, e. g. the
next driving manoeuvre. The last an-
nouncement can be repeated with updat-
ed information.

>

Press the preview area while route guid-
ance is active. 

The last announcement is repeated with
updated information. The volume is also
displayed. 

Changing the announcement volume 

The volume of announcements can be ad-
justed. 

>

Press the preview area while route guid-
ance is active and the toolbar deactivat-
ed. 

The bar display indicates the volume.

>

Press 

  or 

  to  increase  or  de-

crease the volume. 

>

Press 

 in order to mute the an-

nouncements. 

The button will now have a red border.

>

Press 

 again in order to cancel the

mute function.

The bar display disappears again automat-
ically after a short while if no button is
pressed. 

6
7

8

9

4

!

Warning.

Always adjust the volume so that you can
still hear any ambient noise while
driving.

Summary of Contents for Traffic Assist Z 201

Page 1: ...Operating instructions...

Page 2: ...Connecting power supply 18 TMC antenna 18 GPS antenna 18 Unit antenna 18 Connecting up external antenna 19 Memory card 19 Inserting memory card 19 Ejecting memory card 19 Unit bracket 20 Fitting the...

Page 3: ...he Volume button 53 The Time button 53 The Announce streets button 54 The Reset button 54 Traffic announcements using TMC 54 Displaying TMC messages on the map 55 Using TMC 55 Reading a message 56 Dis...

Page 4: ...s 84 Closing the settings menu 84 The individual menu items 85 Battery 85 Day night display 85 Calibration 86 Language 86 Automatic on off 87 Sounds 87 Factory settings 87 Information 88 Specialist wo...

Page 5: ...ether to follow the details given or not We accept no liability for the navigational system issuing incorrect details As a result of traffic routing changes and deviating data inaccurate or incorrect...

Page 6: ...he unit or the rechargeable battery Any modification to the unit is also impermissible and renders the type approval invalid Use only genuine BECKER original accessories This will ensure that all the...

Page 7: ...he navigational func tion inside buildings When used in vehi cles you may not be able to adequately re ceive GPS data depending on how the Traffic Assist is installed In such cases you will have to co...

Page 8: ...perating instruc tions not illustrated Complaints procedure Please contact your local stockist if you have any complaints The unit can also be sent directly to Harman Becker in its orig inal packaging...

Page 9: ...Data on page 94 Cable for power supply from cigarette lighter This cable allows the unit to be connected up to the car s cigarette lighter The power supply must satisfy the follow ing requirements DC...

Page 10: ...nna to im prove reception in vehicles where only limited GPS reception is available not in cluded in the scope of supply Please con tact your local stockist for more informa tion Details of the connec...

Page 11: ...anation of the Traf fic Assist functionalities is contained in these operating instructions Registration You can register your product using our software service we will then inform you of any new upd...

Page 12: ...DK S N FIN TR GR PL CZ H SK Overview Traffic Assist Scope of supply 1 Traffic Assist PND Personal Navigation Device 2 USB connection cable 3 Unit bracket 4 Cable for power supply from car s cigarette...

Page 13: ...n showing the main menu selected 2 Touch screen key Press activates the corresponding key command 3 Becker button Press Back function in most applications Press and hold switches Traffic Assist on and...

Page 14: ...PL CZ H SK Left side of unit 1 SD card slot 2 3 5 mm socket for headphones headphones not included in scope of delivery socket for the TMC antenna 3 Mini USB port Top of unit 4 Reset button Bottom of...

Page 15: ...life of electronic components in your unit damage the rechargeable batteries and cause certain plastics to warp or melt Do not store your mobile navigation system in cold environments During operatio...

Page 16: ...your mobile navi gation system Display quality declaration In some cases for technical reasons a few discoloured dots pixels may be visible on the display Some pixels may also appear brighter or dark...

Page 17: ...ting socket on the carrier plate as far as the stop without using ex cessive force Insert the adapter into the cigarette lighter Note Note that if the battery is completely dis charged it may take up...

Page 18: ...the TMC anten na into the socket provided on the back of the carrier plate without using exces sive force GPS antenna Unit antenna The GPS antenna is integrated into the housing Danger Ensure that you...

Page 19: ...ry card is only used for updates and for playing music looking at images or watching videos The card slot is located on the left side of the unit The card slot is equipped with a spring actuated locki...

Page 20: ...unlight Temperatures inside the vehicle of 70 C and higher may damage parts of the bracket 2 1 3 4 6 5 1 2 3 4 5 6 Note Fasten the unit holder such that your field of vision is not impaired when the T...

Page 21: ...can be moved with out excessive force Move the carrier plate to the re quired position and hold it in this posi tion Tighten the fastening screw suffi ciently so that the Traffic Assist is held secur...

Page 22: ...the text The following prompt appears shortly af terwards If you agree to the request contained in this prompt press the OK button Switching off You can switch the unit off at any time Press the butto...

Page 23: ...recisely and e g buttons have to be touched off centre in order to be actu ated calibration should be undertaken The calibration function is started from the Settings menu see also page 86 Basic infor...

Page 24: ...for processing When a navigation destination is entered the Traffic Assist compares the entry with the set of data The Traffic Assist then only makes those letters which are possible available for se...

Page 25: ...E and UE if necessary If for example you are looking for the location W rzburg then simply press WUERZBURG or WURZBURG Special characters can be useful when naming destinations and routes In order to...

Page 26: ...corner of the display un til the desired method of entry is acti vated The inscription on the button symbolises the method of entry The button represents automat ic mode This means that on entry the...

Page 27: ...tch on Traffic Assist again do not press the screen after the unit is switched on After a short time the Traffic Assist is dis played as a removable storage medium on the computer Transferring maps Th...

Page 28: ...rectly Switch the Traffic Assist back on The new card is ready for use immediately Transferring music tracks pic tures and videos Pictures music and videos must be stored on a separate Micro SD memory...

Page 29: ...sition your height above sea level can be calculated if signals are received from four or more sat ellites The Traffic Assist determines the direc tion and distance from the destination us ing a navig...

Page 30: ...desti nations most recently travelled to as well as saved destinations is displayed in the lines below this The destination list The destination list displays line by line all destinations available...

Page 31: ...n Any destination stored in fast access mode can be displayed and edited Press the button to the left of the de sired destination A selection menu appears Icon Meaning This destination is a standard d...

Page 32: ...st access mode press the Enter destination button at the top of the screen The destination input menu will appear Protect entry The destination is pro tected against automatic deletion This function i...

Page 33: ...on map you can select a des tination directly on the map and start route guidance See Selecting a destination from the map on page 41 Enter geo coordinates The geographic coordinates for a destina tio...

Page 34: ...ance You can enter the exact destination ad dress in the address input menu The following settings can be made in the address input menu Town Postcode Street and house number Junctions as an orientati...

Page 35: ...he postcode consec utively When sufficient letters have been entered it will automatically switch to a list from which you can select the town However you can switch to the list before this by pressin...

Page 36: ...the street list Once a few letters of the desired street have been entered you can display a list of all the streets with the relevant letter com binations or this list will be displayed au tomaticall...

Page 37: ...en using the Start button The other options on this screen are de scribed under Displaying the entire route on page 63 Storing a destination In the address input menu the Save but ton opens a menu whe...

Page 38: ...e included in the map and can be displayed there Points of interest include airports and fer ry ports restaurants hotels petrol sta tions public buildings You can use points of interests as navigation...

Page 39: ...have selected the category any points of interest belonging to the relevant category and available within the area in question will now be displayed The name distance as the crow flies and the addres...

Page 40: ...o the point of interest Show route Press the button next to your cho sen point of interest to display any addi tional information about the destination Point of interest near to destination Press the...

Page 41: ...a destination straight from the map Press Enter destination in fast access mode Press the Select on map button The map display appears Press the desired point lightly on the surface of the screen A fl...

Page 42: ...for the geo graphic longitude and latitude east west or north south Then enter the desired values using the buttons to You can enter coordinates in three differ ent ways The following formats can be...

Page 43: ...Create new route button Previously stored routes are shown in a list below this Scrolling through stored routes Press the arrow keys on the right of the screen to scroll through the stored routes Edit...

Page 44: ...can simulate the entire route quickly or slowly You can stop the simulation by tapping the screen You can use the and buttons in the bottom line to scroll through the indi vidual stages in the route A...

Page 45: ...you have entered several destinations for a route you can use the Traffic Assist to optimise the order of the destinations for the journey distance Call up the map display for the stages of the route...

Page 46: ...ge of the settings by pressing the and buttons The Travel info button In the Travel info settings window you can set which additional information you would like displayed during route guid ance Press...

Page 47: ...n the route selection and on the calculation of the estimated journey times Press Route options in the settings menu The Route options settings window ap pears Select the mode of travel after pressing...

Page 48: ...sing the button next to Avoid you can exclude various types of road e g motorways ferries and toll roads from the route calculation You can set one of the following options for each of these road type...

Page 49: ...on You can configure settings for the recep tion of traffic announcements in the TMC settings window Press TMC in the settings menu The TMC settings window appears Setting Meaning Lane info When this...

Page 50: ...tation search The cur rently tuned TMC sta tion is displayed in the adjacent field This can only be set if the Auto select station function is switched off Rerouting This button allows you to choose w...

Page 51: ...by pressing the OK button The Speed info button The Speed info settings window allows you to display speed limits parallel to the navigation You can also be warned against exceeding the speed limit b...

Page 52: ...t settings window you can set the measurement units to be used for times and distances Press Format in the settings menu The Format settings window appears Press the field next to Time to switch be tw...

Page 53: ...button The Time button You can select the time zone relevant for your location in the Time settings win dow This setting is important for the cor rect calculation of the estimated time of arrival Pres...

Page 54: ...s the Reset button Press the Yes button The navigation settings are reset to their factory settings Traffic announcements using TMC Provided the TMC antenna is connected your Traffic Assist can receiv...

Page 55: ...ed blue Arrows indicating the traffic direction which is affected by the traffic problem continue to be displayed In addition to the coloured mark a warn ing sign is displayed on the stretch of road a...

Page 56: ...you can process this message If you wish to recalculate the route press the Yes button The route is recalculated and if possible a detour is calculated If you wish to cancel the change you can call up...

Page 57: ...t affects your route a window with detailed informa tion on the traffic announcement appears If you wish to calculate a detour around the traffic problem press Consider message or alternatively Ignore...

Page 58: ...ower level Display TMC setting Map display with route guidance Speed limit on the road currently be ing driven on display not available for all roads Zoom buttons Information box showing compass vehic...

Page 59: ...under neath it If two driving manoeuvres are to be performed in succession within a short time another smaller arrow indicating the second driving manoeuvre is displayed above the first arrow You can...

Page 60: ...eated with updat ed information Press the preview area while route guid ance is active The last announcement is repeated with updated information The volume is also displayed Changing the announcement...

Page 61: ...moved accordingly You can also select a point as a destina tion as described under Selecting a desti nation from the map on page 41 Map display options In the map display options you can change the se...

Page 62: ...The following options are available Select a POI on the route Display TMC messages located on the route Block a route ahead Change the route options Cancel route guidance You can cancel active route...

Page 63: ...he destination on the map You also have the option of viewing the complete set of di rections Open the options menu for the map display Press the Guidance button Press the Show route button The entire...

Page 64: ...s menu for the map display Press the Guidance button Press the Itinerary button The planned route is displayed on the map By pressing the or button you can simulate the entire route quickly or slowly...

Page 65: ...display Press the Map button Press the 3D button for 3D display or the 2D button for 2D display The map changes to the selected display 2D view or 3D view Changing zoom steps and map angle You can cho...

Page 66: ...you can set the angle of inclination of the map display This set ting can only be changed if the Autozoom function is turned on Use the arrow buttons to set the de sired maximum angle of inclination P...

Page 67: ...tton Press the Position info button The current position is displayed If possi ble an address is displayed If no address is available for the current position the geographic coordinates are displayed...

Page 68: ...d shows the dis tance to the point of interest The indica tion on the right shows the detour re quired to reach the point of interest Press one of the points of interests to start route guidance to it...

Page 69: ...ahead This determines a certain stretch of road that should not be used Traffic Assist then attempts to calculate a diversion Open the options menu for the map display Press the Route button Press the...

Page 70: ...icro SD memory card Press the Music button If a track is already playing the playback menu is displayed immediately If no track is playing the selection menu is displayed Selecting a track Tracks can...

Page 71: ...t Playlists the playlists on the memory card are listed Selection using Folders is described here as an example The other selection options are similar in functionality Press the Folders button The di...

Page 72: ...terrupted and playback of the new track begins Playback To play the music track displayed in the track line press the following button Press the button with the play icon The MP3 player starts playbac...

Page 73: ...ected Setting the volume You can set the volume of the MP3 play back In the playback menu press the button Press or to increase or de crease the volume Press in order to mute the music Press again in...

Page 74: ...e observe this warning Confirm the message by pressing the OK button The image viewer menu appears The image viewer menu In the image viewer menu you can select images start a slide show and call up t...

Page 75: ...to the next or previous image Press the centre of the image to hide the image menu Press the right or left hand side of the screen to move to the next or previous im age Press the centre of the image...

Page 76: ...lder level The slide show will end once all images have been displayed Press the button to stop the show be fore the end Settings In the settings you can choose the speed at which the images are displ...

Page 77: ...he vid eo player must not be used when driving Please observe this warning Confirm the message by pressing the OK button The selection menu is displayed In the selection menu all the folders on the me...

Page 78: ...again Playback The displayed video is played using the following button Press the button with the play icon The video player starts playback The but ton display changes to the pause icon At the top ri...

Page 79: ...rtainment Press the Games button A message is displayed stating that the games must not be used when driving Please observe this warning Confirm the message by pressing the OK button The selection men...

Page 80: ...in menu press Extras This displays the extras menu Select the desired function by pressing one of the buttons Travel assistant In the travel assistant you can look up in ternational telephone dialling...

Page 81: ...or Unit converter Press Unit converter in the travel assist ant Select the measurement you wish to convert Here length is selected as an example Press the button marked to input a value for conversion...

Page 82: ...ss the button marked to call up the settings menu for the world clock Choose whether to display the clock as Analog or Digital Press the World clock button to turn the display of two additional world...

Page 83: ...TRAS D GB F I E P NL DK S N FIN TR GR PL CZ H SK Calculator You have the option of opening up a con venient calculator Press Calculator in the extras menu Press to show additional calculator functions...

Page 84: ...The system settings menu You can select the various settings options from the system settings menu Operation Selection options Select the desired menu item by pressing the appropriate button The func...

Page 85: ...indicated by the mains socket symbol in the status display Closing the status display Pressing the OK button closes the status display and shows the settings menu Day night display You can set the Tr...

Page 86: ...uage selection appears The language selection shows the available languages in a list several pages long Each list field is in the form of a button Each button is labelled with the language name and t...

Page 87: ...Left icon The function is switched on the Traffic Assist switches off automati cally Right icon The function is switched off the Traffic Assist does not switch off automatically Sounds You can switch...

Page 88: ...he Traffic Assist Press the Information button The information display appears Note in particular the product designa tion and the software version Always quote these details in enquiries to the serv...

Page 89: ...JPEG Joint Photographic Experts Group The JPEG is the most common type of storage format for dissipating picture compression i e when compressing de tails of the picture are lost Still provides good...

Page 90: ...ffic Message Channel Traffic announcements transmitted by most FM stations via RDS Basis for dy namic navigation USB Universal Serial Bus The Universal Serial Bus USB is a bus sytem for interconnectio...

Page 91: ...32 Configuration 33 Destination list 30 Destination memory changing 31 scrolling 31 Destinations Entering 33 protected 31 Standard 31 storing 37 Directions 63 Displaying the route 37 63 E Entering a...

Page 92: ...ity 39 near destination 40 near to an address 40 on the route 68 Position display 41 R Random play function 73 Repeat current track 73 Restrictions Ferries 48 Motorways 48 Toll roads 48 Route guidance...

Page 93: ...Display on the map 55 on the route 69 Recalculating routes 57 TMC antenna 18 Toll roads 48 Track repeat 73 Traffic information 47 Travel assistant 80 U Unit converter 81 USB 90 Using fast access mode...

Page 94: ...th 24 Bit colour depth 16 7 Mio Colours Low reflection values Storage 2 GB Flash Storage 64 MB SD RAM Micro SD Card Reader Support up to 4 GB FAT 32 formatted USB Interface USB Client 2 0 MINI USB Hea...

Page 95: ...prevented The EC type approval mark E13 issued by Luxembourg s Road Traffic Registra tion Authority in accordance with European Directive ECE R10 governing the EMC of motor vehicles in its current ver...

Page 96: ...se take these products to communal collecting points or recycling centres for processing and salvage of materials The units will be accepted there free of charge The proper disposal of this product he...

Page 97: ...f manufacturers to take back these batteries free of charge and to correctly recycle them or to dispose of them as hazardous waste statutory obligation to take back If you wish to return your batterie...

Page 98: ...e the 4 housing screws using a small cross slot screwdriver Lever off the rear of the housing using a flat blade screwdriver levering at the slits at the side of the housing Lever off the battery bond...

Reviews: