background image

16

6

X

X

X

X

λ

1     

λ

2    

λ

3     

λ

4

λ

1

λ

2

λ

3

λ

4

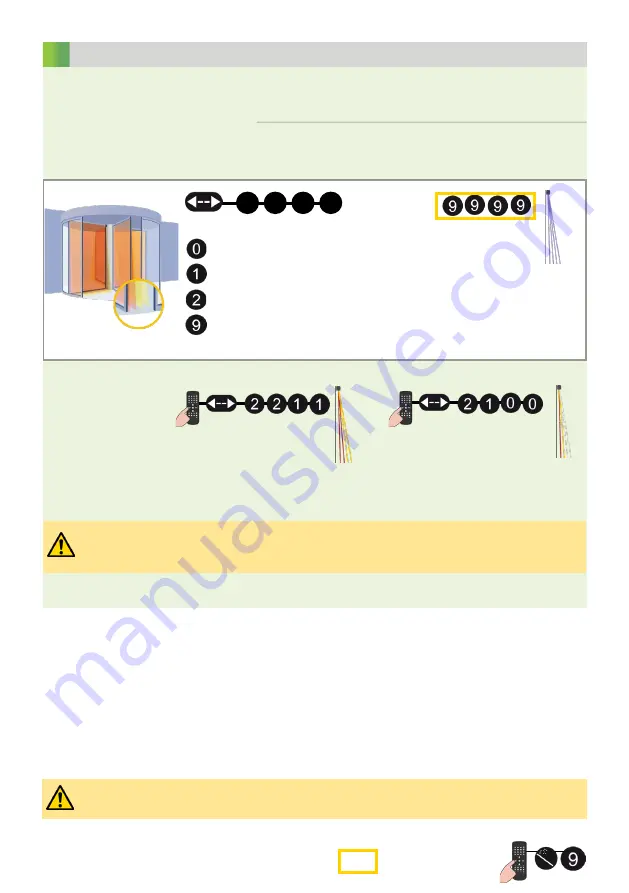
The optional field can be used to slow down the door.

Test the good functioning of the installation before leaving the premises.

FACTORY VALUES

OPTIONAL CONFIGURATION (RELAY 1)

LZR-P110 ON REVOLVING DOORS

6.1 SLOW-DOWN FUNCTION

λ

1 + 

λ

2 stop the door

λ

3 + 

λ

4 slow down the door

curtain is inactive on both fields

curtain is active on optional field and slows down the door (R1)

All curtains are active on 
both fields

The distance between the curtains depends on the mounting height and side. When mounted on the 

left, the distance between 

λ

1 and 

λ

4 is approximately 10 cm for every meter (mounting height). 

Example

: at 5 m the distance between 

λ

1 and 

λ

4 is 50 cm.

curtain is active on safety field and stops the door (R2)

curtain is active on both fields

λ

1 stops the door

λ

2 slows down the door

λ

3 + 

λ

4 are inactive

Ex:

Summary of Contents for LZR P110

Page 1: ... I F I Z I E R U N G N A C H DIN 18650 E N A B L E S A C C O R D A N C E W I T H EN LASER SCANNER FOR PEDESTRIAN DOORS User s Guide for software version 0600 and higher See tracking label on product for serial number SWINGING SLIDING REVOLVING This user s guide is an informative document and can not be seen as a commitment of result ...

Page 2: ...responsible for carrying out a risk assessment and installing the sensor and the door system in compliance with applicable national and international regulations and standards on door safety Other use of the device is outside the permitted purpose and can not be guaranteed by the manufacturer The manufacturer cannot be held responsible for incorrect installations or inappropriate adjustments of th...

Page 3: ...r error no power power Caution Laser radiation LED flashes quickly LED flashes LED is off 1 laser sweep emission 2 laser sweep reception 3 LED signals 4 4 screws for position lock 2 5 connector 6 protection cover 7 visible laser beams 3 8 notches for tilt angle adjustment 2 9 adjustable bracket 10 cable conduits 4 1 Detection LED relay 1 optional field 2 Detection LED relay 2 safety field 3 Error ...

Page 4: ... ACCESS CODE DELETING AN ACCESS CODE The access code is recommended for sensors installed close to each other After unlocking the red LED flashes and the sensor can be adjusted by remote control If the red LED flashes quickly after unlocking you need to enter an access code from 1 to 4 digits field width 4 2 m field width is defined by teach in To end an adjustment session always lock the sensor E...

Page 5: ...de of the bracket Position the bracket and fasten the 4 screws firmly in order to avoid vibrations Position the housing on the bracket and turn the sensor until the two triangles are face to face MOUNTING WIRING POWER SUPPLY POWER SUPPLY RELAY 1 OPENING VIA VIRTUAL PUSH BUTTON RELAY 2 SAFETY TEST TEST NOT USED GREEN BROWN WHITE YELLOW PINK VIOLET RED BLUE WHITE RED WHITE BLUE Open the protection c...

Page 6: ...tion of the detection field Adjust the tilt angle of the detection field with the hex key The visible laser beam should be positioned 5 cm in front of the door frame Lock the position of the mounting bracket to avoid malfunctioning in case of extreme vibrations Unlock the sensor and activate the visible laser beams in order to position the curtains parallel to the door POSITIONING A teach in is la...

Page 7: ...tection zone The sensor will learn its surroundings and adapt the detection field shape to these Objects in the detection field will be cut out During teach in the detection field should be free of snow buildups heavy rain snowfall fog or other moving objects MIN MAX 0 5 m 5 0 m no field Ex for a field width of 4 2 m 5 2 FIELD WIDTH 5 1 SAFETY FIELD TEACH IN After teach in the field width should b...

Page 8: ...e installation before leaving the premises FACTORY VALUES OPTIONAL CONFIGURATION 6 1 VIRTUAL PUSH BUTTON TEACH IN VPB Make sure the white and yellow wires are connected to the corresponding inputs before configuring the virtual push buttons 6 2 ACTIVATING DEACTIVATING THE DETECTION CURTAINS λ1 λ2 are active λ3 λ4 are inactive curtain is inactive curtain is active All curtains are active The distan...

Page 9: ...the bracket Position the bracket and fasten the 4 screws firmly in order to avoid vibrations Position the housing on the bracket and turn the sensor until the two triangles are face to face MOUNTING WIRING POWER SUPPLY POWER SUPPLY NOT USED RELAY 2 SAFETY TEST TEST NOT USED GREEN BROWN WHITE YELLOW PINK VIOLET RED BLUE WHITE RED WHITE BLUE Open the protection cover plug the connector and position ...

Page 10: ...sition of the detection field Adjust the tilt angle of the detection field with the hex key The visible laser beam should be positioned 10 cm in front of the door axis Lock the position of the mounting bracket to avoid malfunctioning in case of extreme vibrations Unlock the sensor and activate the visible laser beams in order to position the curtains parallell to the door POSITIONING A teach in is...

Page 11: ...e detection field will be cut out During teach in the detection field should be free of snow buildups heavy rain snowfall fog or other moving objects 0 5 m 5 0 m no field Ex for a field width of 4 2 m 5 2 FIELD WIDTH 5 1 SAFETY FIELD TEACH IN After teach in the field width should be reduced by remote control During this operation there is no safety on the door Wait for the teach in process to fini...

Page 12: ...re inactive curtain is inactive curtain is active All curtains are active The distance between the curtains depends on the mounting height and side When mounted on the left the distance between λ1 and λ4 is approximately 10 cm for every meter mounting height Example at 5 m the distance between λ1 and λ4 is 50 cm LZR P110 ON SWINGING DOORS Depending on the needed field depth activate or deactivate ...

Page 13: ... side of the bracket Position the bracket and fasten the 4 screws firmly in order to avoid vibrations Position the housing on the bracket and turn the sensor until the two triangles are face to face WIRING POWER SUPPLY POWER SUPPLY RELAY 1 OPTIONAL SLOWDOWN RELAY 2 SAFETY STOP TEST TEST NOT USED GREEN BROWN WHITE YELLOW PINK VIOLET RED BLUE WHITE RED WHITE BLUE Open the protection cover plug the c...

Page 14: ...ion is changed No reference point POSITIONING A teach in is launched the sensor learns its environment and automatically determines the detection field s Both RED LEDs flash slowly The 3 visible laser beams automatically light up during the 30 seconds of the teach in Ex 3 s max 30 s LZR P110 ON REVOLVING DOORS Adjust the lateral position of the detection field Adjust the tilt angle of the detectio...

Page 15: ...cts in the detection field will be cut out During teach in the detection field should be free of snow buildups fog or other moving objects 5 1 SAFETY FIELD TEACH IN The door has to complete at least 1 full cycle complete turn for the sensor to learn its environment During this operation there is no safety on the door Once the door has completed its cycle you can wait for the teach in process to fi...

Page 16: ... inactive on both fields curtain is active on optional field and slows down the door R1 All curtains are active on both fields The distance between the curtains depends on the mounting height and side When mounted on the left the distance between λ1 and λ4 is approximately 10 cm for every meter mounting height Example at 5 m the distance between λ1 and λ4 is 50 cm curtain is active on safety field...

Page 17: ...onfigure the field dimensions of the optional field relay 1 you have to cancel the virtual push button function by launching a new VPB teach in without any movement in the detection field R1 R2 IMMUNITY FILTER MIN OBJECT SIZE OUTPUT CONFIGURATION DETECTION FIELD REDIRECTION approximate values UNCOVERED ZONE Increase in case of snow dead leaves etc optional safety safety optional or safety off OUTP...

Page 18: ...ed to the test input or the power supply Check the size of the fields Launch a teach in Step out of the field and or remove the any object s from the field Activate the 3 red beams and check if the position of the sensor is correct If not adjust the hex screws Verify the field size Launch a teach in Check the position of the sensor Check the mounting side setting If there is no background set the ...

Page 19: ...presence 5 0 m x 5 0 m 5 25 cm adjustable 2 0 3516 2 1 cm 3 m 3 5 cm 5 m 700 mm x 300 mm x 200 mm testbody CA according to EN 16005 DIN 18650 IEC EN 60825 1 wavelength 905 nm output power 0 10 mW CLASS 1 wavelength 635 nm output power 1 mW CLASS 2 10 35 V DC sensor side to be operated from SELV compatible power suppliers only 5 W 1 8 A max 80 ms 35 V 5 m typ 20 ms max 80 ms output activation delay...

Page 20: ...ith the European directives 2011 65 EU 2014 30 EU and 2006 42 EC Notified Body for EC inspection 0044 TÜV NORD CERT GmbH Langemarckstr 20 45141 D Essen EC type examination certificate number 44 205 13089626 Angleur June 2018 Pierre Gardier The complete declaration of conformity is available on our website This product should be disposed of separately from unsorted municipal waste PLEASE KEEP FOR F...

Reviews: