background image


Seite 25 von 32 


OPERATION 


You can set all functions directly on the unit.  
Depending on the function set, the indicator lights on the control panel light up. 

 
SWITCH ON THE UNIT 
 

1.  Connect the unit to the earthed socket.  

2.  Press the 

 - button to switch on the unit.  

3.  When the unit is switched on, it starts in smart mode.  

4.  The 

 - indicator lights up. 

5.  Press the 

 - button again to switch to standby mode.  

6.  In standby mode, the 

 - indicator lights up slightly.  


NOTE


Never switch off the air purifier by pulling the plug directly from the mains. To switch off, 

always press the on/off button and wait a few minutes before disconnecting the unit from the 

mains. This allows the unit to go through a cycle of checks to verify its functionality. 

 
SET FUNCTIONS 
 

Smart mode  

Optimal for everyday use, the unit itself controls how strongly the air is cleaned.  

1.  Press the 

- button until the "Smart" indicator on the control element lights up.  

2.  To exit smart mode, press the 

- button again. 


Light sensor 

The unit has a light sensor that adjusts the backlight and air quality indicator to the ambient 
brightness when the unit is in smart mode.  
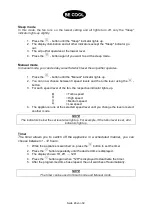
When it is dark, the display illumination and the air quality indicator are dimmed down to a 
minimum. 
 

NOTE


It is recommended to use the unit in Smart mode. In Smart mode, the unit works most 

efficiently as it regulates the fan speed automatically based on the level of particulate matter 

in the room. 


Fan speed listing based on PM2.5 value 

Air quality 

indicator Light 

Blue 

Green 

Yellow 

Red 

PM2.5 value 

0-50 

50-100 

100-150 

150+ 

Fan stage 

Low 

Medium 

High 

Turbo 

Summary of Contents for BC52LR2101

Page 1: ...BEDIENUNGSANLEITUNG Luftreiniger BC52LR2101 HERZLICHEN GLÜCKWUNSCH VIELEN DANK DASS SIE SICH FÜR EIN PRODUKT VON BE COOL ENTSCHIEDEN HABEN ...

Page 2: ...Informationen zur Sicherheit Standort und zum elektrischen Anschluss 3 4 Recycling Entsorgung Konformitätserklärung 5 Beschreibung des Geräts 6 Beschreibung des Displays und Bedienelement 6 Lieferumfang 7 Inbetriebnahme 7 9 Bedienung 10 13 Wartung und Reinigung 14 15 Behebung von Problemen 16 Technische Informationen 17 Garantie 18 DE EN ...

Page 3: ...ngsmaterial fern Bei Verschlucken besteht Erstickungsgefahr 9 Ist das Stromversorgungskabel beschädigt muss es vom Hersteller oder einer autorisierten Servicestelle ausgetauscht werden um alle möglichen Risiken zu vermeiden 10 Das Gerät muss in Übereinstimmung mit lokalen Aufstellungs und Betriebsvorschriften für elektrische Anlagen installiert werden 11 Die elektrische Steckdose in der Sie das Ge...

Page 4: ...ie die Kundenhotline 30 Erhalten Sie den Luftreiniger in einem guten Zustand indem Sie das Gerät pflegen und reinigen 31 Der Luftfilter ist mindestens einmal wöchentlich zu reinigen 32 Bewahren Sie das Gerät senkrecht an einem sicheren trockenen und für Kinder unzugänglichem Ort auf wenn es nicht verwendet wird Verdecken Sie das Gerät nicht mit Kunststoffverpackungen 33 Lagern Sie das Gerät in ein...

Page 5: ...elt bei Für weitere Information wenden Sie sich bitte an Ihren Händler oder die örtlichen Behörden ENTSORGUNG DER BATTERIEN Das Symbol durchgestrichene Mulltonne erfordert die separate Entsorgung von Batterien Bitte entsorgen Sie die Batterien umweltgerecht Werfen Sie Batterien NICHT in den Hausmüll Benutzen Sie bitte die Rückgabe und Sammelsysteme in Ihrer Umgebung oder wenden Sie sich an den Hän...

Page 6: ...einheit Abdeckung b Wassertank c Befeuchtungsrohr d Befeuchtungstrichter BESCHREIBUNG DES DISPLAYS UND BEDIENELEMENT b Bedienelement Luftauslass a c d Tragegriff PM2 5 Luftfeuchtigkeit Sensor Filter Abdeckung Netzkabel Wasser Auslass Luftqualitäts Anzeige ...

Page 7: ...mindestens 30 cm betragen Vergewissern Sie sich vor dem Geräteeinsatz dass Lufteingang und Luftausgang frei von Hindernissen und nicht blockiert sind Beachten Sie die Hinweise des Kapitels Wichtige Informationen zur Sicherheit Standort und zum elektrischen Anschluss INSTALLATION TAUSCH DER FILTER Mit nur ein paar Schritten können Sie Ihren Luftreiniger in Betrieb nehmen 1 Abnehmen der Filter Abdec...

Page 8: ...en 4 Aktivkohle Filter im Gerät installieren Stecken Sie zunächst den Aktivkohle Filter in das Gehäuse wie auf der Abbildung angezeigt Beachten Sie dabei dass Sie den Filter korrekt einsetzen müssen um eine optimale Funktion zu garantieren Sie können sich an der Grifflasche auf der Oberseite des Filters orientieren diese muss stets nach außen gerichtet sein 5 HEPA Filter im Gerät installieren Stec...

Page 9: ...tzen und anschließend an der Oberseite mit beiden Händen festdrücken bis es einrastet HINWEIS Verwenden Sie das Gerät niemals wenn die Schutzfolie noch am Filter ist Das kann zu Schäden am Gerät führen HINWEIS Achten Sie darauf dass der Filter richtig herum eingelegt ist Grifflasche nach außen HINWEIS VERWENDEN SIE DAS GERÄT NIEMALS OHNE FILTER Verwendung der Befeuchtungseinheit ...

Page 10: ...es Ziehen des Steckers vom Netz aus Drücken Sie zum Ausschalten immer die Ein Aus Taste und warten Sie einige Minuten bevor Sie das Gerät vom Netz trennen So kann das Gerät einen Zyklus von Kontrollen durchlaufen um seine Funktionalität zu überprüfen FUNKTIONEN EINSTELLEN Smart Modus Optimal für den alltäglichen Einsatz das Gerät stellt die Luftreinigung anhand der gegenwärtigen Luftqualität autom...

Page 11: ...eep Indikator aufleuchtet 2 Die Displaybeleuchtung und alle anderen Anzeigen bis auf den Sleep Indikator gehen aus 3 Der Luftreiniger arbeitet auf der niedrigsten Stufe 4 Drücken Sie die Taste erneut wenn Sie den Schlafmodus verlassen möchten Manueller Modus Im manuellen Modus können Sie die Geschwindigkeit des Lüfters wie gewünscht einstellen 1 Drücken Sie die Taste sooft bis der Manual Indikator...

Page 12: ...Filter hat eine Lebensdauer von ca 6 9 Monaten wenn das Gerät jeden Tag für ca 8 Stunden verwendet wird 1 Wenn der Indikator blinkt signalisiert das Gerät dass der Filter getauscht werden muss 2 Tauschen Sie die Filter indem Sie wie unter dem Punkt Installation Tausch der Filter beschrieben vorgehen 3 Drücken und halten Sie die und die Taste gleichzeitig für 3 Sekunden um das Reinigungsintervall z...

Page 13: ...tive Luftfeuchte von 45 60 erreicht welche am gesündesten für Menschen ist 1 Versichern Sie sich dass der Wassertank gefüllt ist 2 Drücken Sie die Taste um die Befeuchtungs Funktion zu aktivieren der Indikator leuchtet auf wenn die Funktion aktiviert ist 3 Drücken Sie die Taste erneut um die Funktion zu deaktivieren 4 Wenn der Indikator am Bedienelement leuchtet signalisiert das Gerät dass der Was...

Page 14: ...lter sehr schmutzig können Sie diesen in Warmwasser tauchen und mehrmals durchspülen allerdings sollte die Wassertemperatur nicht 40 C überschreiten Lassen Sie den Luftfilter nach dem Waschen gut austrocknen und dann setzten Sie diese wieder ein HINWEIS Benutzen Sie das Gerät nie ohne den Vorfilter Setzten Sie den Filter erst ein wenn er vollständig getrocknet ist Reinigung des HEPA Aktivkohle Fil...

Page 15: ...feuchtungsrohr 4 Entleeren des Wassertanks Lassen Sie das Wasser aus dem Gerät ab indem Sie den unten an der Rückseite befindlichen Stöpsel herausziehen Stellen Sie dabei ein Behältnis unter die Öffnung um das Wasser aufzufangen Vergessen Sie nicht den Stöpsel wieder in die Öffnung zu stecken 5 Reinigung der Befeuchtungseinheit Reinigen Sie die Befeuchtungseinheit mit einer weichen Bürste oder ein...

Page 16: ...n Der Luftqualitätssensor ist verschmutzt Reinigen Sie den Sensor Die Fenster im Raum sind geöffnet Verunreinigungen von außen gelangen in den Raum Schließen Sie immer die Fenster wenn Sie das Gerät verwenden Die Luftqualität verbessert sich nicht Die Filter sind Wartungsbedürftig Reinigen oder tauschen Sie die Filter aus Das Gerät läuft auf einer niedrigen Stufe im manuellen Modus Stellen Sie das...

Page 17: ...ng 230V Frequenz 50Hz Max Stromstärke 0 3A CADR 380 m h Filter HEPA H13 Gewicht 7 5 kg Abmessungen 382 x 223 x 548 mm Kontaktadresse für weitere Informationen Schuss Home Electronic GmbH Scheringgasse 3 A 1140 Wien Tel 43 1 97 0 21 0 Serviceline 43 1 97 0 21 544 www becool at FB Nr 236974 t FB Gericht Wien ...

Page 18: ...hren sind Geräte bei denen die Typenbezeichnung und oder Seriennummer am Gerät geändert gelöscht unleserlich gemacht oder entfernt worden ist Dienstleistungen außerhalb unserer Vertragswerkstätten die Transportkosten zu einer Vertragswerkstatt oder an uns und retour sowie die damit verbundenen Risiken Filter Wir weisen nachdrücklich darauf hin dass innerhalb der Garantiezeit bei Bedienungsfehlern ...

Page 19: ...teristics of this device in any way and only use replacement parts and accessories recommended by the manufacturer failure to do so will void the warranty 6 For any repairs to the device power plug or cable always and exclusively contact authorized service centers The customer service centers can be accessed online at www becool at 7 Remove the packaging and make sure the air conditioner is not da...

Page 20: ...ng the unit 31 The air filter should be cleaned at least once a week 32 Store the device vertically in a safe place dry and out of the reach of children when not in use Do not cover the device with plastic packaging 33 Store the unit in a room with no ignition sources in operation e g open fire service gas appliance or electric heater with open heat source 34 The Air Purifier should be transported...

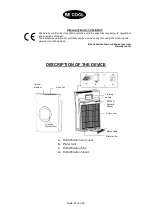
Page 21: ...laration of conformity can be viewed at any time under the following link www becool at downloads Errors and technical changes reserved www becool at DESCRIPTION OF THE DEVICE a Humidification unit cover b Water tank c Humidification tube d Humidification funnel b Control element Air outlet a c d Carrying handle PM2 5 Humidity Sensor Filter cover Mains cable Water outlet ...

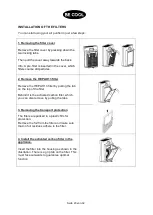
Page 22: ...for protection This film must be removed from the filters before they are put into operation for the first time Place the unit on a level surface with a properly earthed socket The distance to walls or other objects must be at least 30 cm Before using the unit make sure that both air inlet and air outlet are free of obstructions and not blocked Observe the instructions in the chapter Important inf...

Page 23: ...emove the HEPA H13 filter by pulling the tab on the top of the filter Behind it is the activated carbon filter which you can also remove by pulling the tabs 3 Removing the transport protection The filters are packed in a plastic film for protection Remove the foil from the filter and make sure that no foil residues adhere to the filter 4 Install the activated carbon filter in the appliance Insert ...

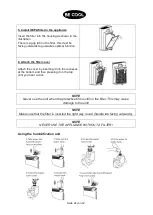
Page 24: ...Attach the filter cover Attach the cover by inserting it into the recesses at the bottom and then pressing it on the top until you hear a click NOTE Never use the unit when the protective film is still on the filter This may cause damage to the unit NOTE Make sure that the filter is inserted the right way round handle tab facing outwards NOTE NEVER USE THE APPLIANCE WITHOUT A FILTER Using the humi...

Page 25: ...cle of checks to verify its functionality SET FUNCTIONS Smart mode Optimal for everyday use the unit itself controls how strongly the air is cleaned 1 Press the button until the Smart indicator on the control element lights up 2 To exit smart mode press the button again Light sensor The unit has a light sensor that adjusts the backlight and air quality indicator to the ambient brightness when the ...

Page 26: ...tton 3 For each speed level of the fan the respective indicator lights up Turbo speed High speed Medium speed Low speed 4 The appliance runs at the selected speed level until you change the level or select another mode NOTE The indicators below the set level also light up For example if the turbo level is set all 4 indicators light up Timer The timer allows you to switch off the appliance in a sch...

Page 27: ...removes static electricity 1 Press the button to activate the ionizer the indicator lights up when the function is activated 2 Press the button again to deactivate the ionizer NOTE The ionizer can be activated in any mode Humidification function The air purifier is also equipped with a humidifier the unit measures the relative humidity of the room air and shows this on the display every 10 seconds...

Page 28: ...never clean the appliance with water This could be dangerous Never use petrol alcohol or solvents for cleaning Do not spray insecticides or similar agents on the air purifier Cleaning the pre filter every 2 weeks To remove the dust accumulated in the pre filter use a hoover If the pre filter is very dirty you can immerse it in hot water and rinse it several times however the water temperature shou...

Page 29: ...cation unit 1 Remove the cover Remove the cover 2 Remove the tank Remove the tank from the housing 3 Remove the humidification funnel and pipe Remove the humidification funnel and the humidification tube 4 Emptying the water tank Drain the water from the appliance by pulling out the plug located at the bottom of the back Place a container under the opening to catch the water Do not forget to put t...

Page 30: ... Place the unit at least 30 cm away from walls and objects The unit always indicates poor air quality The air quality sensor is dirty Clean the sensor The windows in the room are open Impurities from outside enter the room Always close the windows when using the unit Air quality is not improving The filters are in need of maintenance Clean or replace the filters The unit runs at a low level in man...

Page 31: ... 230V Frequency 50Hz Max Current 0 3A CADR 380 m h Filter HEPA H13 Weight 7 5 kg Dimensions 382 x 223 x 548 mm Contact addresses for further information Schuss Home Electronic GmbH Scheringgasse 3 A 1140 Vienna Tel 43 1 97 0 21 0 Service line 43 1 97 0 21 544 www becool at FB No 236974 t FB Court Vienna ...

Page 32: ...erial number on the device have been erased rendered illegible or removed Service work not performed by our authorised workshops transport costs to an authorised workshop or us and back as well as associated risks Filter Please note that within the warranty period we charge a flat rate of 60 indexed as per consumer price index 2015 June 2020 in case of operating errors or if no fault can be found ...

Reviews: