background image

Chapter 3: Operation

21

If you observe a swollen waste cubitainer, release of air from 
the cubitainer, or a buildup of pressure, immediately replace 
the air filter on the top of the waste cap assembly. 

4. Retighten the cap assembly on the waste cubitainer.

5. Toggle the power switch on the right side of the BD FACSFlow 

supply system control panel to the On position.

The System On indicator and the Power indicator in the toggle 
switch illuminate.

6. Check the sheath fluid supply line and the sheath filter for the 

presence of air.

If you see air in the line or the filter, perform steps 7 and 8. If 
not, go to step 9.

7. Verify that the sheath plenum is depressurized.

8. If there is air in the sheath fluid supply line, locate the Prime 

button under the Pump Fill indicator light, and then press and 
hold down the Prime button for one-half second.

Use only the Prime button if there is air in the sheath fluid 
supply line. If the Prime button does not activate the pump 
cycle, the BD FACSFlow supply system will clear the air in the 
sheath fluid supply line during the next pump cycle.

9. Turn on the cytometer.

10. Allow 20 to 30 seconds for the sheath plenum to pressurize.

Caution!

If the air filter on the top of the waste 

cubitainer cap assembly becomes clogged, air cannot 
be vented from the cubitainer, causing it to swell 
under pressure. If you observe swelling of the waste 
cubitainer, loosen the cap to relieve the pressure, and 
immediately replace the air filter. Removing the air 
filter or the waste cubitainer cap assembly without 
first relieving the pressure might generate an 
unnoticeable aerosol. Use appropriate precaution 
when troubleshooting a clogged air filter. Wear 
suitable protective clothing, eyewear, and gloves.

Summary of Contents for FACSFlow Supply System

Page 1: ...d Company BD Biosciences 2350 Qume Drive San Jose CA 95131 USA bdbiosciences com ResearchApplications bd com BD Biosciences European Customer Support Tel 32 53 720 600 help biosciences bd com BD FACSF...

Page 2: ...every precaution to ensure accuracy BD Biosciences assumes no liability for any errors or omissions nor for any damages resulting from the application or use of this information BD Biosciences welcome...

Page 3: ...ations and requirements 17 Chapter 3 Operation 19 Starting up the system 20 Shutting down the system 22 Responding to alarms 22 Chapter 4 Maintenance 25 Replacing the sheath cubitainer 26 Replacing th...

Page 4: ...BD FACSFlow Supply System User s Guide iv Chapter 5 Troubleshooting 43 Troubleshooting 44...

Page 5: ...ACSFlow supply system The BD FACSFlow Supply System User s Guide is intended for laboratory personnel and flow cytometry operators Application specific instructions are not included in this guide This...

Page 6: ...used in this guide to alert you to potential hazards Safety symbols Symbol Meaning Caution alert Identifies a hazard or unsafe practice that could result in data loss material damage minor injury seve...

Page 7: ...cting technical support If additional assistance is required contact your local BD Biosciences technical support representative or supplier When contacting BD Biosciences have the following informatio...

Page 8: ...This page intentionally left blank...

Page 9: ...ystem overview This section includes these topics Product description page 10 Principles of operation page 12 Control panel page 13 Sheath plenum enclosure page 16 Specifications and requirements page...

Page 10: ...y system to the sheath plenum The photo shows the BD FACSFlow supply system and its associated parts The system includes BD FACSFlow supply system unit Four liter sheath plenum for the cytometer store...

Page 11: ...cription 1 Power switch 2 Cabinet base 3 Air filter 4 Waste cubitainer probe 5 Probe holder 6 Sheath cubitainer probe 7 Plenum Caution Do not move the BD FACSFlow supply system by pulling on the probe...

Page 12: ...probes with a fluid level sensor that extends into the plenum When the probe in the sheath plenum detects a specified low level it signals the BD FACSFlow supply system to pump sheath fluid from the 2...

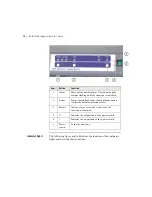
Page 13: ...nction of the controls and indicators on the control panel You can access and monitor all of the BD FACSFlow supply system functions from the control panel Control buttons The following figure and tab...

Page 14: ...s off the audible alarm The indicator light remains flashing until the situation is remedied 2 Prime Pumps sheath fluid to the sheath plenum until it reaches the default operational level 3 Restart Af...

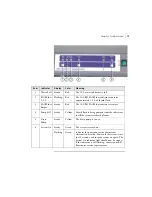
Page 15: ...4 Pump Fill Steady Yellow Sheath fluid is being pumped from the cubitainer to fill the cytometer sheath plenum 5 Drain Pump Steady Yellow The drain pump is in use 6 System On Steady Green The system i...

Page 16: ...ntroduction This topic describes the sheath plenum enclosure Description The sheath plenum enclosure holds the sheath plenum and the sheath filter The following figure shows the enclosure Caution The...

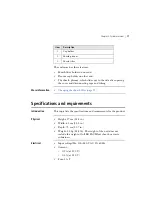
Page 17: ...page 39 Specifications and requirements Introduction This topic lists the specifications and requirements for the product Physical Height 57 cm 22 4 in Width 62 cm 24 4 in Depth 73 cm 28 7 in Weight...

Page 18: ...BD FACSFlow Supply System User s Guide 18 Operating environment Temperature 16 C 29 C Humidity 10 90 relative humidity at 35 C non condensing Air filtering no excessive dust and smoke...

Page 19: ...3 Operation This section includes these topics Starting up the system page 20 Shutting down the system page 22 Responding to alarms page 22...

Page 20: ...an run dry Procedure It is important to perform the following steps in the order given This will allow the pump in the BD FACSFlow supply system to fill the sheath plenum without creating back pressur...

Page 21: ...dicator light and then press and hold down the Prime button for one half second Use only the Prime button if there is air in the sheath fluid supply line If the Prime button does not activate the pump...

Page 22: ...cytometer shutdown procedure 2 Shut off the BD FACSFlow supply system by toggling the power switch to the Off position after you have turned off the cytometer More information Starting up the system...

Page 23: ...ensor probe into a 500 mL beaker filled with a fresh 10 bleach solution and let the probe soak for a few minutes For instructions on preparing the bleach solution see Replacing the waste cubitainer pa...

Page 24: ...sciences Procedure Sheath Empty alarm The Sheath Empty alarm is triggered when the sensor probe detects that the sheath cubitainer is empty To respond to a Sheath Empty alarm 1 Press the Alarm button...

Page 25: ...ath cubitainer page 26 Replacing the waste cubitainer page 27 Flushing the BD LSRFortessa system page 30 Flushing the BD LSRFortessa system with a BD HTS page 33 Replacing the air filter page 37 Chang...

Page 26: ...from hitting the bottom of the cubitainer Procedure To replace the sheath cubitainer 1 Loosen the sheath sensor probe cap assembly and carefully remove the sensor probe from the sheath cubitainer keep...

Page 27: ...eplace the waste cubitainer whenever it gets close to being full You can use BD FACSClean at full strength as a replacement for 10 bleach Preparing 10 bleach solution Prepare a 10 bleach solution usin...

Page 28: ...r probe from the waste cubitainer 4 Place a cap set aside from a new sheath cubitainer installed in the system onto the waste cubitainer and tighten it Caution Biohazard All biological specimens and m...

Page 29: ...label the cubitainer as WASTE and affix a biohazard label onto the cubitainer 8 Discard the waste according to federal state and local regulations Item Description 1 Neck support color 2 Waste cubita...

Page 30: ...tart More information Flushing the BD LSRFortessa system page 30 Replacing the sheath cubitainer page 26 Flushing the BD LSRFortessa system Introduction This topic describes the procedure for flushing...

Page 31: ...s steel container near the cytometer Note In the next two steps use the tubing lines that are dedicated to the stainless steel container 4 Connect the air line green from the stainless steel container...

Page 32: ...e STNDBY button lights amber press the PRIME button again 6 Install a tube with 3 mL of 10 bleach or full strength BD BD FACSClean solution on the SIP and put the tube support arm underneath the tube...

Page 33: ...rinse any remaining bleach out of the stainless steel container when the procedure is completed to avoid corrosion 16 Reconnect the air and fluid lines coming from the sheath plenum More information...

Page 34: ...ntainer The cytometer system is shipped with a stainless steel container for sheath fluid This container is replaced by the sheath cubitainer when the BD FACSFlow supply system is installed Save the s...

Page 35: ...ess steel container near the cytometer Note In the next two steps use the tubing lines that are dedicated to the stainless steel container 5 Connect the air line green from the stainless steel contain...

Page 36: ...dialog is displayed while cleaning is in progress Cleaning can take up to 30 minutes 8 Remove the stainless steel container and fill it with DI water 9 Reinstall the stainless steel container and clic...

Page 37: ...n This topic describes the procedure for replacing the air filters An air filter is located on the cap assemblies of the sheath and waste cubitainers Procedure To replace an air filter 1 Remove the ai...

Page 38: ...nsert a new air filter into the silicone tubing 3 Verify that the cap assembly on each cubitainer is tightened Item Description 1 Waste sensor probe 2 Air filter 3 Silicone tubing 4 Cap assembly 5 She...

Page 39: ...ilter Introduction This topic describes how to change the sheath filter The sheath filter is connected in line with the sheath line It filters the sheath fluid as it comes from the sheath container Wh...

Page 40: ...quick disconnect on both sides of the filter assembly and pulling it out of the holder on the sheath plenum enclosure 3 Over a sink or beaker Remove the vent line from the filter and set it aside Remo...

Page 41: ...th line to the filter assembly by squeezing the quick disconnect 4 Attach the cytometer fluid line to the filter assembly via the quick disconnect 5 Install the filter assembly into the holder on the...

Page 42: ...m The tubing has color coded connectors that plug into the BD FACSFlow supply system Caution Biohazard Do not disconnect the tubing from the back of the BD FACSFlow supply system or loosen the caps fr...

Page 43: ...n Color Function 1 black AC plug 2 black 1 A T fuse 3 silver Waste cubitainer sensor connector 4 blue Waste cubitainer tubing connector 5 red Waste container tubing connector 6 silver Waste container...

Page 44: ...BD FACSFlow Supply System User s Guide 44...

Page 45: ...5 Troubleshooting This section includes this topic Troubleshooting page 44...

Page 46: ...osciences service representative Sheath plenum not refilling when it should The sheath probe in the sheath plenum is wet or otherwise not functioning correctly Remove the sheath probe and dry it off t...

Reviews: