


36
4. BIOS SETUP
4
4
4
B
B
B
I
I
I
O
O
O
S
S
S
S
S
S
E
E
E
T
T
T
U
U
U
P
P
P
The GT440ZX motherboard uses AWARD
BIOS, which is stored in a Flash EEPROM
and can be upgraded by a floppy disk-based
program. The BIOS has a built-in Setup
Program that allows users to modify the
basic system configuration settings. The
settings are then stored in a dedicated
battery-backed memory, called CMOS
RAM that retains the information when the
power is turned off. The BIOS provides
critical low-level support for the system’s central processing, memory and I/O
subsystems. The AWARD BIOS has been customized by adding important,
nonstandard, features such as virus and password protection, power management, and
detailed fine-tuning of the chipset which controls the system. The remainder of this
manual is intended to guide you through the process of configuring your system using
the BIOS Setup.
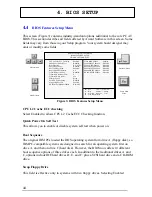
4.1
How To Enter BIOS Setup
The AWARD BIOS is immediately activated when you first turn on the computer. The
BIOS reads system configuration information in CMOS RAM and begins the process of
checking the system and configuring it through the power-on self test (POST). When
these preliminaries are finished, the BIOS seek an operation system on the data storage
devices (hard drive, floppy drive, etc.). The BIOS launches the operating system and
hands over control of system operation to it.
To start Setup, press the <Del> key during boot-up before or while a message similar
to this appears briefly at the bottom of the screen during POST (Power On Self Test):
Press DEL if you want to enter SETUP
If the above message disappears before you have responded and you still wish to enter
Setup, reboot the system to try again by pressing the “RESET” button on the system
case. You may also restart by simultaneously pressing the <Ctrl>, <Alt> and <Delete>
keys.
Press
F1
to continue,
DEL
to enter SETUP
Summary of Contents for GT440ZX
Page 1: ...1 Advanced Pentium II Motherboard GT440ZX USER S MANUAL ...
Page 5: ...5 EASY INSTALLATION ...
Page 9: ...9 2 FEATURES 2 2 2 F F FE E EA A AT T TU U UR R RE E ES S S Photo Of The Motherboard ...
Page 34: ...34 3 INSTALLATION SETUP ...
Page 35: ...35 3 INSTALLATION ...
Page 57: ...57 4 BIOS SETUP 4 13 Exit Without Saving Abandon all CMOS value change without saving ...


