background image

17

Eco Mode

Calibrate

Volume

Appliance and display settings

e

On

Off

Minimal power consumption 

e

Eco Mode

has been set

e

e

e

Volume

Eco Mode

Brightness

Appliance and display settings

Low

High

For normal living conditions

Medium

Volume

has been set

Eco Mode

is active

e

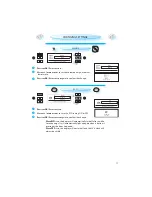
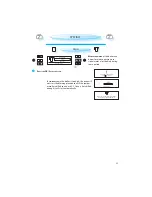
CHANGING SETTINGS

ECO

   P

RESS


THE

 OK / S

ELECT


BUTTON


   U

SE


THE


UP

 / 

DOWN


BUTTONS


 to turn the ECO setting ON or OFF.

   P

RESS


THE

 OK / S

ELECT


BUTTON


 again to confirm the change.

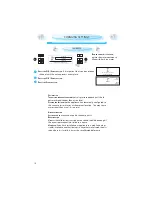
W

HEN

 ECO 

IS


ON

 the display will automatically turn off after a while 

to save energy. It will automatically light up again when a button is 
pressed or the door is opened.

W

HEN

 OFF 

IS


SET

,  

the display will not turn off and the 24 h clock will 

always be visible.

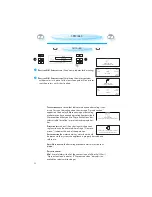
VOLUME

   P

RESS


THE

 OK / S

ELECT


BUTTON


   U

SE


THE


UP

 / 

DOWN


BUTTONS


 to set the volume on high, medium, 

low or mute.

   P

RESS


THE

 OK / S

ELECT


BUTTON


 again to confirm the change.

Summary of Contents for ECTM 9145

Page 1: ...zioni per l uso Brugsanvisning Bruksanvisning Käyttöohje Manual de utilização Instrucciones para el uso Instrukcje użytkowania Használati utasítás Οδηγίες Χρήσης Инструкция за употреба Návod k použití Návod na použitie Instrucţiuni de utilizare Инструкции по эксплуатации ECTM 9145 ...

Page 2: ...ONNECTING 6 BEFORE FIRST USE 7 IMPORTANT SAFETY INSTRUCTIONS 7 READCAREFULLYANDKEEPFORFUTUREREFERENCE 7 IMPORTANT PRECAUTIONS 8 GENERAL 8 CAREFUL 8 ACCESSORIES 9 GENERAL 9 CHOOSINGCOOKINGCONTAINER 9 WIRESHELF 9 BAKING DRIPTRAY 9 STEAMTRAY 9 WATERCONTAINER 9 APPLIANCE FEATURES 10 CONTROL PANEL 10 KEY LOCK 11 MESSAGES 12 SHORTCUTS 13 ...

Page 3: ...GE 15 CLOCKSETTING 16 BRIGHTNESS 16 VOLUME 17 ECO 17 CALIBRATE 18 DURINGCOOKING 19 SPECIALS 20 DOUGHPROVING 21 DESCALING 22 DRAIN 23 DISINFECTION 24 YOGHURT 25 PRESERVATION 26 FINISHING 27 REHEAT 28 STEAM DEFROST 29 MANUAL 31 STEAM 32 FORCEDAIR STEAM 33 FORCEDAIR 34 ...

Page 4: ...IN 42 PASTA 43 EGGS 44 PIZZA PIE 45 DESSERTS 46 BREAD CAKES 47 MAINTENANCE CLEANING 49 GENERAL 49 DISHWASHERSAFE 49 REMOVINGTHESHELFSUPPORTS 50 DISHWASHERUNSAFE 50 REPLACINGTHEOVENLIGHTBULB 50 TROUBLE SHOOTING GUIDE 51 DATA FOR TEST HEATING PERFORMANCE 52 TECHNICAL SPECIFICATION 52 ...

Page 5: ...of chil dren THIS APPLIANCE is marked according to the Euro pean directive 2002 96 EC on Waste Electrical and Electronic Equipment WEEE By ensuring this product is disposed of correctly you will help prevent potential negative consequences for the environment and human health which could otherwise be caused by inappropriate waste handling of this product THE SYMBOL on the product or on the documen...

Page 6: ...t immerse the mains cord or plug in water Keep the cord away from hot surfaces Electri cal shock fire or other hazards may result ENSURE the oven cavity is empty before mount ing CHECK THAT THE VOLTAGE on the rating plate corre sponds to the voltage in your home THE OVEN CAN BE OPERATED ONLY if the oven door is firmly closed THE EARTHING OF THIS APPLIANCE is compulsory The manufacturer will accept...

Page 7: ...r laboratory use NEVER PUT OR DRAG utensils across the bottom of the oven as this could scratch the surface Al ways put utensils on the wire shelf or trays DO NOT HANG OR PLACE heavy items on the door as this can damage the oven opening and hinges The door handle should not be used for hanging things on THE DOOR SEALS AND THE DOOR SEAL AREAS must be regularly inspected for damage If these areas ar...

Page 8: ...and the risk of scalding or burns can be avoided IMPORTANT PRECAUTIONS DO NOT USE THE CAVITY for any storage purposes FRUIT JUICE DRIPPINGS may leave permanent stains Let the oven cool and clean before next use LET THE OVEN COOL OFF before cleaning The water in the bottom recess is hot after cooking KEEP THE DOOR SEAL SURFACES CLEAN The oven door must shut properly WIPE OFF ANY RESIDUAL CONDENSATI...

Page 9: ...ced Air require the water container to be full FILL WATER CONTAINER to the MAX mark with tap water USE ONLY fresh tap water or still bottled water Never use distilled or filtered water nor any other liquids in the water container IT IS IMPORTANT TO EMPTY THE WATER CONTAINER AFTER EACH USE This is for hygienic reasons It also pre vents condensate from building up inside the appliance CAREFULLY slow...

Page 10: ...s settings START BUTTON BUTTONS Scrolls up down or adjusts to higher lower values FAVORITE BUTTON 10 most used functions MENU BUTTON Choose functions APPLIANCE FEATURES TEMPERATURE SENSOR DOOR SEAL WATER CONTAINER VALVE SEAT SHELF LEVELS STEAM INLET FORCED AIR FAN Lift pull Push VA Lift RE SENSOR AVORITE BUTTON Set Cle ON B M C T BUTTON START BU ...

Page 11: ...HEARD 3 SECONDS USE THIS FUNCTION to hinder chil dren from using the oven unat tended WHEN THE LOCK IS ACTIVE all buttons are non responsive A CONFIRMATION MESSAGE is displayed for 3 seconds be fore returning to the previous view THE KEY LOCK ID DEACTIVATED the same way it was acti vated PLEASE NOTE These buttons only work in conjunction when the oven is turned OFF ...

Page 12: ...d Please remove and empty the container Press OK Select button when done Draining Boiler 25 WHEN USING SOME OF THE FUNCTIONS the oven may stop and prompt you to perform an action or simply advice on which accessory to use MESSAGES WHEN A MESSAGE APPEAR Open the door if needed Perform the action if needed Close the door and restart by pressing the Start button ...

Page 13: ... The most frequently used function is pre selected PRESS THE OK SELECT BUTTON to confirm your selection USE THE UP DOWN OK SELECT BUTTONS to make the needed adjust ments PRESS THE START BUTTON WHEN YOU BEGIN using your oven the list consists of 10 empty posi tions marked shortcut As you use the oven over time it will auto matically fill in the list with shortcuts to your most frequently used funct...

Page 14: ...ed depending on the ECO func tion being turned ON or OFF see ECO for more information THE DESCRIPTIONS IN THIS IFU assume that the oven is turned ON USE THIS FUNCTION when you need a kitchen timer to measure exact time for various purposes such as standing times for roasts and cooking on cook top THIS FUNCTION IS ONLY AVAILABLE when the oven is switched off or in standby mode KITCHEN TIMER PRESS T...

Page 15: ...ill flash and needs to be reset YOUR OVEN HAS a number of func tions which can be adjusted to your personal taste CHANGING SETTINGS PRESS THE MENU BUTTON USE THE UP DOWN BUTTONS until Settings is shown PRESS THE OK SELECT BUTTON USE THE UP DOWN BUTTONS to choose one of the settings to adjust PRESS THE BACK BUTTON TO EXIT the settings function when you are done LANGUAGE PRESS THE OK SELECT BUTTON U...

Page 16: ...et Press to set time to confirm 00 00 HH MM CLOCK SETTING PRESS THE OK SELECT BUTTON The digits flicker USE THE UP DOWN BUTTONS to set the 24 hour clock PRESS THE OK SELECT BUTTON again to confirm the change CHANGING SETTINGS BRIGHTNESS PRESS THE OK SELECT BUTTON USE THE UP DOWN BUTTONS to set the level of brightness suitable to your preference PRESS THE OK SELECT BUTTON again to confirm your sele...

Page 17: ... THE UP DOWN BUTTONS to turn the ECO setting ON or OFF PRESS THE OK SELECT BUTTON again to confirm the change WHEN ECO IS ON the display will automatically turn off after a while to save energy It will automatically light up again when a button is pressed or the door is opened WHEN OFF IS SET the display will not turn off and the 24 h clock will always be visible VOLUME PRESS THE OK SELECT BUTTON ...

Page 18: ...ea level DURING THE CALIBRATION the appliance is automatically configured to the current pressure ratios at the present location This may cause more steam than usual It is normal AFTER CALIBRATION LET THE OVEN COOL OFF and wipe dry the damp parts RECALIBRATION USUALLY the calibration is carried out once and should be enough if the oven is permanently installed in a house HOWEVER if you have instal...

Page 19: ... OR DOWN BUTTONS you may toggle between the parameters to select which you wish to alter PRESSING THE OK SELECT BUTTON selects and enables it to be changed it flashes Use the up down buttons to alter your setting PRESS THE OK SELECT BUTTON AGAIN to confirm your selection The oven continues automatically with the new setting BY PRESSING THE BACK BUTTON you may return directly to the last pa rameter...

Page 20: ...cial functions Follow instructions in the separate function chapter example Dough proving SPECIAL FUNCTIONS FUNCTION SUGGESTED USE DOUGH PROVING USE TO PROVE the dough inside the oven at a constant temperature of 40 C DESCALE USE TO DESCALE the boiler DRAIN MANUAL DRAINING of the boiler DISINFECTION FOR DISINFECTION of baby bottles or jars YOGHURT FOR MAKING OF YOGHURT PRESERVATION FOR PRESERVATIO...

Page 21: ...THE PROVING TIME by a compared to a traditional recipe 2 ND PROVING AFTER ROLLING out the dough also this proving can be done in the oven Cover the items with a baking cloth and insert the baking tray on level 2 or 3 SHORTEN THE PROVING TIME by a compared to a traditional recipe SHORTENING THE PROVING TIMES is recommended because the ambient temperature is more optimal inside than outside the oven...

Page 22: ...ough descaling liquid available We recommend that you use Wpro active clean des caler suitable for coffee espresso machines and ket tles PRESS THE OK SELECT BUTTON after placing the water container with descaler in its place Follow on screen guides Do not inter rupt the process until it has finished DESCALING LASTS about hour during which no cook ing function can be activated A message Please re m...

Page 23: ...ct button when done SPECIALS DRAIN PRESS THE OK SELECT BUTTON MANUAL DRAINING of the boiler can be performed to ensure no re sidual water is left behind during some period IF TEMPERATURE in the boiler is too high the oven will not start the draining procedure until the temper ature has chilled to under 60 C Once it has chilled enough it will start automatically ...

Page 24: ... heat resistant and able to withstand 100 C PLACE THE BAKING DRIP TRAY OR WIRE SHELF ON LEVEL 1 Place the items on it well spaced from each other to allow steam to reach all parts ALL ITEMS shall be dismantled to their smallest individual parts to al low the steam to reach all sides DRY ALL PARTS THOROUGHLY before reassembling them NOTE A MINIMUM TIME OF 20 MINUTES is needed for proper results and...

Page 25: ...ld have the same percentage fat content PUT THE MIX in 6 7 portion sized glass dishes Cover each one tightly with a lid or heat resistant cling film Special yoghurt jars may also be used PLACE THE DISHES on the wire shelf in the oven SET THE TIME to 5 hours Temperature is factory set at 40 C ALLOW THE YOGHURT TO COOL and then place in refrigerator for sever al hours before serving It will keep for...

Page 26: ...ared jars on the Wire shelf If the jars are too high place them directly on the bottom of the Drip tray on level 1 USE ONLY FRUIT and vegetables of good quality Jars can be cleaned with the disinfection function Open the door after the preserving time has ended but let the jars remain in the oven until they have reached room temperature PRESERVATION FOOD AMOUNT TIME HINTS VEGETABLES 1 LITER JAR 40...

Page 27: ... which setting to edit PRESS THE OK SELECT BUTTON to confirm USE THE UP DOWN BUTTONS to change the setting PRESS THE OK SELECT BUTTON to confirm Repeat step 4 7 if needed PRESS THE START BUTTON USE THIS FUNCTION for reheating and finish cooking of ready made meals such as roasts fish and gratins PLACE THE FOOD TO BE FINISHED on the steam tray on level 3 and the Drip tray beneath it Set the tempera...

Page 28: ... chilled or room tempered food WHEN YOU ARE SAVING a meal in the refrigerator or plating a meal for reheating arrange the thicker denser food to the out side of the tray and the thinner or less dense food in the middle ALWAYS COVER FOOD when using this func tion SOME MINUTES STANDING TIME ALWAYS IMPROVES the result CHILLED FOOD SERVINGS REHEAT TIME TEMPERATURE HINTS DINNER PLATE 1 2 18 25 MIN 100 ...

Page 29: ...SS THE START BUTTON USE THIS FUNCTION for defrosting Meat Poultry Fish Vegetables Bread and fruit WHEN DEFROSTING it is better to under thaw the food slightly and allow the process to finish during standing time STANDING TIME AFTER DEFROSTING ALWAYS IMPROVES the result since the temperature will then be evenly distributed throughout the food PLACE BREAD with wrapping on to avoid it becoming soggy ...

Page 30: ...G 25 30 MIN 20 25 MIN LEGS 30 35 MIN 25 30 MIN FISH WHOLE 600 G 30 40 MIN 25 30 MIN FILLETS 300 G 10 15 MIN 10 15 MIN BLOCK 400 G 20 25 MIN 20 25 MIN VEGETABLES BLOCK 300 G 25 30 MIN 20 25 MIN PIECES 400 G 10 15 MIN 5 10 MIN BREAD LOAF 500 G 15 20 MIN 25 30 MIN SLICES 250 G 8 12 MIN 5 10 MIN ROLLS BUNS 10 12 MIN 5 10 MIN CAKE 400 G 8 10 MIN 15 20 MIN FRUIT MIXED 400 G 10 15 MIN 5 10 MIN BERRIES 25...

Page 31: ...E UP DOWN BUTTONS until Manual is shown PRESS THE OK SELECT BUTTON USE THE UP DOWN BUTTONS to choose one of the Manual functions Follow instructions in the separate function chapter MANUAL FUNCTIONS FUNCTION SUGGESTED USE STEAM FOR COOKING with steam FORCED AIR STEAM TO COOK poultry roasts meat and baked fish FORCED AIR TO COOK pastry cakes and pies ...

Page 32: ...the oven has cooled below 100 C before us ing this function Open the door and let cool off FOOD TEMP C TIME ACCESSORIES HINTS RED BEATS SMALL 100 C 50 60 MIN STEAM TRAY on level 3 Drip tray on level 1 RED CABBAGE SLICED 30 35 MIN WHITE CABBAGE 25 30 MIN WHITE BEANS SOAKED 75 90 MIN DRIP TRAY on level 3 ADD DOUBLE amount of water FISH TERRINE 75 80 C 60 90 MIN WIRE SHELF on level 3 COVER WITH LID o...

Page 33: ...SS THE START BUTTON USE THIS FUNCTION TO cook roast meats poultry and jacket pota toes frozen convenience foods sponge cakes pastry fish and puddings FOOD STEAM LEVEL TEMP C TIME ACCESSORIES HINTS RIBS LOW 160 170 C 80 90 MIN WIRE SHELF on level 2 DRIP TRAY ON LEVEL 1 START with bone side up and turn after 30 minutes TURKEY BREAST BONELESS 1 1 KG MEDIUM 200 210 C 50 60 MIN CENTER TEMPERATURE shoul...

Page 34: ...ook me ringues pastry sponge cakes soufflés poultry and roast meats ALWAYS USE THE WIRE SHELF to put food on to allow the air to circulate properly around the food USE THE DRIP TRAY when baking small items like cookies or rolls FOOD TEMP C TIME ACCESSORIES HINTS SWISS ROLL 230 C 7 8 MIN BAKING TRAY on level 2 COOKIES 165 175 C 12 15 MIN PETIT CHOUX 190 200 C 25 30 MIN ENSURE the oven is dry BISCUI...

Page 35: ... to choose one of the Assisted Mode functions PRESS THE OK SELECT BUTTON to confirm USE THE UP DOWN BUTTONS to select food PRESS THE OK SELECT BUTTON to confirm FOLLOW the on screen instructions concerning water container and other accessories USE THE UP DOWN BUTTONS to select which setting to edit PRESS THE OK SELECT BUTTON to confirm USE THE UP DOWN BUTTONS to change the setting PRESS THE OK SEL...

Page 36: ...evel 1 SEASON the roast and insert meat thermometer if desired Place roast on wire shelf PORK 60 80 MIN LAMB 1 1 HOUR VEAL 50 70 MIN STEAMED HOT DOG 10 15 MIN STEAM TRAY on level 3 Baking Drip tray on level 1 PLACE in one layer on the steam tray MEAT LOAF 35 45 MIN WIRE SHELF on level 2 MIX your favorite meat loaf recipe and shape into a loaf Place in oven proof dish on wire shelf ...

Page 37: ...1 SEASON the fillets PIECES ROASTED 25 30 MIN WIRE SHELF on level 3 Baking Drip tray on level 1 SEASON and place with skin side up WHOLE ROAST 50 60 MIN WIRE SHELF on level 2 Baking Drip tray on level 1 SEASON and place with breast side up Ensure the meat is well done by pricking with a tooth pick in the thickest parts The meat juice should be non colored DUCK 1 1 HOUR SEASON and place with breast...

Page 38: ...ith bread crumbs STEAMED 35 55 MIN STEAM TRAY on level 3 Baking Drip tray on level 1 SEASON the fish and fill the cavity with herbs if desired FILLETS STEAM 12 18 MIN SEASON the fillets CUTLETS STEAM 15 20 MIN SEASON the cutlets GRATIN FROZEN 35 45 MIN WIRE SHELF on level 2 ENSURE the food is placed in an ovenproof dish on top of the wire shelf SHELLFISH MUSSELS STEAMED 8 12 MIN STEAM TRAY on leve...

Page 39: ...N WIRE SHELF on level 2 PLACE in ovenproof dish or directly on Wire shelf GRATIN 40 50 MIN SLICE raw potatoes and interlace with onion Season with salt pepper and garlic and pour over cream and milk Sprinkle cheese on top FROZEN FRENCH FRIES 15 25 MIN BAKING DRIP TRAY on level 2 ADD FOOD when oven is preheated Stir when oven prompts Sprinkle with salt after cooking WEDGES 30 40 MIN PEEL and cut in...

Page 40: ...evel 3 Baking Drip tray on level 1 PLACE IN STEAM TRAY Arrange an even layer CARROTS 20 30 MIN CUT IN PIECES OF SIMILAR SIZE ASPARAGUS 20 30 MIN ARTICHOKES 40 55 MIN STEAMED GREEN BEANS 20 30 MIN BROCCOLI 15 25 MIN DIVIDE in pieces CAULI FLOWER 20 30 MIN BRUSSELS SPROUTS 20 35 MIN FROZEN GRATIN 20 30 MIN WIRE SHELF on level 2 ENSURE THE FOOD IS PLACED IN AN OVEN PROOF DISH ...

Page 41: ... CUT PEPPERS in halves horizontally and remove cores and seeds Mix minced beef onion egg bread crumbs water or milk and spices Stuff peppers and place in oven proof dish Sprinkle with bread crumbs and lump some butter on top SQUASH 20 30 MIN CUT SQUASH lengthwise in halves and scoop out the seeds Fry mushrooms and leek and mix with chopped tomatoes and some crème fraiche or mix with ajvar relish S...

Page 42: ...20 60 MIN BAKING DRIP TRAY on level 3 MIX RICE AND WATER on the tray in proportion 300 ml rice and 500 ml water BASMATI 25 30 MIN MIX 300 ml rice and 450 ml water WHITE LONG GRAIN 35 40 MIN MIX 300 ml rice and 450 ml water GRAIN BULGUR 10 40 MIN MIX 300 ml grain and 600 ml water COUSCOUS 10 15 MIN MIX 300 ml grain and 300 ml water ...

Page 43: ...le below FOOD COOK TIME ACCESSORIES HINTS PASTA LASAGNA HOME MADE 25 35 MIN WIRE SHELF on level 2 PREPARE your favorite recipe or follow the recipe on the lasagne package Place in oven proof dish on wire shelf FROZEN 40 50 MIN ENSURE THE FOOD IS PLACED IN AN OVEN PROOF DISH ...

Page 44: ...S FUNCTION TO cook eggs only FOOD COOK TIME ACCESSORIES HINTS EGGS HARD 15 18 MIN STEAM TRAY on level 3 BAKING DRIP TRAY on level 1 IF THE EGGS will be eaten cold rinse them immediately in cold water MEDIUM 12 15 MIN SOFT 9 12 MIN ...

Page 45: ... greased tray Add topping like tomatoes mozzarella cheese and ham Insert food when oven prompts THIN FROZEN 8 12 MIN INSERT FOOD when oven prompts PAN FROZEN 12 20 MIN CHILLED 7 12 MIN QUICHE LORRAINE 30 45 MIN WIRE SHELF on level 2 PREPARE THE PASTRY 250 g flour 150 g butter 2 tblsp water or use ready made pastry 400 450 g Line a pie dish with the pastry Add a stuffing of 200 g ham and 175 g chee...

Page 46: ...aced in an oven proof dish BAKED APPLES 20 30 MIN REMOVE THE PIPES and fill with marzipan or cinnamon sugar and butter Place in oven proof dish FRUIT COMPOTE 10 20 MIN STEAM TRAY on level 3 BAKING DRIP TRAY on level 1 CUT FRUIT in pieces CRÈME BRÛLÉE 20 30 MIN FOR 4 PORTIONS mix 2 egg yolks and 2 whole eggs with 3 tablespoons sugar and vanilla Heat up 100 ml cream 200 ml milk and mix into the eggs...

Page 47: ...ht bread Form into rolls and place on baking tray to prove Add when oven prompts NOTE A dough based on 150 ml liquid and 200 225 g flour is optimal for one tray FROZEN 10 13 MIN FOR READY BAKED ROLLS ADD food when oven prompts PRE BAKED 8 10 MIN FOR VACUUM PACKED ROLLS Add when oven prompts CANNED 10 14 MIN FOR 4 6 PIECES REMOVE from package Add when oven prompts SCONES 9 13 MIN SHAPE into one lar...

Page 48: ...when oven prompts COOKIES 10 15 MIN PLACE ON BAKING PAPER 12 16 pcs Add when the oven prompts MERINGUES 50 60 MIN MAKE A BATCH of2eggwhites 80 gsugarand100gdesiccated coconut Seasonwithvanillaand almondessence Shapeinto20 24pieces ongreased bakingtray orbakingpaper Addfoodwhen ovenprompts NOTE Ensurethecavityiswipedoff anddry Ensuretheboilerisempty RunDrainfunctionifyou renot sure ...

Page 49: ...he shelf support and wipe the interior of the oven clean Don t forget the cavity ceiling which is easily overlooked REMOVE EMPTY AND DRY the water container af ter each use SALTS ARE ABRASIVE and if deposited in the cook ing compartment rust could develop in plac es Acid sauces like ketchup mustard or salted foods e g cured roasts contain chloride and acids These affect steal surfaces It s a good ...

Page 50: ...over REPLACING THE OVEN LIGHT BULB TURN THE GLASS CAP anticlock wise to un screw REMOVE the seals and metal ring and clean the glass cap REPLACE the old bulb with a 10 W 12 V G4 heat resistant oven halogen bulb REFIT THE RING and seals to the glass cap REFIT THE ASSEMBLY by screwing it on clock wise DISHWASHER UNSAFE WATER PIPE REMOVE THE WATER PIPE from the water con tainer for easy cleaning Plea...

Page 51: ...necessary calls for which you will be charged When calling for Service please give the serial number and type number of the oven see Ser vice label Consult your warranty booklet for further advice IF THE MAINS CORD NEEDS REPLACING it should be replaced by the original mains cord which is available via our ser vice organization The mains cord may only be replaced by a trained service techni cian SE...

Page 52: ...ollowing for this oven TECHNICAL SPECIFICATION TEST APPROX TIME TEMPERATURE PREHEATED OVEN ACCESSORIES 8 4 1 30 35 MIN 150 C NO BAKING DRIP TRAY 8 4 2 18 20 MIN 170 C YES BAKING DRIP TRAY 8 5 1 33 35 MIN 160 C NO WIRE SHELF 8 5 2 65 70 MIN 160 170 C YES WIRE SHELF SUPPLY VOLTAGE 230 V 50 HZ RATED POWER INPUT 1450 W FUSE 10 A FORCED AIR 1400 W OUTER DIMENSIONS HXWXD 455 X 595 X 565 INNER DIMENSIONS...

Page 53: ...53 ...

Page 54: ...54 ...

Page 55: ...55 ...

Page 56: ...56 GB 4 6 1 9 6 9 4 7 3 2 1 1 ...

Reviews: