Batavia MAXXPACK BT-CLT001 Operating Instructions Manual Download Page 8

English

6

OPERATION

WARNING: 

Always wear eye protection, ade-

quate respiratory and hearing protection, as 
well as suitable gloves, when working with this 
tool.

Switching on and off

1.  Ensure the trimmer head is in the correct 

mode.

2.  Pick up the trimmer; hold the machine 

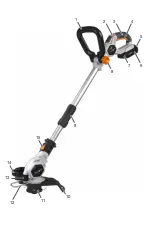
with one hand on the Main Handle 

(3)

 and 

the other on the Auxiliary Handle 

(1)

. The 

handle is equipped with an integrated 
Safety Lock-Off 

(2)

.

3.  Switch on the machine by pressing the 

Safety Lock-Off and then the On/Off Trig-
ger 

(4)

. The machine will run until the On/

Off Trigger is released.

Grass trimming

1.  Always keep the machine at arm’s length 

with the trimmer head pointed away from 
your body.

2.  Move the trimmer head across the area to 

be trimmed using a smooth sweeping 
motion.

3.  When approaching an edge or wall, try to 

avoid allowing the line to impact the wall or 
any other hard vertical surface.

Lawn edging

WARNING: 

Be careful when lawn edging as 

any excess line cut off will be removed on a 
vertical axis and if the tool is tilted it is possible 
it could be thrown towards the operator’s eyes.
1.  Put the tool into lawn edging mode with 

the Mode Selector 

(15)

.

2.  Turn the tool over so the Edging Small 

Roller 

(13)

 and Edging Large Roller 

(14)


are on the ground and position on the 
edge of the lawn.

3.  Carefully move the tool along, trimming 

only the excess grass over the edge of the 
earth below.

Feeding the trimmer line

•  When the trimmer line becomes too short, 

bump the spool housing quickly and gen-
tly against the ground while de machine is 
running and the spool will release more 
trimmer line.

MAINTENANCE AND CLEANING

WARNING: 

Always disconnect from the mains 

power supply, before carrying out any mainte-
nance/ cleaning of the charger. Remove the 
battery before carrying out any maintenance/
cleaning of the tool.

Maintenance

There are no inner parts of the tool which need 
maintenance.

Cleaning

•  Keep safety devices, ventilation openings 

and the motor housing as free as possible 
from dirt and dust. Rub the electric power 
tool with a clean cloth or blow over it with 
low pressure compressed air.

•  We recommend that you clean your elec-

tric power tool immediately after each use.

•  Clean the electric power tool regularly with 

a damp cloth and somewhat soft soap. Do 
not use any cleaning or solvent materials; 
these can attack the device’s plastic com-
ponents. Make sure that no water can get 
inside the electric power tool.

TECHNICAL DATA

No Load Speed.   .   .   .   .   .   .   .   .   .   . 8000 min

-1

Trimming Diameter . . . . . . . . . . 230 mm
Dimensions .   .   .   .   .   .   .   .   .   155 × 24 × 19 cm
Weight . . . . . . . . . . . . . . . . .  2.3 kg
Sound Pressure Level L

pA

  . . . .  72.40 dB(A)

Uncertainty K

pA

.   .   .   .   .   .   .   .   .   .   .   .   .   . 3 dB

Sound Power Level L

WA

   . . . . . .87.37 dB(A)

Uncertainty K

WA

.   .   .   .   .   .   .   .   .   .   .   .   .   . 3 dB

Hand Arm Vibration 
  Main handle . . . . . . . . . . . 6.531 m/s

2

  Auxiliary handle  . . . . . . . . . 6.764 m/s

2

Uncertainty K .   .   .   .   .   .   .   .   .   .   .   .   .   .1.5m/s

2

Summary of Contents for MAXXPACK BT-CLT001

Page 1: ...T001 Item No 7062515 www batavia eu MAXXPACK Cordless grass trimmer Akku Rasentrimmer Coupe bordure sans fil Accu grastrimmer Operating instructions Bedienungsanleitung Original Mode d emploi Gebruiks...

Page 2: ......

Page 3: ...1 15 14 5 6 13 12 7 8 9 10 11 2 3 4...

Page 4: ...lle 14 Gro e Kantenrolle 15 Funktionswahlschalter APER U 1 Poign e auxiliaire 2 Verrouillage de s curit 3 Poign e principale 4 Bouton de marche arr t 5 Bouton de d gagement de la batterie 6 Batterie n...

Page 5: ...Betrieb 10 Wartung und Reinigung 10 Technische Daten 11 EG Konformit tserkl rung 11 TABLE DES MATI RES Consignes de s curit 12 Avant la premi re utilisation 13 Utilisation normale 13 Avant utilisatio...

Page 6: ...excessively long nylon line or feed line especially when used in lawn edging mode The surplus line may be cut off during use and thrown towards the face of the operator WARNING Never place hands or f...

Page 7: ...ssible IMPORTANT Switch off and disconnect the mains supply or battery when The tool is unattended Before replacing the spool Before performing maintenance on the tool BEFORE FIRST USE Remove the mach...

Page 8: ...edge of the lawn 3 Carefully move the tool along trimming only the excess grass over the edge of the earth below Feeding the trimmer line When the trimmer line becomes too short bump the spool housing...

Page 9: ...g of batteries Contact your local authorities to find out where your nearest disposal area is Do not dispose of batteries with domestic refuse Do not dispose of by burning risk of explosion EC DECLARA...

Page 10: ...mmt schalten Sie das Ger t sofort aus Trennen Sie es vom Stromnetz bzw nehmen Sie den Akku heraus bevor Sie den verwickelten M hfaden zu l sen versuchen WARNUNG Stellen Sie den M hfaden nicht berm ig...

Page 11: ...Freien Bewahren Sie das Ger t in einem regen dichten Nebengeb ude auf oder nehmen Sie es ins Wohnhaus mit um eine elektri sche Gef hrdung und m glicherweise irreparable Sch den am Ger t zu verhindern...

Page 12: ...gen weit ausholenden Bewegung ber den zu schneidenden Bereich 3 Wenn Sie sich einer Kante oder Mauer n hern achten Sie darauf die Mauer bzw harte senkrechte Fl chen im Allgemeinen nicht mit dem M hfad...

Page 13: ...l und Kunststoffe F hren Sie defekte Bauteile der Sonderm llentsorgung zu Fragen Sie im Fachgesch ft oder in der Gemeindever waltung nach Das Produkt und das Benutzerhandbuch k nnen ge ndert werden Di...

Page 14: ...tement D branchez le c ble d alimentation ou enlevez la batterie avant d essayer d enlever le blocage ATTENTION Ne d roulez pas trop de fil de nylon surtout lors de la coupe de bordure de gazon Un fil...

Page 15: ...les plus chaudes ou restez l ombre le plus possible IMPORTANT D branchez toujours l outil ou enlever la batterie lorsque l outil est laiss sans surveillance avant de remplacer le fil avant d effectue...

Page 16: ...util est inclin il est possible que du fil soit expuls vers les yeux de l op rateur 1 R glez l outil en mode coupe bordure gr ce au s lecteur de mode 15 2 Tournez l outil de mani re que la roulette de...

Page 17: ...d chets sp ciaux Renseignez vous dans un magasin sp cialis ou aupr s de l administration de votre commune Le produit et le manuel utilisateur peuvent tre modifi s Les caract ristiques techniques peuv...

Page 18: ...n draad ontknoopt WAARSCHUWING Gebruik de machine niet met een overmatige draadlengte vooral bij het gebruik voor het maaien van graskanten Delen van het draad worden mogelijk afgesneden en kunnen in...

Page 19: ...or accu Gebruik de machine niet voordat deze volledig afgekoeld is Voor kom het gebruik van de machine wanneer mogelijk in de hoogste middag temperatu ren en gebruik de machine zoveel mogelijk in scha...

Page 20: ...s afge sneden en mogelijk in de richting van de gebruiker afgevuurd 1 Plaats de machine met behulp van de stand selectieschakelaar in de graskant stand 2 Draai de machine zodat de kleine en grote roll...

Page 21: ...batterijen aan de bescherming van het milieu Neem voor milieu vriendelijke afvoer contact op met de lokale overheid EG CONFORMITEITSVERKLARING Hiermee verklaren wij Batavia GmbH Wet houder Wassebalie...

Page 22: ...e Centre de service apr s vente Conservez le bon d achat original Cette garantie couvre tous les d fauts de mat riau et de main d uvre constat s sur ce produit Batavia pendant une p riode de deux ans...

Reviews: