


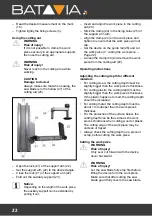


– Read the desired measurement on the mark
(16).
– Tighten lightly the fixing screws (3).
Using the cutting aid
WARNING
Risk of injury!
If it is not possible to clamp the work
piece securely in an appropriate support,
then use the cutting aid.
WARNING
Risk of injury!
Never reach in the cutting area while
working.
CAUTION
Damage to device!
Always make sure that when sawing, the
saw blade is in the hollow (27) of the
cutting aid (20).
– Open the lock (21) of the support arm (22).
– Set the support arm (22) to the desired angle.
– Close the lock (21) of the support arm (22).
– Fold out the auxiliary support (23).
Notice:
Depending on the length of the work piece,
the auxiliary support can be extended by
pulling it out.
– Insert and align the work piece in the cutting
aid (20).
– Stick the clamp (24) in the fixing holes (25) of
the support arm (22).
– Align the clamp (24) on the work piece and
tighten to ensure that the work piece will not
slip.
– Set the device on the guide rail (26) and cut
the work piece
(
☞
cutting the work piece –
Page 22).
– Loosen the clamp (24) and remove the work
piece from the cutting aid (20).
Operating instructions
Adjusting the cutting depth for different
materials
• For cutting wood, the cutting depth must be
slightly bigger than the work piece’s thickness.
• For cutting plastic, the cutting depth must be
slightly bigger than the work piece’s thickness.
If the plastic happens to melt, the cutting depth
should be increased.
• For cutting metal, the cutting depth must be
about 1 mm deeper than the work piece’s
thickness.
• For the protection of the surface below, the
cutting depth can be the same as the work
piece’s thickness when cutting wood or plastic.
The cutting edge of the work piece may be
unclean or frayed.
• Always check the cutting depth on a piece of
scrap, before cutting the work piece.
Cutting the work piece
WARNING
Risk of injury!
Only ever cut forward with the device,
never backward.
WARNING
Risk of injury!
Let the saw blade fully stop first before
lifting the device form the work piece.
Make sure that after cutting the saw
blade guard fully covers the saw blade.
22
TM
Summary of Contents for 7060765
Page 52: ...2012 Batavia GmbH 7060765 3...


