background image

Notice:

Please make sure that the correct depth is 

set for the saw blade depending on the  


material (

 Operating instructions– Page  

 22).

–   Open the lock on the cutting depth limiter (5).

–   Set the cutting depth limiter (5) on the desired 

cutting depth.

–   Close the lock on the cutting depth limiter (5).

Turning the device on/off


WARNING

Risk of injury!

Before cutting, wait until the blade has  


  reached its maximum speed.

Notice:

The device is fitted with an overload 

protection. If the indicator light (11) starts to  


flash, reduce the feed force with which you  


push the device through the work piece.


If the indicator light (11) lights up   


continuously and the device has stopped,  


the overload protection has switched the  


device off. Either the feed force was too  


high or the saw blade was blocked by a  


foreign body in the work piece. In both  


cases, turn the device off and check the  


work piece for foreign bodies and the saw  


blade for damage.


If you do not find any foreign body in the  


work piece, you may resume your work at  


reduced feed force.

–   slide the On/Off switch (12) backwards.

Notice:

For a better handling of the device, a press 

button is integrated to the On/Off switch (12).  


  Turn the device on and press the button.

–   Release the On/Off switch (12).

Assemble/set up the parallel limit stop

Notice:

The parallel limit stop can be used for  

 precise cutting of the work piece.


  The parallel limit stop can be assembled  


  on the device from both sides. The length  


  specification on the parallel limit stop is  


  only an approximate dimension.

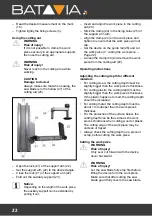
–   Loosen fixing screws (3).

–   Guide the parallel limit stop (18) through the 

opening guides (4).

21

EN

Summary of Contents for 7060765

Page 1: ...1010 21 TM Bedienungsanleitung Original Operating instructions Gebruiksaanwijzing Mode d emploi Modelnr BT CS004 Art Nr 7060765 Multi Tauchkreiss ge Multi Plunge Saw Multi invalcirkelzaag Multi scie...

Page 2: ...iert 14 Technische Daten 14 Ersatzteile Zubeh r 14 Anhang 15 Konformit tserkl rung 15 Contents Before you start 15 Use as intended 15 What do the symbols used mean 15 For your safety 16 General safety...

Page 3: ...rveonderdelen accessoires 37 Bijlage 37 Conformiteitsverklaring 37 Table des mati res Avant de commencer 38 Utilisation conforme l usage pr vu 38 Signification des symboles utilis s 38 Pour votre s cu...

Page 4: ...Gefahr f r Leib und Leben WARNUNG Art und Quelle der Gefahr Bei Missachtung des Gefahrenhinweises entsteht eine Gefahr f r Leib und Leben VORSICHT Art und Quelle der Gefahr Dieser Gefahrenhinweis warn...

Page 5: ...mmen werden wenn beim berpr fen keine Fehler gefunden werden Ist ein Teil defekt muss es unbedingt vor dem n chsten Gebrauch ersetzt werden Beim Betrieb auf ausreichende Beleuchtung achten Beim Arbeit...

Page 6: ...Runde Werkst cke d rfen nicht ges gt werden da sie durch das rotierende S geblatt verkantet werden k nnen Versuchen Sie nie Kurven zu schneiden Dieses Ger t ist nur f r geradlinige Schnitte konstruier...

Page 7: ...S geblattschutz 3 Fixierschraube Befestigung Parallelanschlag 4 F hrungs ffnungen Parallelanschlag 5 Schnitttiefenbegrenzer 6 Mutter Befestigung S geblattschutz 7 Spindelarretierung 8 Absaugstutzen 9...

Page 8: ...nbaulage des S geblatts beachten Spindelarretierung 7 dr cken und gedr ckt halten Schraube 15 bei gedr ckter Spindel arretierung 7 gegen den Uhrzeigersinn in Welle eindrehen und mit geeignetem Werkzeu...

Page 9: ...n wenn keine Defekte oder Fehler gefunden werden Ist ein Teil defekt muss es unbedingt vor dem n chsten Gebrauch ersetzt werden berpr fen Sie vor Einstecken des Netzsteckers den sicheren Zustand des G...

Page 10: ...Ger t ab und pr fen Sie das Werkst ck auf Fremdk rper und das S geblatt auf Besch digungen Sollten Sie keinen Fremdk rper im Werkst ck finden setzen Sie Ihre Arbeit mit reduzierter Vorschubkraft fort...

Page 11: ...rkst ck ausrichten und festdrehen um Werkst ck gegen Verrutschen zu sichern Ger t auf F hrungsschiene 26 setzen und Werkst ck s gen Werkst ck s gen Seite 11 Schraubzwinge 24 l sen und Werkst ck aus Sc...

Page 12: ...igungen berpr fen Sichtpr fung gegebenenfalls durch Fachkraft ersetzen lassen Regelm ig je nach Einsatzbedingungen Schraubverbindungen Alle Schraubverbindungen berpr fen und gegebenenfalls festziehen...

Page 13: ...ile die ber die S ge hinausragen abmontieren Beim Versand nach M glichkeit die Originalverpackung verwenden Entsorgung Ger t entsorgen Ger te die mit dem nebenstehenden Symbol gekennzeichnet sind d rf...

Page 14: ...auch der Garantieanspruch erl scht und Ihnen ggf Zusatzkosten entstehen Technische Daten Nennspannung 230 V Frequenz 50 Hz Nennleistung 600 W Sicherheitsklasse II doppelisoliert Schutzgrad IP 20 Kabel...

Page 15: ...firewood Round work pieces may not be cut since they can tilt with the rotating saw blade Only materials approved for use with the appropriate saw blade may be worked on Only saw blades appropriate fo...

Page 16: ...used within the stated limits for voltage power and nominal speed Technical data Page 25 If extension cables are necessary make sure they are suitable for the product and the environment Ask your loca...

Page 17: ...k pieces that contain ropes cords bands cables or wires or any such materials Always keep at a sufficient distance from the saw blade Turn the device off and wait until the saw blade has stopped befor...

Page 18: ...ective hard metal parts from the saw blade Hearing damage if not wearing the required hearing protection Harmful emissions of wood dust if used in closed spaces Your device at a glance 1 Release Saw b...

Page 19: ...sembling the saw blade WARNING Risk of injury Always follow the direction of rotation of the saw blade when installing WARNING Risk of injury When assembling the saw blade guard make sure that the spr...

Page 20: ...of the suction hose 9 until it clicks into place Introduce the suction nozzle 8 in the opening of the device until it clicks into place Operation WARNING Risk of injury In the event of malfunctions r...

Page 21: ...evice off Either the feed force was too high or the saw blade was blocked by a foreign body in the work piece In both cases turn the device off and check the work piece for foreign bodies and the saw...

Page 22: ...e rail 26 and cut the work piece cutting the work piece Page 22 Loosen the clamp 24 and remove the work piece from the cutting aid 20 Operating instructions Adjusting the cutting depth for different m...

Page 23: ...y specialist Regularly depending on operating conditions Screw connections Check all screw connections and tighten as required Clean the dust from the vents on the engine Remove the chips with a vacuu...

Page 24: ...to dispose of such electrical and electronic equipment separately Please check with your local authorities about proper disposal facilities With separate collections you are able to send your old devi...

Page 25: ...the dangers and risks involved Spare parts Accessories Spare parts and accessories can be ordered through our webshop www batavia eu 25 EN Failures und Assistance If something does not work DANGER Mo...

Page 26: ...buiten de wettelijke aansprakelijkheid voor de fabrikant Wat betekenen de gebruikte symbolen In de gebruiksaanwijzing worden gevarenaanduidingen en aanwijzingen duidelijk aangegeven De volgende symbo...

Page 27: ...ten geaard stopcontact De zekering dient plaats te vinden met een aardlekschakelaar met een nominale stroom van niet meer dan 30 mA Er dient voor het aansluiten van de machine voor te worden gezorgd d...

Page 28: ...n beschadigen het zaagblad leiden tot grote zaagsneden en mogelijk tot breuk van het zaagblad Er is een risico op ernstig letsel Zaag met de machine uitsluitend vooruit nooit achteruit 28 TM voor het...

Page 29: ...onder het werkstuk De beschermkap van het zaagblad biedt hier geen bescherming tegen het zaagblad Stel de zaagdiepte van de machine altijd in op de dikte van het werkstuk Aanwijzingen voor de bedienin...

Page 30: ...tiging parallelaanslag Zaaghulp Gereedschap Draagtas Aanwijzing Als er een onderdeel ontbreekt of is beschadigd neem dan contact op met de verkoper Montage WAARSCHUWING Risico op letsel Haal voor alle...

Page 31: ...ansluiten stofzuiger WAARSCHUWING Risico op letsel Sluit bij gebruik van de machine altijd een geschikte stofzuiger aan LET OP Materi le schade De aansluiting voor de stofzuiger 8 kan maar op n plaats...

Page 32: ...de juiste diepte instelling van het zaagblad voor de verschillende materialen Aanwijzingen voor de bediening pagina 34 Haal de vergrendeling van de zaagdiepte instelling 5 los Stel de zaagdiepte inste...

Page 33: ...aai de fixeerschroef 3 los Schuif de parallelaanslag 18 door de doorvoeropeningen 4 Lees de gewenste maat af op de markering 16 Draai de fixeerschroef 3 lichtjes vast Gebruik van de zaaghulp WAARSCHUW...

Page 34: ...ARSCHUWING Risico op letsel Laat het zaagblad eerst volledig tot stilstand komen alvorens u de machine van het werkstuk tilt Let er bij het zagen op dat de beschermkap van het zaagblad het zaagblad vo...

Page 35: ...SCHUWING Risico op letsel Haal voor alle werkzaamheden aan de machine altijd de stekker uit het stopcontact haal de stroom van de machine Het zaagblad vervangen WAARSCHUWING Risico op letsel Het zaagb...

Page 36: ...er iets niet functioneert GEVAAR Levensgevaar Ondeskundige reparaties kunnen ertoe leiden dat uw machine niet langer veilig functioneert Daarmee brengt u uzelf en uw omgeving in gevaar Het zijn vaak s...

Page 37: ...e geluidsbronnen bijv het aantal machines en andere naburige activiteiten De toelaatbare waarden voor de werkplek kunnen ook van land tot land verschillen Deze informatie zal de gebruiker echter in st...

Page 38: ...e pour la vie et l int grit corporelle en cas de non respect de la phrase de risque AVERTISSEMENT Nature et origine du danger Il peut y avoir un risque pour la vie et l int grit corporelle en cas de n...

Page 39: ...port de l appareil Utilisation Poste de travail L appareil peut uniquement tre utilis lorsqu il est en parfait tat Si l appareil ou une partie de l appareil est d fectueuse il ou elle doit tre remis e...

Page 40: ...eux longs 40 TM V rifiez r guli rement le bon serrage de tous les assemblages par vis Ceci permet de garantir la s curit de l appareil Utiliser exclusivement des pi ces de rechange d origine Ces pi ce...

Page 41: ...cas d une utilisation de l appareil conforme l usage pr vu et en cas de respect de toutes les consignes de s curit de la notice d instructions les risques r siduels suivants doivent tre envisag s Con...

Page 42: ...eil Montage de la lame de scie AVERTISSEMENT Risque de blessure Lors du montage respecter imp rativement le sens de rotation de la lame de scie AVERTISSEMENT Risque de blessure Lors de la mise en plac...

Page 43: ...ure d aspiration 8 dans les orifices une extr mit du tuyau d aspiration 9 Tourner l g rement la tubulure d aspiration 8 dans l extr mit du tuyau d aspiration 9 jusqu ce que l ensemble s enclenche vous...

Page 44: ...l arri re 44 TM V rifier avant de commencer AVERTISSEMENT Risque de blessure L appareil peut uniquement tre mis en marche si aucun d faut n a t constat Si une pi ce est d fectueuse celle ci doit tre...

Page 45: ...e coupe 20 pendant l op ration de sciage D bloquer le dispositif de verrouillage 21 du bras auxiliaire 22 R gler le bras auxiliaire 22 en fonction de l angle souhait Bloquer nouveau le dispositif de v...

Page 46: ...ir comprim ou avec une brosse 46 TM Remarque En fonction de la longueur de la pi ce usiner le support auxiliaire peut tre rallong en le faisant coulisser Positionner et aligner la pi ce usiner dans l...

Page 47: ...copeaux avec un aspirateur ou une brosse Nettoyage de l appareil DANGER Risque d lectrocution L appareil ne doit jamais tre expos l eau ou aux projections d eau Ne jamais utiliser de produit d tergent...

Page 48: ...eils usag s ou de les valoriser autrement Vous contribuez ainsi la protection de l environnement contre d ventuelles mati res polluantes Elimination de l emballage L emballage est constitu de carton e...

Page 49: ...1 8 mm Lames de scie admissibles TCT HSS Diamant Niveau de pression acoustique LpA 83 1 dB A Incertitude K 3 dB A Niveau sonore LWA 94 1 dB A Incertitude K 3 dB A Vibrations a 2 451 m s2 Incertitude...

Page 50: ...ennes 2004 108 CE compatibilit lectromagn tique CEM 2006 42 CE machines et 2006 95 CE basse tension ainsi que les modifications y apport es Pour valuer la conformit nous avons eu recours aux normes h...

Page 51: ...anneer dit product niet correct functioneert wend u zich alstublieft altijd eerst tot onze klantenservice Bewaar altijd uw aankoopbewijs De garantieservice is alleen van toepassing op materiaal of pro...

Page 52: ...2012 Batavia GmbH 7060765 3...

Reviews: