background image

Ÿ

The installation must conform to local codes, or 
in the absence of local codes, with the standard 
for the storage and handling of liquid petroleum 
gases.

Ÿ

A  dented,  rusted  or  damaged  tank  may  be 
hazardous and should be checked by your tank 
supplier.  Never  use  a  tank  with  a  damaged 
valve connection.

Ÿ

The tank must be arranged to provide for vapor 
withdrawal from the operating cylinder.

Ÿ

Never  connect  an  unregulated  tank  to  the 
heater.

LEAKAGE TEST

Gas connections on the heater are leak tested at 
the  factory  prior  to  shipment.  A  complete  gas 
tightnes  scheck  must  be  performed  at  the 
installation  site  due  to  possible  mishandling  in 
shipment  or  excessive  pressure  being  applied  to 
the heater.

Ÿ

Make  a  soap  solution  of  one  part  liquid 
detergent  and  one  part  water.  The  soap 
solution  can  be  applied  with  a  spray  bottle, 
brush or rag. Soap bubbles will appear in case 
of a leak.

Ÿ

The heater must be checked with a full cylinder.

Ÿ

Make sure the safety control valve is in the OFF 
position.

Ÿ

Turn the gas supply ON.

Ÿ

In case of a leak, turn off the gas supply. Tighten 
any leaking fittings, then turn the gas supply on 
and recheck.

Ÿ

Never leak test while smoking.

OPERATION AND STORAGE

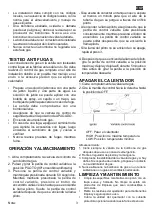
1.Turn  on  the  valve  on  the  gas  supply  cylinder 

completely.

2.  Press  and  turn  the  variable  control  knob  to 

PILOT position (counter-clockwise 90 º)

3. Press down the variable control knob and hold 

for 60 seconds. While holding down the variable 
control  knob,  press  the  igniter  button  several 
times  until  the  pilot  flame  lights.  Release  the 
variable control knob after the pilot flame lights.

Note:
-  If  a  new  tank  has  just  been  connected,  please 

allow at least one minute for the air in the gas 
pipeline to purge out through the pilot hole.

- When lighting the pilot flame make sure that the 

variable  control  knob  is  consinuously  pressed 
down while pressing the igniter button. Variable 
control knob can be released after the pilot flame 
lights.

-  If  the  pilot  flame  does  not  light  or  it  goes  out, 

repeat step 3.

4.  After  the  pilot  flame  lights,  turn  the  variable 

control knob to maximum position and leave and 
leave it there for 5 minutes or more before turning 
the knob to desired temperature position.

TO TURN OFF THE HEATER

1. Turn the variable control knob to PILOT position.
2. Press and turn the variable control knob to OFF 

position.

3.  Turn  off  the  valve  on  the  gas  supply  cylinder 

completely.

Storage: 

1. Always close the gas valve of the gas cylinder 

after use or in case of a disturbance.

2. Remove the pressure regulator and the hose.
3.  Check  the  tightness  of  the  gas  valve  and  for 

damage.  If  you  suspect  a  damage,  have  it 
changed by your gas dealer.

4. Never store liquid gas cylinder in a sub-terrain, or 

at places without adequate ventilation.

12

ENG

Summary of Contents for PROMETEO BLACK 11K

Page 1: ...MANUAL DE INSTRUCCIONES ESTUFA DE GAS EXTERIOR OUTDOOR PATIO HEATER Model Model PROMETEO BLACK 11K www bastilipo com ...

Page 2: ...ción de la carcasa del cilindro Ÿ No mueva el aparato cuando esté en funcionamiento Ÿ Cierre la válvula en la bombona de gas o el regulador antes de mover el aparato Ÿ La tubería o la manguera flexible deben cambiarse dentro de los intervalos prescritos Ÿ Use solo el tipo de gas y la bombona especificada por el fabricante Ÿ La bombona utilizada en su estufa de gas debe cumplir con los siguientes req...

Page 3: ...tector u otro dispositivo de protección retirado para reparar el calefactor debe reemplazarse antes de operar el calefactor Ÿ Se debe mantener una distancia de seguridad suficiente cuando la estufa de gas esté encendida para evitar quemaduras Ÿ Los niños deben ser supervisados cuidadosamente cuando estén en el área de la estufa de gas Ÿ Debe cambiar la bombona de gas en un área bien ventilada lejos...

Page 4: ...lla de control variable presione el botón de encendido varias veces hasta que se encienda la llama piloto Suelte la perilla de control variable después de que se encienda la llama piloto Nota Si se acaba de conectar un tanque nuevo espere al menos un minuto para que el aire de la tubería de gas se purgue a través del orificio piloto Al encender la llama piloto asegúrese de que la perilla de control...

Page 5: ...TIPO DE GAS GAS PRESIÓN PRESIÓN DE GAS DEL REGULADOR I 28 30 37 3 Butane Propane 28 30 mbar 37 mbar 28 30 mbar 37 mbar I3B P 30 Butane propane or their mixtures 30 mbar 50 mbar 30 mbar 50 mbar I3B P 50 Butane propane or their mixtures I3B P 37 Butane propane or their mixtures 37 mbar 37 mbar ENTRADA TOTAL CALOR Hs Qn I 28 30 37 3 Butane Propane 28 30 mbar 37 mbar 11 kW G30 800 g h G31 786 g h TAMA...

Page 6: ...nilla de control 4 Base 5 Ruedas ENSAMBLAJE DE PARTES 1 Utilice 2 tornillos M8x16mm y tuercas M8 para unir el soporte con la rueda a la base 1 Tornillo M8 x 16 Tuerca M8 Tuerca circular M6 Tornillo M5 x 8 Destornillador Llave inglesa Tuerca M8 Tornillo M8 Llave inglesa ...

Page 7: ...ce 4 tornillos M5x8mm para unir la base del soporte del tanque y el cilindro 3 Use la tuerca circular para conectar las dos medias protecciones de seguridad al cabezal del quemador Tornillo M5 Destornillador Tornillo M5 Destornillador ...

Page 8: ...uridad anual y cada vez que se conecta una bombona o si se reemplaza una parte del sistema de gas ADVERTENCIA Nunca use una llama encendida para verificar si hay fugas de gas Asegúrese de que no haya chispas o llamas encendidas cerca mientras revisa si hay fugas Las chispas o llamas encendidas pueden provocar incendios explosiones daños a propiedad lesiones corporales graves o hasta la muerte Inspe...

Page 9: ...mente la boquilla de la aspiradora sobre las guardas para eliminar el polvo o la suciedad que pueda haberse acumulado en el interior o en la unidad PRECAUCIÓN No use detergentes fuertes limpiadores químicos o disolventes ya que pueden dañar el acabado de la superficie de los componentes Cuando acabe la vida útil del producto asegúrese de depositar el producto en un sitio de reciclaje donde correspo...

Page 10: ...a de gas en linea Falta de presión en la bombona Limpie el área sucia Apretar las conexiones Reemplace el termopar Comprobar conexiones Tanque casi vacío Cambiar la bombona No se enciende la llama La presion es baja Apertura bloqueada Control no encendido Termopar mal Ensamblaje de la luz piloto doblado No está en la ubicación correcta Sustituir la bombona Quitar y limpiar Gire la válvula a ON Ree...

Page 11: ...not move the appliance when in operation Ÿ Shut off the valve at the gas cylinder or the regulator before moving the appliance Ÿ The tubing or the flexible hose must be changed within the prescribed intervals Ÿ Use only the type of gas and the type of cylinder specified by the manufacturer Ÿ The LP tank used with your patio heater must meet the following requirements Ÿ Purchase LP tanks only with the...

Page 12: ...ce removed for servicing the heater must be replaced before operating the heater Ÿ Adults and children should stay away from high temperature surface to avoid burns or clothing ignition Ÿ Children should be carefully supervised when they are in the area of the heater Ÿ To change the gas cylinder in a amply ventilated area away from any ignition source candle cigarettes other flame producing applian...

Page 13: ...urn the variable control knob to PILOT position counter clockwise 90 º 3 Press down the variable control knob and hold for 60 seconds While holding down the variable control knob press the igniter button several times until the pilot flame lights Release the variable control knob after the pilot flame lights Note If a new tank has just been connected please allow at least one minute for the air in t...

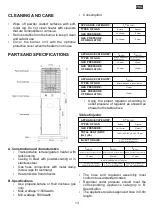
Page 14: ...above Table of injector Ÿ The hose and regulator assembly must conform to local standard codes Ÿ Regulator outlet pressure should meet the corresponding appliance category in B Specification Ÿ The appliance requires approved hose in 0 6m length APPLIANCE CATEGORY TYPES OF GAS GAS PRESSURE TOTAL HEAT INPUT Hs Qn I 28 30 37 3 Butane Propane 28 30 mbar 37 mbar 10 kW G30 728 g h G31 715 g h INJECTOR SI...

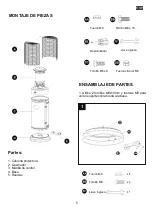
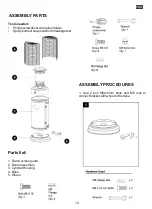
Page 15: ...er w medium blade Ÿ Spray bottle of soap solution for leakage test Parts list 1 Flame screen guard 2 Burner assembly 3 Cylinder Housing 4 Base 5 Wheel ASSEMBLY PROCEDURES 1 Use 2 pcs M8x16mm bolts and M8 nuts to connect bracket with wheel to the base 14 ...

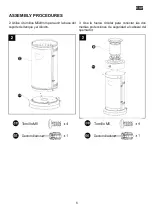
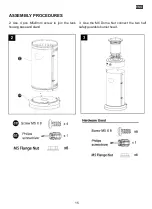
Page 16: ...ENG ASSEMBLY PROCEDURES 2 Use 4 pcs M5x8mm screw to join the tank housing base and stand 3 Use the M6 Dome Nut connect the two half safety guards to burner head 15 ...

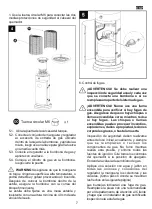
Page 17: ...d each time a cylinder is hooked up or if a part of the gas system is replaced WARNING Never use an open flame to check for gas leaks Be certain no sparks or open flames are in the area while you check for leaks Sparks or open flames will result in a fire or explosion damage to property serious bodily injury or death Leak testing must be done before initial use annually and whenever any gas Components...

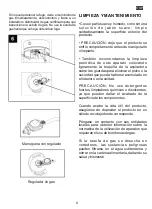
Page 18: ... recommend the periodic cleaning of this appliance by lightly running a vacuum cleaner nozzle over the guards to remove any dust or dirt that may have accumulated inside or on the unit CAUTION Do not use harsh detergents chemical cleaners or solvents as they may damage the surface finish of the plastic components Indoor use only Environment Meaning of crossed out wheeled dustbin Do not dispose of e...

Page 19: ...ck of fuel pressure Clean dirty area Tighten connections Replace thermocouple Check connections Tank near empty Refill LPG tank Burner will not light Pressure is low Opening blocked Control not ON Thermocouple bad Pilot light assembly bent Not in correct location Tank near empty Refill LPG tank Remove and clean Turn valve to ON Replace thermocouple Place pilot properly Position properly and retry If...

Page 20: ...www bastilipo com Compañía Pineda Álvarez S L P I Sta Isabel c Alicatadores 23 Población El Viso del Alcor Provincia Sevilla Código Postal 41520 Tel 34 955 741 038 Fax 34 955 741 254 Móvil 34 615 264 338 ...

Reviews: