


18
TROUBLESHOOTING PROBLEMS AND FAQ
TROUBLESHOOTING PROBLEMS AND FAQ
Q: THE PUMP DOESN’T RUN
A:
Check the battery charge and recharge if necessary.
A:
Check the battery connections, clean and re-secure
if necessary.
Q: THE BATTERY WILL NOT HOLD A CHARGE
A:
Verify that the loaded boat is not exceeding the weight
capacity of the lift. If the battery is a flooded-cell type,
check the electrolyte level.
A:
Ensure the solar panel is properly connected.
A:
Re-align the solar panel for proper exposure to the sun.
A:
Recharge the battery with a 10 amp charger and
check the charge again.
A:
Have the battery tested. It may be old and
require replacement.
A:
If the lift is being used frequently during the day, it
may be necessary to use a 110-volt maintainer/charger.
Q: THE REMOTE CONTROL IS NOT FUNCTIONING
A:
A:
Verify that the power unit battery is charged and connections are tight.
A:
Reprogram the remote key fobs.
Q: HOW DOES THE REMOTE CONTROL WORK?
Q: DOES THE LIFT HAVE TO GO ALL THE WAY UP?
A:
YES - in order for your lift to function as intended the lift
must ALWAYS be stored in the full upright position when
the boat is unattended.
Q: IS MY BOAT SECURE?
A:
Yes, once you verify that the lift is Over-Center , switch
off the power and lock the power unit box, there is less
chance of theft.
™
Q: DO I NEED A MOORING LINE?
A:
Under most circumstances one mooring line is sufficient
to prevent the boat from drifting away if the lift is
inadvertently lowered or the water level rises.
Q: HOW MUCH SUN DOES THE SOLAR PANEL NEED?
A:
The panel should receive constant sun for at least 8 hours a day.
Q:
WHAT IF I GET A NEW BOAT?
A:
Re-leveling the boat lift may be necessary.
A new lift
will be required if the boat exceeds the weight capacity
of your current lift.
Q: THE PUMP RUNS, BUT THE LIFT DOESN’T MOVE
A:
Check the 'quick couplers' in the Power Unit. If they are not
screwed together tight enough, built-in check valves will
not allow fluid to flow. See Page 12.
A:
Check the fluid level. See Page 12.
Q: IS THE HYDRAULIC FLUID SAFE FOR THE FISH?
A:
We use a special low-toxicity hydraulic fluid that is safe
for the environment. This fluid is different than food-grade
oil. Only use Basta Boatlifts approved fluid in your
hydraulic system.
Q: HOW DO I CHANGE THE HYDRAULIC FLUID?
A:
Our fluid should not require replacement for a considerable
amount of time. If yours has been contaminated or the
hydraulic power unit has been replaced, visit our web site at
www.gobasta.com
for detailed instructions.
POWER-UP
At power-up the remote fob function has a ten second delay.
Failure to wait for this ten seconds can make the wait time much
longer.
LIFT OPERATION
The remote fob is non-functional until it is enabled by
depressing the lower right button momentarily.
After the
initial ten second delay, depressing the unlock button enables
operation using the remote fob.
The lockout is re-enabled after
60 seconds without a button press.
Lift operation using the fob is limited to 120 seconds of
continuous operation. If a longer cycle is needed it is necessary
to release and then re-depress the button.
LOW BATTERY LOCKOUT
This control incorporates a low voltage lockout
which is
intended to protect the battery from abuse and over-discharge.
When the battery drops below the low battery threshold during
pump operation, further activation using the Fob is not allowed.
The battery needs to be checked prior to further operation. The
manual switches will allow the lift to operate if sufficient battery
power is present.
FOB PROGRAMMING
At initial power up there is a five second window when it is
possible to reprogram the receiver to enroll a remote fob. Up to
four fobs may be enrolled. If a fifth fob is enrolled, the first
enrolled fob will fall off the list.
To enroll a fob, turn off the power to the lift for fifteen or more
seconds. When power is turned back on press both the UP and
DOWN buttons on the fob simultaneously. This must be done
within the first five seconds after power is applied.
LIGHTING CIRCUIT
The lighting circuit is activated whenever the lift is operated. The
lights stay on for 2 minutes after the lift is operated
The lights may be manually turned on or off by depressing the
lower left button on the remote Fob. When manually enabled the
lights will automatically turn off after 4 minutes. This is prevents
accidental battery discharge.
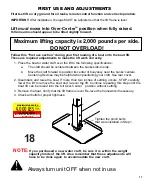
STORAGE
Always leave the boat in the fully raised, Over-Center™
position with the power off.
FOR ASSISTANCE OR SERVICE:
Contact your local dealer or call 1 - 866 - GO - BASTA
website: www.gobasta.com email: [email protected]
19
MAINTENANCE
tm
Your Basta Boatlift requires very little maintenance once installed.
Occasionally wipe the solar panel with a clean, damp cloth to preserve its charging performance.
Every 6 months, we recommend:
Inspect the hoses, cylinders and fittings for leaks and wear.
Check the wire terminals for snugness and corrosion.
Check the hydraulic fluid and battery electrolyte levels:
The battery electrolyte should be slightly above the indicator ring in each cell.
Carefully add DISTILLED water if necessary. Do not over-fill.
The hydraulic fluid level should be about one inch below the top of the reservoir with the lift DOWN.
DO NOT add fluid with the lift in the raised position!
Use only Basta approved fluid.
We recommend Chevron Clarity® AW ISO 32 or CITGO Aquamarine® 46 hydraulic oils.
DATE:
WHAT WAS DONE:
The battery in the key fob transmitter may be low. Replace it with a
new lithium CR2032. These are widely available at variety, hardware
and even grocery stores. Polarity is marked on the battery holder.


