Lower the lift completely, then raise it slightly.
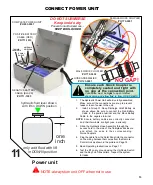
Disconnect the hydraulic hose quick couplers in the Power Unit box to
separate it from the lift.
14
13
Move the lift into its operational position
17
16
Go to 'First Use' instructions on Page 17.
Re-connect the hydraulic hose quick couplers in the Power Unit box.
Raise the lift fully and finish adjusting the legs so that the base frame
is level side-to-side and forward-to-aft.
15
Adjust the legs to provide enough water over the lift so that the boat
will not have to be "driven" hard up onto the bunks.
86.75"
117"
21"
36"
28"
shown
without
extension
arms
15"
without extensions - 57"
with extensions - 62” - 80"
78"
17"
Use these diagrams to help place the lift
18
FIRST USE AND ADJUSTMENTS
Follow this “first use section” during your first loading of a boat onto the boat lift.
These are required adjustments to make the lift work correctly.
1. Place the boat or water craft over the lift to the following specifications:
a. The craft should be centered between the bunks side-to side.
b. Move the craft forward to position its center of buoyancy near the bunks' centers.
Centering Devices may be helpful when positioning your craft. See rear cover.
Disembark and raise the boat. If more than two inches of settling occurs, STOP, carefully
lower the lift to remove the boat and re-level the lift. Continue repeating this step until the
boat lift can be raised into the full Over-Center position without settling.
tm
3.
Remove the boat. Verify that the lift frame is level. Re-level the framework if necessary.
NOTE:
If you purchased a new water craft, be sure it is within the weight
capacity limits of the lift. Also remember that these adjustments will
have to be done again to accommodate the new craft.
First test lift on dry ground for oil leaks, remote control function and correct operation.
2.
IMPORTANT:
After installation, the legs MUST be adjusted so that the lift frame is level.
TM
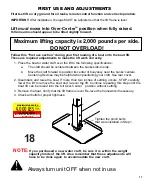
Always turn unit OFF when not in use
Lift
must
move into Over-Center position when fully raised.
H-frame arms should appear to be tilted slightly forward.
Tighten the pinch bolts
that were installed in Step 1.
4.
Check all bolts for proper tightness.
Maximum lifting capacity is 2,000 pounds per side.
DO NOT OVERLOAD!
Do not exceed the maximum weight capacity
specified for the lift.
4,000 LBS
DANGER
MAXIMUM CAPACITY
T O T A L
B O T H
L I F T S
16
17


