background image

ii

BE1-50 Introduction

CONFIDENTIAL INFORMATION

OF BASLER ELECTRIC COMPANY, HIGHLAND, IL.  IT IS LOANED FOR CONFIDENTIAL USE, SUBJECT
TO RETURN ON REQUEST, AND WITH THE MUTUAL UNDERSTANDING THAT IT WILL NOT BE USED
IN ANY MANNER DETRIMENTAL TO THE INTEREST OF BASLER ELECTRIC COMPANY.

It is not the intention of this manual to cover all details and variations in equipment, nor
does this manual provide data for every possible contingency regarding installation or
operation.  The availability and design of all features and options are subject to
modification without notice.  Should further information be required, contact Basler
Electric Company, Highland, Illinois.

First Printing:  January 1986

Printed in USA

© 1998, Basler Electric Co., Highland, IL 62249

November 1998

BASLER ELECTRIC

ROUTE 143, BOX 269

HIGHLAND, IL 62249 USA

http://www.basler.com, [email protected]

PHONE 618-654-2341

FAX 618-654-2351

Summary of Contents for BE1-50

Page 1: ... 05647 6 10 07 14 056 06 0 175 18 4 744 06 4 Publication 9 1710 00 990 Revision C 11 98 ...

Page 2: ... the procedures presented in this manual INTRODUCTION This Instruction Manual provides information concerning the operation and installation of BE1 50 Instantaneous Overcurrent Relays To accomplish this the following is provided Specifications Functional characteristics Installation Operational Tests Mounting Information ...

Page 3: ...d variations in equipment nor does this manual provide data for every possible contingency regarding installation or operation The availability and design of all features and options are subject to modification without notice Should further information be required contact Basler Electric Company Highland Illinois First Printing January 1986 Printed in USA 1998 Basler Electric Co Highland IL 62249 ...

Page 4: ...NCTIONAL DESCRIPTION 3 1 General 3 1 Functional Description 3 1 Step Down Transformer 3 1 Full Wave Rectifiers 3 1 Response Characteristics 3 2 Pickup Settings 3 2 Pickup Comparators 3 2 Pulse Stretchers 3 2 Outputs 3 2 Targets 3 2 Power Supply 3 2 Power Supply Status Outputs 3 3 SECTION 4 INSTALLATION 4 1 General 4 1 Relay Operating Precautions 4 1 Dielectric Test 4 1 Mounting 4 1 Connections 4 8...

Page 5: ...iv BE1 50 Introduction CONTENTS Continued SECTION 7 MANUAL CHANGE INFORMATION 7 1 Changes 7 1 ...

Page 6: ...lt Detection BE1 50 relays can be applied to monitor zero sequence currents that are indicative of ground faults The most sensitive method of ground fault protection utilizes a single current transformer through which all the conductors are passed Figure 1 1b Another method uses the residual connection of the three phase CTs Figure 1 1d with the relay set higher than the normal system unbalance Th...

Page 7: ...Differential Protection MODEL AND STYLE NUMBER DESCRIPTION BE1 50 Instantaneous Overcurrent Relays electrical characteristics and operational features are defined by a combination of letters and numbers that make up its style number The model number together with the style number describe the options included in a specific device and appear on the front panel drawout cradle and inside the case ass...

Page 8: ...ge Continuously adjustable over the range defined by the style number with independent ranges and adjustments for each phase and neutral pickup Pickup Accuracy 2 or 40 mA of pickup setting whichever is greater Dropout Within 2 of pickup Timing 1 5 cycles or less from onset of overcurrent condition 30 milliseconds at 50 Hz 25 milliseconds at 60 Hz Power Supply Power supply Types F G and H derive op...

Page 9: ...cated value t the time in seconds I maximum current Table 1 2 Power Supply Burden Type Nominal Input Voltage Input Voltage Range Burden at Nominal O Mid Range 48 Vdc 24 to 150 Vdc 4 0 W P Mid Range 125 Vdc 120 Vac 24 to 150 Vdc 90 to 132 Vac 4 0 W 10 0 VA R Low Range 24 Vdc 12 to 32 Vdc 4 0 W S Mid Range 48 Vdc 125 Vdc 24 to 150 Vdc 24 to 150 Vdc 4 0 W 4 0 W T High Range 250 Vdc 240 Vac 62 to 280 ...

Page 10: ... high potential test as follows All circuits to ground 2121 Vdc Input to output circuits 1500 Vac or 2121 Vdc Shock In standard tests the relay has withstood 15 g in each of three mutually perpendicular planes without structural damage or degradation of perfor mance Vibration In standard tests the relay has withstood 2 g in each of three mutually per pendicular planes swept over the range of 10 to...

Page 11: ...eter no stops sets the pickup point for all neutral overcurrent elements within the relay Continuously adjustable over the range defined by the style number C POWER Indicator LED illuminates to indicate that the relay power supply is functioning D Target Reset Lever Linkage extends through bottom of front cover to reset the target indicators E Target Indicators Optional Magnetically latching indic...

Page 12: ...2 2 BE1 50 Human Machine Interface Figure 2 1 Location of Controls and Indicators ...

Page 13: ...Relay Figure 3 1 Functional Block Diagram Step Down Transformer Monitored system currents are applied to the primaries of internal current transformers and stepped down to internal circuit levels The internal current transformers provide 1500 V isolation for the twelve volt logic circuits of the relay Full Wave Rectifiers Outputs from each step down transformer are full wave rectified and applied ...

Page 14: ...tputs Defined by the style number individual output relays may be provided for each monitored phase and neutral One output relay may serve for all monitored phases and neutral In addition one auxiliary output relay may be provided that serves for all monitored phases and neutral Targets Magnetically latching target indicators may be provided for each monitored phase and neutral These targets are a...

Page 15: ...g solid state power supply Nominal 12 Vdc is delivered to the relay internal circuitry Input source voltage for the power supply is not polarity sensitive A red LED turns ON to indicate that the power supply is functioning properly Power Supply Status Output A normally closed output relay may be provided whose contact remains open when energized by the presence of nominal voltage at the output of ...

Page 16: ...te the following precautions 1 A minimum of 0 2 A in the output circuit is required to ensure operation of current operated targets 2 The relay is a solid state device If a wiring insulation test is required remove the connecting plugs and withdraw the cradle from its case 3 When the connecting plugs are removed the relay is disconnected from the operating circuit and will not provide system prote...

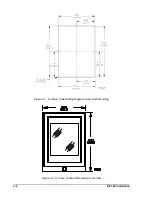
Page 17: ...4 2 BE1 50 Installation Figure 4 1 S1 Case Panel Drilling Diagram Semi Flush Mounting Figure 4 2 S1 Case Outline Dimensions Front View ...

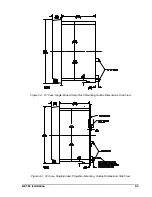
Page 18: ...BE1 50 Installation 4 3 Figure 4 3 S1 Case Single Ended Semi Flush Mounting Outline Dimensions Side View Figure 4 4 S1 Case Single Ended Projection Mounting Outline Dimensions Side View ...

Page 19: ...4 4 BE1 50 Installation Figure 4 5 S1 Case Double Ended Semi Flush Mounting Outline Dimensions Side View Figure 4 6 S1 Case Double Ended Projection Mounting Outline Dimensions Side View ...

Page 20: ...BE1 50 Installation 4 5 Figure 4 7 S1 Case Single Ended Panel Drilling Diagram Rear View ...

Page 21: ...4 6 BE1 50 Installation Figure 4 8 S1 Case Double Ended Panel Drilling Diagram Rear View ...

Page 22: ...BE1 50 Installation 4 7 Figure 4 9 Outline Dimensions Rear View ...

Page 23: ...e made with minimum wire size of 14 AWG For the ground wire refer to the following note Typical sensing input connections are shown in Figures 4 10 through 4 13 Typical output connections are shown in Figures 4 14 and 4 15 Typical internal connections are shown in Figures 4 16 through 4 18 Relay circuitry is connected to the case terminals by removable connection plugs 1 plug for 10 terminal cases...

Page 24: ...BE1 50 Installation 4 9 Figure 4 11 Three Phase and Neutral Sensing Input Connections Figure 4 12 Two Phase and Neutral Sensing Input Connections ...

Page 25: ...4 10 BE1 50 Installation Figure 4 13 Three Phase Sensing Input Connections Figure 4 14 Typical Output Connections Sensing Input Type E or G and Output F or H or Sensing Input Type J and Output J or K ...

Page 26: ...BE1 50 Installation 4 11 Figure 4 15 Typical Output Connections Sensing Input Type F and Output E or G ...

Page 27: ...4 12 BE1 50 Installation Figure 4 16 Typical Internal Connections Three Phase and Neutral Sensing Output Type E Option 3 6 ...

Page 28: ...BE1 50 Installation 4 13 Figure 4 17 Typical Internal Connections Three Phase and Neutral Sensing Multiple Output Relays ...

Page 29: ...4 14 BE1 50 Installation Figure 4 18 Typical Internal Connections Single Phase Output E Option 3 5 ...

Page 30: ...is required remove the connecting plugs and withdraw the cradle from its case 3 When the connecting plugs are removed the relay is disconnected from the operating circuit and will not provide system protection Always be sure that external operating monitored conditions are stable before removing a relay for inspection test or service 4 Be sure the relay case is hard wired to earth ground using the...

Page 31: ...ctuated Step 4 Turn the pickup adjustment fully CW Reset target indicators if present Step 5 Apply sensing current near zero and slowly increase the sensed current until the test indicator changes state Result Current indicated by the ammeter is within two percent of the high end of the sensing range If present the target indicator for the tested phase or neutral should be actuated Step 6 Repeat S...

Page 32: ... generally have a life expectancy in excess of 10 years at storage temperatures less than 40 C Typically the life expectancy of the capacitor is cut in half for every 10 C rise in temperature Storage life can be extended if at one year intervals power is applied to the relay for a period of thirty minutes TEST PLUG Test plugs Basler part number 10095 or G E part number XLA12A1 provide a quick easy...

Page 33: ... in Specifications Added Note to Table 1 1 Added new power supply information and Fast Transient to Specifications Corrected Figure 2 1 from Instantaneous Undercurrent Relay to Instantaneous Overcurrent Relay Added new power supply information to Section 3 starting with Basler Electric enhanced the power supply design Divided Section 4 Installation into two sections Section 4 Installation and Sect...

Reviews: