background image

Baseline® Push / Pull Dynamometers 


User’s Guide 


4


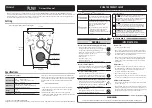
3   MECHANICAL SETUP 


3.1 Loading shaft orientation 

In  order  to  accommodate  a  variety  of  testing  requirements,  the  orientation  of  the  loading  shaft  may  be 
oriented  in  either  of  the  two  positions  shown  below.  To  change  the  loading  shaft  orientation,  loosen  the 
two captive screws on the back side of the housing, separate the two housing halves, rotate one half 180 
degrees, and reassemble. Exercise care when reassembling the two halves of the housing, ensuring that 
internal wires do not interfere.   


     Load cell shaft up 


    Load cell shaft down 


3.2 Mounting to a plate 

Although the dynamometer may be used by hand, proper mounting is important if attached to a fixture or 
test stand. The round steel insert with a hole in the back of the housing is provided to withstand the load 
during a test. A mating dowel pin should be used (see illustration below). An additional two holes are 
supplied for metric screws. These holes are designed to accommodate screws in order to hold the 
dynamometer in place. The screws must 

not

 be used for load bearing purposes. Failure to use a dowel 

pin properly can result in a hazardous situation. 


3.3 Mounting attachments to the dynamometer 


The dynamometer

’s threaded loading shaft is designed to accommodate attachments with female 

threads. To mount n attachment, gently thread it onto the shaft. Attachments may not orient in a parallel 
manner when tight. In such cases, 

do not over-tighten

, or damage will occur. Loosen the attachment to 

the desired position, and use in this manner, or use a jam nut to prevent the attachment from rotating. 
Use two wrenches to tighten a jam nut; the second wrench should engage the flat section of the load cell 
shaft. This is to prevent loosening of the loading shaft, which can lead to damage.  


Summary of Contents for 12-0340

Page 1: ...Push Pull Dynamometers 12 0340 12 0341 12 0342 12 0343 User s Guide...

Page 2: ...ns are also provided For additional information or answers to your questions please do not hesitate to contact us Our technical support and engineering teams are eager to assist you Before use each pe...

Page 3: ...must be powered off before the housing is opened 4 Always consider the characteristics of the sample being tested before initiating a test A risk assessment should be carried out beforehand to ensure...

Page 4: ...ndicator is present 5 When battery life drops to approximately 2 the indicator from step 4 will be flashing Several minutes after timing depends on usage and whether the backlight is turned on or off...

Page 5: ...to withstand the load during a test A mating dowel pin should be used see illustration below An additional two holes are supplied for metric screws These holes are designed to accommodate screws in or...

Page 6: ...wn depending on power conditions Refer to the Power section for details 5 Pull push indicator indicates a push direction indicates a pull direction 4 2 Controls Primary Label Primary Function Secondar...

Page 7: ...e and revert back to the sub menu item or press ESCAPE to revert back to the sub menu item without saving Press ESCAPE to revert one step back in the menu hierarchy until back into normal operating mo...

Page 8: ...Applies to the primary reading on the display Available settings 1 2 4 8 16 32 64 128 256 512 1024 It is recommended to keep the current reading filter at its lowest value for best performance and th...

Page 9: ...in each direction 3 To escape the Calibration menu at any time press ESCAPE The display appears as follows Selecting Cancel will revert back to the Calibration setup Selecting Exit without saving will...

Page 10: ...as follows Apply a weight equal to the full scale of the instrument then press ENTER 9 After displaying Please wait the display appears as follows Remove the load applied in Step 8 leave the fixtures...

Page 11: ...s follows Press ENTER 12 The display appears as follows Reverse the orientation of the load cell shaft by rotating the dynamometer 180 degrees Press DIRECTION to invert the display Then attach weight...

Page 12: ...winging oscillating or vibrating in any manner Then try again The calibration weight does not match the set value The entered calibration point is too close to the previous point CALIBRATION TENSION L...

Page 13: ...ettings select Backlight from the menu The display appears as follows Select Off for the backlight to be off upon powering on the dynamometer Select On for the backlight to be on upon powering on the...

Page 14: ...ue is Real Time 9 5 Restore Default Settings Default factory settings can be restored by selecting Restore Defaults from the menu The settings may be found in the Specifications section The screen app...

Page 15: ...12 0341 0 7 lb 0 33 kg 12 0342 12 0343 0 9 lb 0 41 kg Environmental requirements 40 100 F max 93 humidity non condensating Warranty 3 years see individual statement for further details 10 2 Factory De...

Page 16: ...Baseline Push Pull Dynamometers User s Guide 15 10 4 Dimensions IN MM...

Page 17: ...Baseline Push Pull Dynamometers User s Guide 16 NOTES...

Page 18: ...lic Push Pull Dynamometer Can be used with lift platform to conduct muscle strength and functional capacity tests Model lbF kgF N 12 0340 50 x 0 05 25 x 0 02 250 x 0 2 12 0341 100 x 0 1 50 x 0 05 500...

Reviews: