


Installation and operation
137201
15 / 18
EN
•
Prior t o firs t operation, cl ean the appli anc e and its equi pment , obs er ving i nstr ucti ons in
sect ion 6 'Cl eaning'
. Make sur e no water ent ers el ectric i nst allation and connec tion box. T hen thoroughl y dr y the appli anc e and t he entire eq uipm ent.
•
Ins ert t he bott om c over int o the applianc e. The c over acts as a spac er bet ween t he heating element and l ef t-over f ood tray.
•
Caref ull y i nser t t he c onnection box wit h the heati ng element at t he bac k edge of t he applianc e. A pin in the bott om part of t he c onnecti on box must ent er a hol e in t he mai n applianc e. T his way t he connec tion box is properly mounted.
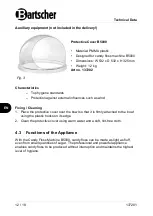
Appliance Preparation
1. Before starting-up, clean the appliance and its equipment inside and outside
observing instructions in section
'Cleaning'
.
2. Dry all cleaned elements and surfaces thoroughly.
3. Refit the removed parts back in the appliance:
– place the bowl on rubber bumpers on the appliance housing,
– fix the bowl on the hooks in the bottom using the clamps on both sides,
– attach the drawer.
Preparing Candy Floss Ingredients
With this candy floss machine you can make candy floss very easily. The appliance
makes sweet candy floss from air and sugar.
To produce candy floss, few ingredients are required:
– sugar, preferably refined,
– wooden sticks with a rough, angular surface so that the candy floss
sticks well (candy floss can slide off smooth wooden sticks),
– various food colourings and flavourings, as desired.
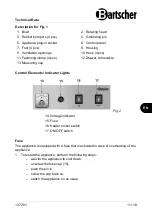
Appliance Start-up
1. First, connect the plug of the power cord to the plug-in socket of the appliance,
located on the right side of the appliance.
2. Plug the power cord plug into a suitable single socket.
3. Switch the appliance on with the ON/OFF rocker switch (set to
'I'
position).
4. Leave the appliance to operate for approx. 1
–2 minutes.
5. Check whether the appliance runs evenly or not.
6. Switch the heater rocker switch to ON
'I'
position.
7. For initial heating, leave the appliance to operate for approx. 4
–5 minutes.
8. Switch the appliance off and wait for the rotating head to stop.
Summary of Contents for B5000
Page 1: ...B5000 137201...


