R5906113 /09
UDX
65
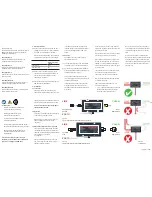
Image 5-2: Small top cover filter replacement
3.
Remove the filter and clean it.
4.
Install either the cleaned filter or a new filter (if the old one is no longer usable).
Caution:
Take notice of the air flow direction of the filter (made visible by a label). Make sure the arrow
points towards the inside of the projector.
5.
Install the small top cover again. See
, page 87.
Clean the metal dust filters
1.
Remove most contamination with a vacuum cleaner.
2.
Blow remaining dust away with compressed air in an other room or outside.
If you cannot clean the filter anymore, insert a new one.
Summary of Contents for UDX Series
Page 1: ...ENABLING BRIGHT OUTCOMES Installation manual UDX...
Page 4: ......
Page 28: ...R5906113 09 UDX 28 Installation process...
Page 50: ...R5906113 09 UDX 50 Image 4 11 Installation procedures...
Page 60: ...R5906113 09 UDX 60 Installation procedures...
Page 72: ...R5906113 09 UDX 72 Flight case and rigging frame...
Page 78: ...R5906113 09 UDX 78 Pulse SFP input use cases...
Page 88: ...R5906113 09 UDX 88 Projector covers...
Page 94: ...Glossary R5906113 09 UDX 94...
Page 98: ...Index R5906113 09 UDX 98...