7. Advanced
Image 7-168
7. Press
ENTER
A dialog box will be displayed.
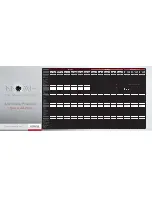
Black Level
Internal
Beta planes
Planes
Level
0
Image 7-169
8. Use the arrows to select the
Beta planes
check box and press
ENTER
Note:
It will take a certain time for the beta plane to be applied
7.9.7.6
Blanking
What can be done?
Blanking or hard edging affects only the edges of the image and is used to frame the projected image on the screen and to hide
unwanted image information (or noise) or to put two images next to each other without overlap (soft edge). This is also called
“stitching”.
The adjustment of hard edges is done in the same menu as the soft edge with the
Edges
disabled (unchecked).
How to setup a hard edge shape ?
1. Press the
MENU
key to activate the Tool bar.
2. Push the cursor key
←
or
→
to highlight
Display setup
3. Push the
↓
key to pull down the menu
4. Push
↓
or
↑
to select
Soft edge
5. Push the
→
key to pull down the menu.
6. Push the cursor key
←
or
→
to highlight
Edit...
Image 7-170
7. Press
ENTER
The soft edge dialog box will be displayed.
R59770286 NW-12 25/09/2008
149
Summary of Contents for NW-12
Page 1: ...NW 12 User Guide R9040410 R59770286 00 25 09 2008...
Page 8: ...Table of contents 4 R59770286 NW 12 25 09 2008...
Page 10: ...1 Introduction 6 R59770286 NW 12 25 09 2008...
Page 16: ...3 Installation guidelines 12 R59770286 NW 12 25 09 2008...
Page 42: ...4 Installation 38 R59770286 NW 12 25 09 2008...
Page 56: ...5 Setup 52 R59770286 NW 12 25 09 2008...
Page 58: ...6 Getting started 54 R59770286 NW 12 25 09 2008...
Page 96: ...7 Advanced Image 7 67 Image 7 68 Image 7 69 92 R59770286 NW 12 25 09 2008...
Page 141: ...7 Advanced Image 7 145 Image 7 146 Image 7 147 Image 7 148 R59770286 NW 12 25 09 2008 137...
Page 164: ...7 Advanced 160 R59770286 NW 12 25 09 2008...
Page 172: ...8 Trouble shooting 168 R59770286 NW 12 25 09 2008...
Page 176: ...Glossary 172 R59770286 NW 12 25 09 2008...