background image

R5906141 /02

Medea series

63

Image 7-4: IR control via reflective screen

Hardwired to the mini jack input

1.

Plug one end of the remote cable in the connector on the front side (3,5mm mini jack) of the RCU.

2.

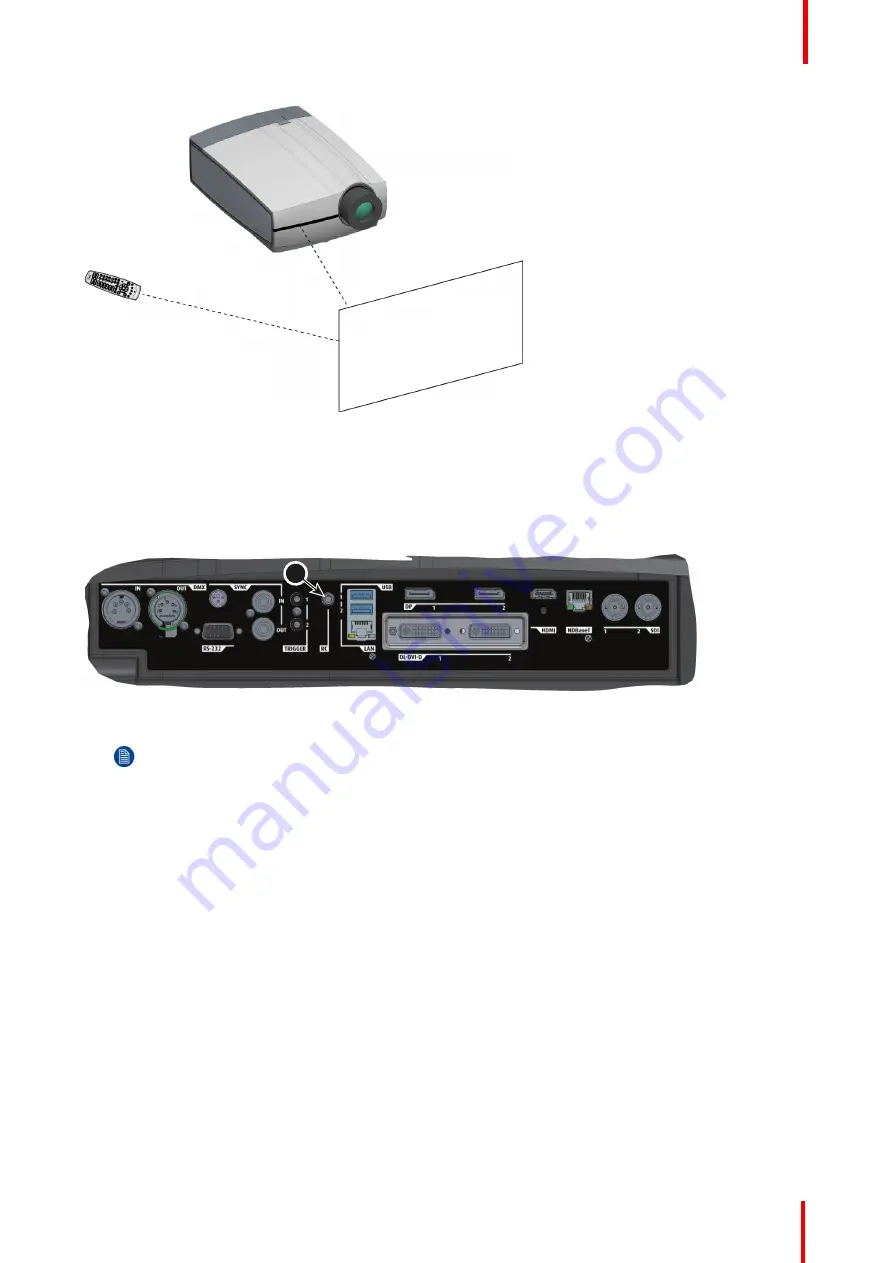
Plug the other end in the connector on the communication interface of the projector, labelled

Remote

CTRL

(reference 1, Image 7-5).

1

Image 7-5

Note:

Plugging the remote control will switch the broadcast address of the remote control to the

default value '0'. This is the only broadcast address that will work when hardwired. If you want to
change the broadcast address after disconnecting the remote control, see

Projector Address

page

64.

Pointing directly to the IR sensor

When using the wireless remote control, make sure you are within the effective operating distance (30m, 100ft
in a straight line). The remote control unit will not function properly if strong light strikes the sensor window or if
there are obstacles between the remote control unit and the projector IR sensor.

Getting Started

Summary of Contents for Medea series

Page 1: ...ENABLING BRIGHT OUTCOMES Installation Manual Medea series...

Page 2: ...d address Barco NV President Kennedypark 35 8500 Kortrijk Belgium www barco com en support www barco com Barco Fredrikstad AS Habornveien 53 N 1630 Gamle Fredrikstad Norway Support fre barco com www b...

Page 3: ...impossible or unsuccessful the purchaser can demand a reduction in the purchase price or cancellation of the contract All other claims in particular those relating to compensation for direct or indire...

Page 4: ...EN55032 CISPR32 Class A MME MultiMedia Equipment Warning This equipment is compliant with Class A of CISPR 32 In a residential environment this equipment may cause radio interference Class A ITE Info...

Page 5: ...2 6 Projector air inlets and outlets 27 2 7 Free download of Projector Toolset 27 3 Installation process 29 3 1 Installation process projector 30 4 Physical Installation 31 4 1 Remote control battery...

Page 6: ...59 7 3 1 General 59 7 3 2 Power on projector 59 7 3 3 Going from READY to ON 60 7 3 4 Going from ON to READY 60 7 3 5 Going from READY to ECO standby 60 7 3 6 Going from ECO to ON 60 7 3 7 Wake on LA...

Page 7: ...d follow all safety guidelines safety instructions and warnings mentioned in this chapter before installing the Medea projector Clarification of the term Medea used in this document When referring in...

Page 8: ...nt s normal operation fails Notice on optical radiation This projector embeds extremely high brightness radiance lasers this laser light is processed through the projectors optical path Native laser l...

Page 9: ...st on the power cord Do not locate this product where persons will walk on the cord To disconnect the cord pull it out by the plug Never pull the cord itself Use only the power cord supplied with your...

Page 10: ...nd possible injury to the user It is hazardous to operate without lens or shield Lenses shields or ultra violet screens shall be changed if they have become visibly damaged to such an extent that thei...

Page 11: ...s should never be blocked by placing the product on a bed sofa rug or other similar surface This product should never be placed near or over a radiator or heat register The device should not be placed...

Page 12: ...restore the product to normal operation If the product has been dropped or the cabinet has been damaged If the product exhibits a distinct change in performance indicating a need for service Replaceme...

Page 13: ...iquement et pas pour des applications grand public 3 5 RG3 1 4 Risk Group 3 Safety 1 4 1 General considerations Notice on optical radiation from Medea Projector when it becomes Risk Group 3 For RG3 no...

Page 14: ...restricted access location This is a RG3 product Based on international requirements no person is allowed to enter the projected beam within the zone between the projection lens and the related Hazar...

Page 15: ...s For applications installed in the USA market the above limits for cinema like environments do not apply The relevant minimum separation height is 2 5m 8 2 ft by the FDA CDRH Non cinema like environm...

Page 16: ...to the light source is less than the HD Restriction Zone RZ based on the HD The projector is also suitable for rear projection applications projecting a beam onto a defuse coated projection screen As...

Page 17: ...the rear reflection from the screen HDreflection also taking into account a 1 meter lateral separation The HDreflection distance equals 25 of the difference between the determined HD distance and the...

Page 18: ...R5906141 02 Medea series 18 Safety...

Page 19: ...nt light level projector placement and type of screen to use are critical to the optimum use of the projection system Barco provides a guarantee relating to perfect manufacturing as part of the legall...

Page 20: ...2 Top IR Receiver for remote control communication 3 Front IR Receiver for remote control communication 4 Adjustable feet 5 Projector lens 6 Lens button 7 LCD panel 8 Keypad 9 Connector panel 2 2 Ins...

Page 21: ...been specifically designed for cleaning optical parts never use industrial strength cleaners on the projector s optics as these will degrade optical coatings and damage sensitive optoelectronics compo...

Page 22: ...3 Remove the polymeric foam 4 Lift the projector wrapped in a plastic bag out of its packaging 5 Place the projector on solid and stable surface then remove the protected plastic bag Save the origina...

Page 23: ...site reference sheet One remote control unit RCU 2 batteries for the RCU Mechanical check This check should confirm that there are no broken knobs or connectors that the cabinet and panel surfaces are...

Page 24: ...LOOR SCREEN Image 2 6 Front projection Ceiling mounted in table position Rear projection The projector is installed either in a table mount or ceiling mount configuration at the other side of the scre...

Page 25: ...l feet are turned in completely and the vertical lens shift is set to zero 0 On axis off axis projection The position of the projector with reference to the screen may also be different depending on t...

Page 26: ...in a slight decline of image quality U 130 100 40 40 D L R P F U D SIDE VIEW P F 130 100 TOP VIEW P F L R 40 40 Image 2 10 Vertical and horizontal shift range P DMD F Field of view It is mechanically...

Page 27: ...stration is necessary 1 Go to the Barco website www barco com 2 On the home page click on myBarco log in 3 On the Sign In page enter your Email address and your password to login If you are not yet re...

Page 28: ...R5906141 02 Medea series 28 Installation Download first the reference manual and follow the installation instructions as written in this manual General...

Page 29: ...29 Overview Installation process projector R5906141 02 Medea series Installation process 3...

Page 30: ...23 4 Mount the projector For more details see chapter Physical Installation page 31 5 Installation of the lens First select a lens with appropriate throw ratio covering the screen size and the project...

Page 31: ...g the mini jack connector of the RCU Remote control protocol setup Remote control on off button Installing the power cord Alignment of a table mounted projector Medea Multifunctional Frame Rigging fra...

Page 32: ...first How to install 1 Push the battery cover tab with the fingernail a little backwards 1 and pull at the same time the cover upwards 2 1 2 Image 4 1 2 Insert the two AA size batteries making sure th...

Page 33: ...Image 4 4 Note While the mini jack cable is connected the IR beam of the RCU is switched off 4 3 Remote control protocol setup About the used protocol The protocol is the code send out by the remote c...

Page 34: ...pported The Input selection button is not supported The Default value button is not supported The Macro button is not supported 4 4 Remote control on off button Purpose of the remote control on off bu...

Page 35: ...The sources should always be connected before the projector is powered up 4 6 Alignment of a table mounted projector How to align 1 Place the projector in the desired location Take into account the z...

Page 36: ...tors or can be used to suspend one projector maximum two from a truss in upright or upside down position 3 2 Image 4 10 Stacking or hanging multiple projectors How to install Installation manual of th...

Page 37: ...n the Barco website allow you to determine the possible lenses for your configuration No Scheimpflug adjustment available on the Medea projector for user This functionality is only foreseen during pro...

Page 38: ...Available lenses with lens adapter Partnumber Description Throw Ratio on F80 Medea Compliance R9802244 FLDX lens EN67 0 91 approved R9802243 FLDX lens EN66 1 12 1 70 approved R9802242 FLDX lens EN63 1...

Page 39: ...n the projector is a turn and click system This double fixation of lens without safety cable allows to avoid lens falling out in case of single fault condition when the projector is used above an audi...

Page 40: ...D lenses The lens must be first mounted on the lens adaptor then the assembly composed by the lens and the adapter could be used like a standalone lens Keep in mind that it is not possible to calibrat...

Page 41: ...connections of the lens with the projector are supplied by the two lens shift connectors references 5 located on front of the Lens holder Adaptor behaves like pass through in term of electrical connec...

Page 42: ...Pull the lens straight out of the projector lens mount Image 5 7 Action arrow 3 5 Replace with another lens or install the projector lens cap Install a lens with adaptor 1 Verify that the projector s...

Page 43: ...row 3 2 2 4 3 Image 5 9 7 Turn the lens assembly to right CW until it is locked Image 5 9 Action arrow 4 A click indicates that the lens mount mechanism is locked 8 Verify that the lens assembly is fi...

Page 44: ...libration The lens shift calibration consists in moving the lens in a reference point then returns it to its original position This operation allows to secure future actions on the lens shift Each tim...

Page 45: ...ed image falls together with the plane of the screen Fp1 Fp2 This is achieved by changing the distance between the DMD plane and the lens plane Lp1 Lp2 The closer the lens plane comes to the DMD plane...

Page 46: ...jector in parallel with the projection screen and use the SHIFT functionality of the Lens Holder to match the projected image with the projection screen If the SHIFT range is not sufficient then the p...

Page 47: ...of focus This is totally normal F 1 Image 5 15 3 Adjust the right side Scheimpflug adjustment screw reference 2 until the test image in the bottom left side of the screen is in focus Use a size 4 hex...

Page 48: ...oming out minimum image size on screen and then zooming in again Verify the image is still sharp If there are any deviations to sharpness repeat steps 2 to 6 until the image is correct 7 Tighten the t...

Page 49: ...49 Overview Introduction Connection Panel Making connections Connector specifications Control interfaces LED and Button indication chart R5906141 02 Medea series Input Communication 6...

Page 50: ...ctor Control 2 RS 232 1 9 pin DB9 connector For Projector Control Allows for wired remote control and monitoring of many projector functions used in installation environments 3 Sync 3 BNC Sync Port IN...

Page 51: ...to the projector but is an undesirable response This will also happen if the startup current for the external equipment is too high even though the nominal power consumption is less than 0 5A 6 3 Maki...

Page 52: ...ax cable length 2 m 24 AWG RBR 2 m 24 AWG HBR1 HBR2 Supported Link Rate RBR HBR1 HBR2 Scan format Progressive Max input data resolution 2560x1600 120Hz WQXGA 3840x2400 60Hz 4K Max Bit depth 8 10 12 bi...

Page 53: ...ck 225HHz Video Datarate 5 3Gbps 70 m Cat5e 6 Pixel Clock 225HHz Video Datarate 5 3Gbps 100 m Cat6a 7 Pixel Clock 225HHz Video Datarate 5 3Gbps Max TMDS Clock Frequency 270 MHz Max video resolution su...

Page 54: ...lue USB connector Type A Function Firmware upgrade using USB sticks Power Power 5V max 1 5A out Standard USB 2 0 6 6 LED and Button indication chart Button Backlight Status Button Color status Descrip...

Page 55: ...re the LED will display red By critical error the projector cannot be restarted until the projector is disconnected from the power supply and then reconnected again If the reason for the error persist...

Page 56: ...R5906141 02 Medea series 56 Input Communication...

Page 57: ...ery powered infrared IR transmitter that allows the user to control the projector remotely This remote control is used for source selection control adaptation and set up Other functions of the remote...

Page 58: ...lue and red backlit LEDs The other keys are only equipped with white and blue backlit LEDs The LEDs are controlled according to the features available LCD panel The LCD panel has two main functions 1...

Page 59: ...up Wake on LAN and local power up button are supported 7 3 Power mode transitions 7 3 1 General Transition Diagram This diagram shows all modes available on the projector unplug ON READY ECO and the...

Page 60: ...DY Once the projector is in READY thePower on off button will be lit WHITE 7 3 5 Going from READY to ECO standby Description If ECO Standby mode is enabled in the service menu refer to the section GUI...

Page 61: ...the remote control to switch off the projector The projector will switch to READY mode first in order to run through a cool down phase see Power mode transitions page 59 2 If ECO Standby mode is enabl...

Page 62: ...nd if the projector operate in 25 C temp condition 7 7 Operation in 24 7 Mode General When the projector is destined to be operated continuously 24 hours a day 7 days a week Barco has a number of reco...

Page 63: ...adcast address of the remote control to the default value 0 This is the only broadcast address that will work when hardwired If you want to change the broadcast address after disconnecting the remote...

Page 64: ...jector Why a projector address As more than one projector can be installed in a room each projector should be separately addressable with an RCU or computer Therefore each projector has its own addres...

Page 65: ...ue 0 7 10 Quick setup via Direct access Quick source selection 1 Press the Input button on the remote control or local keypad I I Image 7 7 The Source selection menu opens on the LCD display Image 7 8...

Page 66: ...R5906141 02 Medea series 66 P P Image 7 9 The Test pattern menu opens on the LCD display 2 Use the arrow keys to select the desired test pattern Getting Started...

Page 67: ...67 About this chapter This chapter contains general maintenance procedures Overview Cleaning the lens Cleaning the exterior of the projector Filters R5906141 02 Medea series Maintenance 8...

Page 68: ...left liquid or stripes Polish with small circles 4 If there are still fingerprints on the surface wipe them off with lens cleaner together with a clean lens cleaning cloth Polish again with a dry one...

Page 69: ...69 Overview Specifications of the Medea M Dimensions of a Medea Technical Regulations R5906141 02 Medea series Specifications A...

Page 70: ...requires EN Series Lens Adapter EN44 2 50 4 60 1 requires EN Series Lens Adapter Optical lens shift Up to 64 vertical lens shift up to 20 horizontal lens shift depending on lens selection Motorized z...

Page 71: ...from Rear w Feet Down Left Side Exhaust from Rear w Feet Down Right Side Clearance Distances Front Left Right Rear 1cm 50cm 80cm 20cm Exhaust Airflow 221 ft3 min 22 9 C Dimensions WxLxH 480 x 680 x 2...

Page 72: ...eet screwed in hole Image A 1 Dimensions in mm CAUTION Take care to not exceed the maximum recommended tightening torque on the fixing screws Use a torque of 4 Nm for the M8 screws and the M6 screws A...

Page 73: ...R5906141 02 Medea series 73 Specifications...

Page 74: ...Barco Fredrikstad AS Habornveien 53 N 1630 Gamle Fredrikstad Norway Registered address Barco NV President Kennedypark 35 8500 Kortrijk Belgium www barco com R5906141 02 2018 12 13...

Reviews: