background image

R5913251 /00

FS-FL40 MKII series

30

Image 3

16

Enter the Apply button to confirm the action

3.6.7 Wired RC connection

About

The remote control can also be directly wired to the projector from the stereo jack connector on the remote,
(See

Functionality overview

page 28 ), to the RC connector on the back panel of the projector.(See section

Connector Panel

)

In this mode, the projector will not be affected by signals from other non-wired remote controls.

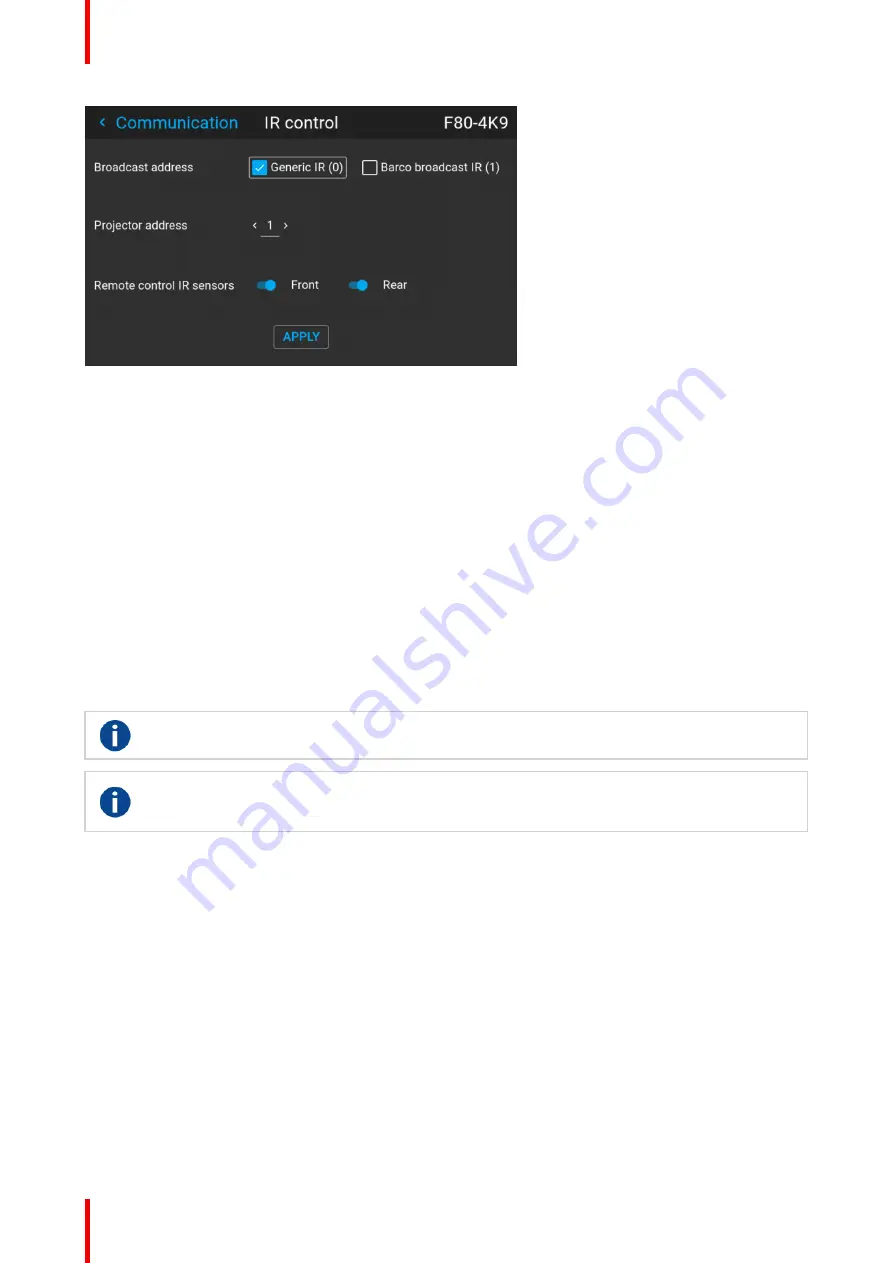
When using wired remote control, the broadcast address must be set to

Generic ID (0)

. See the menu in

Enable / Disable Remote Control

page 29.

It is not possible to program the remote control in wired mode. (Directly connected, no sense in programming).

3.7 Projector Address

Projector address

Address installed in the projector to be individually controlled.

Broadcast address

Projector will always execute the command coming from a RCU programmed with that broadcast
address.

3.7.1 Controlling the projector

Why a projector address?

As more than one projector can be installed in a room, each projector should be separately addressable with
an RCU or computer. Therefore each projector has its own address.

Set up an individual Projector Address

The set up of a projector address can be done via the software.

Projector controlling

When the address is set, the projector can be controlled now:

with the RCU: only for addresses between 1 and 31.

Broadcast Address

Every projector has a broadcast (common) address '0' or '1'. The default address is '0'.

Getting to know the projector.

Summary of Contents for FL40-4K

Page 1: ...ENABLING BRIGHT OUTCOMES User Manual FS FL40 MKII series...

Page 2: ...Registered office Barco NV President Kennedypark 35 8500 Kortrijk Belgium www barco com en support www barco com Barco NV Beneluxpark 21 8500 Kortrijk Belgium www barco com en support www barco com...

Page 3: ...with the limits for a class A digital device pursuant to Part 15 of the FCC rules These limits are designed to provide reasonable protection against harmful interference when the equipment is operated...

Page 4: ...the product or refund of purchase price Patent protection Please refer to www barco com about barco legal patents Disposal of batteries in the product This product contains batteries covered by the D...

Page 5: ...tup 18 3 Getting to know the projector 19 3 1 Location of the main exterior components 20 3 2 Service and maintenance 21 3 3 Power on Standby button backlight indications 21 3 4 LCD Panel 21 3 4 1 LCD...

Page 6: ...A port 42 5 2 Power up the projector 43 5 3 Power down the projector 43 5 4 Power mode transitions 43 5 4 1 General 43 5 4 2 Power on projector 44 5 4 3 Going from READY to ON 44 5 4 4 Going from ON t...

Page 7: ...understand and follow all safety guidelines instructions and warnings included in this chapter and this manual Clarification of the term FL40 series used in this document Use in this document of the t...

Page 8: ...he internal and external temperature rises radiation levels mechanical stability and strength enclosure construction and protection against the risk of fire Simulated single fault condition testing re...

Page 9: ...Always switch off the projector and disconnect from the mains power supply before attempting to remove any of the projector covers or access parts inside the projector This product contains no user s...

Page 10: ...built in installation or enclosure unless proper ventilation is provided Ensure that nothing can be spilled on or dropped inside the projector If this does happen switch off and unplug the mains supp...

Page 11: ...ny service or repairs to this projector ask the service technician to perform safety checks to determine that the product is in proper operating condition 1 3 Safety Symbols FL40 FS40 Description of s...

Page 12: ...with other municipal waste Please dispose of your waste equipment by handing it over to a designated collection point for the recycling of waste electrical and electronic equipment To prevent possibl...

Page 13: ...ctronic Information Products Component name Hazardous substances and elements Pb Hg Cd Cr6 PBB PBDE Printed Circuit Assemblies X O X O O O External Cables X O O O O O Internal wiring X O O O O O Lensh...

Page 14: ...Unit Lead Pb Mercu ry Hg Cadmi um Cd Hexava lent chromi um Cr6 Polybromi nated biphenyls PBB Polybromi nated diphenyl ethers PBDE Printed Circuit Assemblies O O O O External Cables O O O O O Internal...

Page 15: ...ional offices via the contact information given on Barco s web site www barco com Contact information Norway factory Barco Fredrikstad as Habornveien 53 N1630 Gamle Fredrikstad Norway Phone 476930 455...

Page 16: ...ITE Information Technology Equipment Warning This is a class A product In a domestic environment this product may cause radio interference in which case the user may be required to take adequate meas...

Page 17: ...17 R5913251 00 FS FL40 MKII series Important notice 2...

Page 18: ...e heard at startup from ready state to power ON every time the power has been disconnected This sound will appear every time the dimming disk needs to be calibrated during start up Mechanical sound fr...

Page 19: ...e main exterior components 20 3 2 Service and maintenance 21 3 3 Power on Standby button backlight indications 21 3 4 LCD Panel 21 3 5 Local keypad 25 3 6 Remote control 26 3 7 Projector Address 30 3...

Page 20: ...eft Back Top Bottom Image 3 1 Main Components 4 1 7 8 5 2 6 3 5 5 Image 3 2 Main exterior components matrix Item Number Component Item Number Component 1 IR Receiver top 5 Projector feet x4 2 IR Recei...

Page 21: ...g Standby ECO White heartbeat Software Lockup Red Severe errors Red Flashing When severe errors occur the failure description will always be available in the notification page in the status menu 3 4 L...

Page 22: ...ing the touch screen some menu pictures will be present different compared to using the remote control or keypad This applies in those cases where there is a numerical value to be set The illustration...

Page 23: ...and right arrow keys or by swiping the screen left or right The status screens are the following Dashboard The main overview This screen displays all the chosen options on the projector chosen source...

Page 24: ...resources Exit the input monitoring when not in use 3 4 4 OSD Menu mode About This is the projector setup menus explained in detail in their own chapters in this manual Source menu Image menu Install...

Page 25: ...Power on Standby button backlight indications page 21 for info regarding this 1 2 3 4 9 8 5 7 6 10 Image 3 9 Item No Name Description 1 LCD Display Shows navigation menu incl sub menus and projector s...

Page 26: ...ackage resulting in a shorter battery life time At delivery the batteries can be found in a separated bag attached to the remote control unit Before using your remote control install the batteries fir...

Page 27: ...can be switched between these protocols Which protocol to use The NEC protocol have to be used for Barco projectors based on the Pulse platform Loki Balder F40 F70 F80 F90 HDX 4K UDX UDM and more The...

Page 28: ...ontrol is a full feature wireless remote control powered by two 2 standard AA batteries The battery compartment is on the back side of the remote control The remote control is backlit for use in dark...

Page 29: ...g this button multiple times you will have different active filters in the following cycle Red Green Blue default Red only Green only Blue only Red Green Green Blue Red Blue Red Green Blue etc After p...

Page 30: ...ctly connected no sense in programming 3 7 Projector Address Projector address Address installed in the projector to be individually controlled Broadcast address Projector will always execute the comm...

Page 31: ...inly used in multiple projector installations with requirement of synchronization between the units Trigger 2 12VDC 0 5A 6W Trigger Out Voltage No Connection Ground For Controlling Peripherals like mo...

Page 32: ...R5913251 00 FS FL40 MKII series 32 Getting to know the projector...

Page 33: ...33 R5913251 00 FS FL40 MKII series 4 1 Approved lenses 34 4 2 Replace a lens 34 4 3 Locking the lens position 36 Lenses 4...

Page 34: ...2 UST 90 FLDX 0 38 1 Lenses other than above listed may also be used but the maximum throw ratio will be limited to 7 2 1 All lenses up to 7 2 1 belong to RG2 4 2 Replace a lens Lens lever The L40 len...

Page 35: ...position will not be showed with a correct value The functionality is still present but the displayed value is not correct Image 4 1 Install a lens 1 Verify that the projector shutter is activated sh...

Page 36: ...e Lens Shift function when the mechanically lens lock is performed If not the shift mechanism will be possible destructed if lens shift accidentally is performed from the remote control keypad and als...

Page 37: ...or indicated in the figure below Remove the front cover Image 4 6 Image 4 7 4 Tighten the screws indicated below Tighten the screws indicated by the red circles for locking the vertical movement Tight...

Page 38: ...R5913251 00 FS FL40 MKII series 38 Image 4 8 5 Reassemble the front cover Lenses...

Page 39: ...jector source and control connections 40 5 2 Power up the projector 43 5 3 Power down the projector 43 5 4 Power mode transitions 43 5 5 Power modes 45 5 6 Customize projector settings 45 5 7 User int...

Page 40: ...ecifications Parameter Value Connector DVI I female digital RGB Signal characteristics DVI 1 0 Digital TMDS Max cable length 25 m 24 AWG Max pixel rate 330 MHz dual link 165 Mhz single link Scan forma...

Page 41: ...8 10 12 bits EDID Supported HDCP Supported Ethernet No Audio return No HDCP Supported 5 1 2 4 HDBase T Specifications Parameter Value Reference specification HDBaseT 1 0 Specification June 2010 Conne...

Page 42: ...ojector 1x RS 232 for projector control 1x LAN Ethernet for projector control 2x USB A ports 5 1 3 1 RS 232 Specifications Parameter Value RS 232 connector 1 female DB9 connector RS232 in for projecto...

Page 43: ...y button on the keypad or the power button on the remote to bring the projector up to on mode The power button backlight on the keypad will flash blue while the projector is warming up 5 When the powe...

Page 44: ...ll BLINKING WHITE until READY mode is achieved Once in READY mode the Power On Off button will be lit WHITE 5 4 3 Going from READY to ON Description Press the Power On Off button on the projector or t...

Page 45: ...projector has WOL functionality that can be used for the projector to go from ECO mode to READY mode Use a json command for transition from READY to ON The WOL is performed by sending a Magic Packet f...

Page 46: ...tion Navigation You can navigate the OSD using the local keypad or the remote control Press the MENU button to display the OSD The OSD must be enabled press OSD button to enable Use the arrow keys to...

Page 47: ...47 R5913251 00 FS FL40 MKII series 6 1 Profiles introduction 48 6 2 Profiles setup parameters 48 6 3 Create new profile 49 GUI Profiles 6...

Page 48: ...seful in installations where the projector are used for different purposes Image 6 1 6 2 Profiles setup parameters Available profile settings Area of interest Settings Source Currently selected source...

Page 49: ...s Selected files S curve gamma Black Level Mask Black level Enabled status Width for each side File Black level Enabled status Selected file R G B gain values Illumination Illumination power for each...

Page 50: ...R5913251 00 FS FL40 MKII series 50 Image 6 2 3 Select the Edit button Image 6 3 The Profile edit menu shows up Image 6 4 4 Select New profile GUI Profiles...

Page 51: ...rol If assigned preset slot are set to 1 this profile can be recalled by pressing the key MACRO and then 01 on the remote control It is not a requirement to use this function just an option Note The m...

Page 52: ...a profile 1 Enter the Menu Profiles Edit Select the profile to be edited 2 Set or change the Assign to preset slot number or delete the actual profile It is not possible to add or remove selected fea...

Page 53: ...ly synchronized through the whole signal path from the signal source to the picture viewed through the 3D goggles See instructions in this chapter to set up the projector for this feature Active stere...

Page 54: ...bserved Repeat for both sides and adjust the Sync Delay slider until a clean picture is visible in each eye If the 3D picture looks a bit strange through the 3D goggles the solution is to swap eyes by...

Page 55: ...55 R5913251 00 FS FL40 MKII series Sync Delay You can increase or decrease the sync delay The scale goes from 10 000 s to 10 000 s with a step of 100 s 3D...

Page 56: ...R5913251 00 FS FL40 MKII series 56 3D...

Page 57: ...57 R5913251 00 FS FL40 MKII series 8 1 Upgrade procedure 58 Upgrade projector firmware 8...

Page 58: ...lace the projector in Ready mode status indicator is steady White Insert the USB Stick in to the rear USB port on the projector After a few seconds the status indicator will flash rate 3 Hz 180 FPM Th...

Page 59: ...59 R5913251 00 FS FL40 MKII series 9 1 Projector lenses 60 9 2 Projector cabinet 60 9 3 Filters 60 User maintenance Cleaning the projector 9...

Page 60: ...gain with a dry cloth If smears occur when cleaning lenses replace the cloth Smears are the first indication of a dirty cloth 9 2 Projector cabinet WARNING Always disconnect the projector from the mai...

Page 61: ...ile 49 D Disposal Information 12 E Enable Disable Remote Control 29 F Filters 60 Function RGB button 29 RGB filter 29 G General Considerations 8 Getting started Projector address 30 Terminology overvi...

Page 62: ...ariables 47 Projector Accessories 19 cleaning 59 Consumables 19 Low Frequencu Maintenance 19 Main Components 19 power down 39 power modes 39 power up 39 Projector address 30 Controlling 30 Projector s...

Page 63: ......

Page 64: ...Barco NV Beneluxpark 21 8500 Kortrijk Belgium Registered office Barco NV President Kennedypark 35 8500 Kortrijk Belgium www barco com R5913251 00 2020 08 26...

Reviews: