background image

Installation & Operating Instructions

Building Automation Products, Inc., 750 North Royal Avenue, Gays Mills, WI  54631 USA

Tel:+1-608-735-4800 • Fax+1-608-735-4804 • E-mail:[email protected] • Web:www.bapihvac.com

Specifications subject to change without notice.

rev. 02/09/21

39021_RCV_900_BACnet_2020

7 of 12

900MHz WAM Connect

• Bottom Dialogue Box:

 The dialog box at the bottom of this window displays the 

communication between the gateway and any sensors that are communicating with that gateway. 

Bottom Buttons: (not 

required to change for 

setup)

The “CLR” buttons clear the list 

should you need to clean it up 

for training purposes.  
The “Find” button below the left 

column is used to search for 

gateways and sensors if they 

have not already populated in 

the list. 
The column on the right allows 

you to turn off the sensor 

discovery application. 

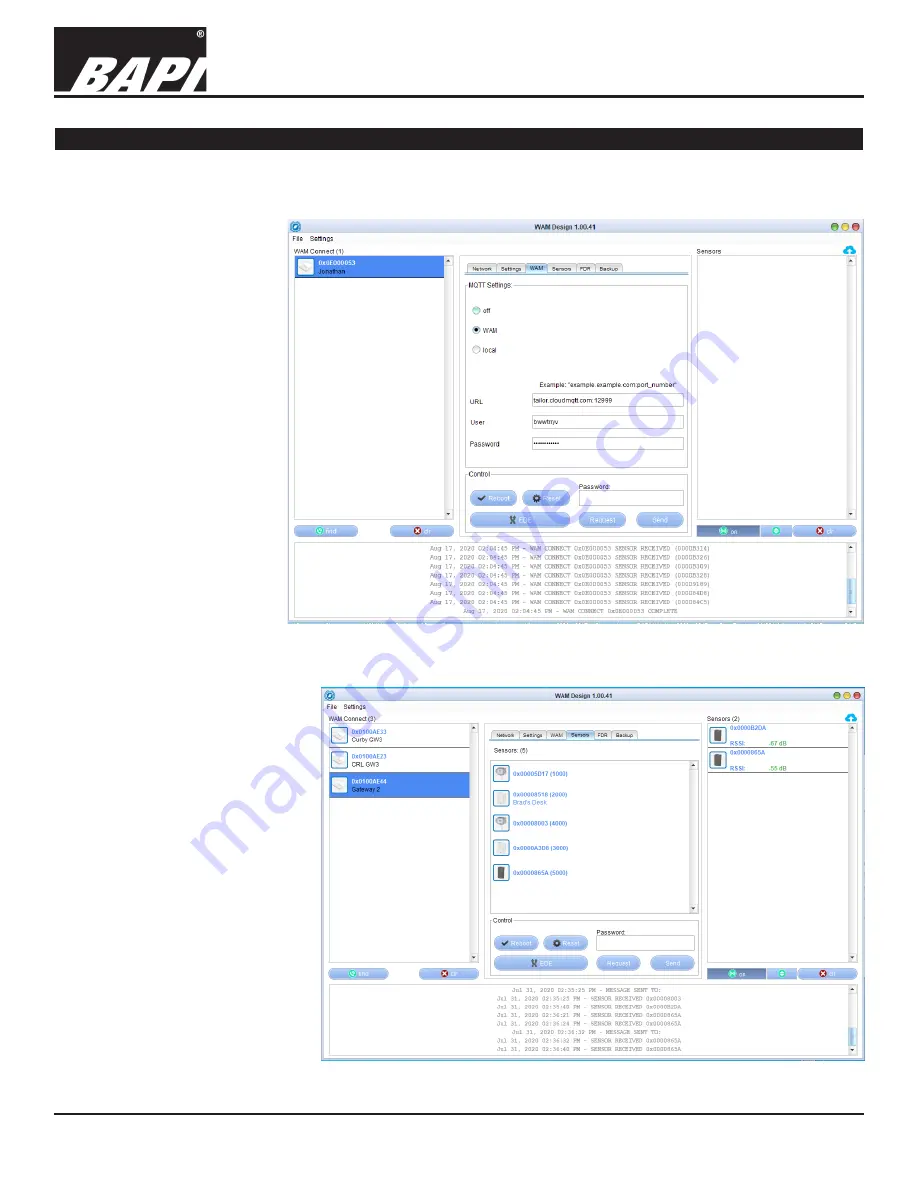
6. Configure the “WAM 

Tab”

Configure the options on the 

“WAM Tab” as needed.

Off:

 Turns off the MQTT output. 

WAM:

 Sends the MQTT output 

to the BAPI WAM System or 

your own MQTT Broker.

Local:

 Sends the information 

to an MQTT broker that sits on 

the LAN. 

URL:

 Location of the MQTT Broker.

User:

 Username for the MQTT 

Broker.

Password:

 Your Password for the 

MQTT Broker. 

7. “Handing off” Sensors to 

the Gateway

Sensors will appear in the right 

column once the battery is 

installed and WAM Link receives 

a transmission from the sensor (or 

the unit is powered for non-battery 

powered units). To assign or “hand off” 

a sensor to the gateway, click on the 

desired gateway from the left column 

of the Configuration Screen (Fig. 7). 

Then click the center “Sensors” tab. 

Now drag one of the available sensors 

from the right column to the center 

“sensors” column.
The “Link Sensor” dialog box will 

Fig. 6: 

Settings Tab on the Design Application Configuration Screen

Fig. 7: 

Configuration Screen showing a completed sensor setup

Continued on next page...

Setup continued...

Summary of Contents for 900 MHz WAM Connect

Page 1: ...900 MHz WAM Connect Wireless Gateway Installation and User Guide...

Page 2: ...cations subject to change without notice rev 02 09 21 39021_RCV_900_BACnet_2020 2 of 12 900MHz WAM Connect Table of Contents Mounting and Termination 3 Overview 4 Customer Provided Equipment and Mater...

Page 3: ...tenna connection Hold the gateway up to the plate and secure by twisting 1 4 turn clockwise POWER OPTIONS Direct 24VAC VDC Power Supply Included Power Over Ethernet PoE on board device LED INDICATORS...

Page 4: ...rarily place the gateway and sensors in their desired locations Material Attenuation Loss Brick 3 5 89 mm 3 5 dB Brick 7 178 mm 5 dB Brick 10 5 276 mm 7 dB Concrete 4 102 mm 12 dB Concrete 8 204 mm 23...

Page 5: ...the pull down box of the initial screen Fig 3 If it does not click the red retry arrows to the right of the box The WAM Link dongle should automatically identify itself to WAM Design software 3 Run th...

Page 6: ...stable Firmware Current Firmware Version Power Level Adjust the dBm level of the gateway radio Channel The gateway picks the channels to use There is no need to adjust this Unit Set the unit of measur...

Page 7: ...tion 6 Configure the WAM Tab Configure the options on the WAM Tab as needed Off Turns off the MQTT output WAM Sends the MQTT output to the BAPI WAM System or your own MQTT Broker Local Sends the infor...

Page 8: ...andoff of sensors to the gateway Note that all the sensors have been removed from the right column and are now in the center column These sensors are now handed off or assigned to the gateway that is...

Page 9: ...d them at least 10 apart the system will not recognise them For example if you assign BACnet IDs for three sensors as of 6000 6001 and 6002 the second two sensors will not save on the system because t...

Page 10: ...mple of what the BACnet Objects will look like from the BAPI Gateway using YABE Yet Another BACnet Explorer Notice the Object Instance ID changes based on the type of value being transmitted Fig 13 BA...

Page 11: ...nsor issues Suggestion the Heartbeat should be set to 3 times the transmit interval value to prevent a fault on one or two missed transmissions BACnet Information continued Fig 14 BACnet information f...

Page 12: ...3 Select the local folder that you created in Step 1 and click Open to save the backup to the folder You will receive a Backup Successful message as shown in Fig 19 RESTORE LOCAL 1 Go to the Backup t...

Reviews: