background image

Troubleshooting

The following troubleshooting tips include some basic instructions for common problems.

Startup Problems

Problem

Solution

Radio won't wake up

While in storage mode, the radio does not operate. All SureCross

®

 radios powered

from an integrated battery ship from the factory in storage mode to conserve the battery.
To wake the device, press and hold button 1 for five seconds. To put any FlexPower

®

 or

integrated battery SureCross radio into storage mode, press and hold button 1 for five
seconds. The radio is in storage mode when the LEDs stop blinking, but in some models,
the LCD remains on for an additional minute after the radio enters storage mode. After a
device has entered storage mode, you must wait one minute before waking it.

Sensors not powered

Many SureCross devices have several switch power outputs for powering sensors. Ena-
ble the power supplies using the I/O point parameters for sensor supply #, supply output
voltage, and warm-up time.

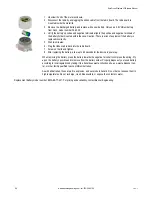
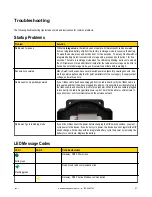
Radio seems only partially powered

If your ribbon cable has been unplugged from the radio board, verify the ribbon cable is
fully seated and that it has been plugged into all pins. It is possible to accidentally plug in
the ribbon cable and miss the top row of pins (shown). When the ribbon cable is plugged
in incorrectly, the radio may partially power up, but it will not be able to communicate to
any sensors nor will it communicate with the wireless network.

Radio won't go into binding mode

If you did not disconnect the power before changing the DIP switch positions, you must
cycle power to the device. If you do not cycle power, the device does not register the DIP
switch changes. For devices with an integrated battery, cycle the power by removing the
battery for one minute. Replace the battery.

LED Message Codes

LED 1

LED 2

Definition/Solution

Solid green

Gateway, DX85: Power is on

Flashing green

Node: Good radio communication link

Gateway, DX85: Active Modbus communication

rev. I

www.bannerengineering.com - tel: 763-544-3164

87

Summary of Contents for DX81H

Page 1: ...SureCross Wireless I O Network Manual rev I 10 25 2012 132607 ...

Page 2: ...wayPro 23 DX83 Ethernet Bridge 24 Setting Up Your Wireless Network 25 Using Extended Address Mode 25 Mixing Performance and Non Performance Radios in the Same Network 25 Applying Power to the Gateway or Node 26 Binding Radios to Form Networks 26 Verify Communications 27 Conducting a Site Survey Gateway and Nodes 27 Conducting a Site Survey Using the Menu System 28 Conducting a Site Survey Using Mo...

Page 3: ...lure 49 Units Defined 50 Interpreting Register Values in the Banner Wireless System 52 Setting up the Wireless Network Using the Rotary Dials 55 Setting Up the Wireless Network 55 Applying Power to the Gateway or Node 57 Verify Communications 58 System Layouts 59 Stand Alone Systems 59 Mapped Pairs DX70 59 Gateway with Multiple Nodes DX80 59 Gateway Configured as a Modbus Master 60 Modbus RTU 61 M...

Page 4: ...Gasket 83 Replacing the Rotary Dial Access Cover 83 Battery Replacement 84 DX81 and DX81H FlexPower Module Battery Replacement 84 DX81P6 FlexPower Module Battery Replacement 84 DX80 Integrated Battery Replacement 85 DX99 Battery Replacement DX99 B Housings 85 DX99 Battery Replacement DX99 D Housings 85 Troubleshooting 87 Startup Problems 87 LED Message Codes 87 LCD Message Codes 89 Modbus Message ...

Page 5: ...tt Radios 102 FCC Certification 2 4GHz 103 Certified For Use in the Following Countries 104 Exporting SureCross Radios 106 Warnings 107 Antenna Installation 107 Banner Engineering Corp Limited Warranty 107 Contact Us 107 Contents 5 ...

Page 6: ...l between the wireless network and the host controller When the Gateway using its Modbus RTU RS 485 connection is a Modbus slave to a Modbus RTU host controller the wireless network may contain up to 47 Nodes in a single wireless network and the Gateway holds the Modbus registers of all wireless devices within the network A Node is a wireless network end point device used to provide sensing capabi...

Page 7: ...ctly to the host system without using an Ethernet switchbox hub some host systems may require a crossover cable By default the DX83 is configured to use Modbus TCP To use EtherNet IP you must connect the DX83 to a managed switch and you must use the Web Configuration tool to select Ether Net IP see SureCross Wireless I O Product Manual or Host Configuration Manual Host Systems Host connected syste...

Page 8: ... Six pack battery supply module BWA SOLAR 001 Solar supply includes solar panel rechargeable batteries and controller DX81H Single battery supply module de signed specifically to power the DX99 In trinsically Safe devices with polycarbonate housings SureCross User Configuration Tool The User Configuration Tool UCT offers an easy way to link I O points in your wireless network view I O register val...

Page 9: ...exidecimal 1 to F Each Node within a network must have a unique Node Device Address 3 Push button 1 Single click to advance across all top level DX80 menus Single click to move down interactive menus once a top level menu is chosen Button 1 is also used to wake integrated battery mod els from the hibernation mode they ship in 4 Push button 2 Double click to select a menu and to enter manual scroll...

Page 10: ...the Gateway s LCD viewing device address The Gateway is predefined as Device Address 0 On the Node sets the Node s Device Address hexidecimal 1 to F Each Node within a network must have a unique Node Device Address 3 Push button 1 Single click to advance across all top level DX80 menus Single click to move down interactive menus once a top level menu is chosen 4 Push button 2 Double click to selec...

Page 11: ... and power requirements of the device Connecting dc power to the commu nication pins will cause permanent damage Wire No Wire Color Description 1 2 3 4 5 1 Brown 10 to 30V dc 2 White RS485 D1 B 3 Blue dc common GND 4 Black RS485 D0 A 5 Gray Comms Gnd 5 pin Euro Style Wiring Nodes Wiring the 5 pin Euro style connector depends on the model and power requirements of the device Wire No Wire Color 10 t...

Page 12: ...ugh the RUN menu and communication begins between the Gateway and Node s Auto looping through the RUN menu is the normal operating mode for all devices on the wireless network From the RUN Menu or any menu single click button 1 to advance through the top level menus The device auto display loops through the menu options if either of the RUN DINFO or FCTRY menus are selected If the device is paused...

Page 13: ...Survey Device Config Device Error 16 8 32 Single click Button 2 Single click Button 2 SAVES DISPLAYED VALUE Single click B1 MAXN Timing 48 MANUAL AUTO AUTO SET Single click Button 2 Single click Button 2 Single click B1 XADR Extended Addressing XADR ADJUST ROTARY SWITCH TO SET XADR Single click Button 2 XXXXXX Single click B1 Single click Button 2 CONFRM XADR XXXXX NETWRK Single click Button 2 BIN...

Page 14: ...u to power down the Node Press and hold Button 1 from power down mode to enter RUN mode ADJUST LEFT ROTARY SWITCH TO SET NETWORK ID ADJUST RIGHT ROTARY SWITCH TO SET NODE ADDRESS DEV I O XX NOD XX NID XX ON OFF Single click Button 1 Single click Button 1 Single click Button 1 DX80 MODEL 0x0000 2 0 00 Single click Button 1 to advance through menu MANUAL AUTO SET Single click Button 2 Single click B...

Page 15: ... or Node and the I O values of the device When using extended address mode the network ID NID is not used The Network ID is typically used only in rotary dial address mode On the Gateway the I O displayed may be the I O of the Gateway or of a selected Node To view the I O of a specific Node set the position of the rotary dials to the Node s address For example to view the I O of Node 12 set the Ga...

Page 16: ... the network ID NID slave ID baud rate and parity When in extended address mode the DINFO menu also displays the maximum Node setting and the extended addressing XADR or binding code used to form the network On the Node the DINFO menu displays the device type including the Node ad dress the device name and the network ID NID When using extended address binding mode the network ID value is no longe...

Page 17: ...000 2 PROD DATE 00 00 Single click Button 1 DX80 MODEL 0x0000 2 Factory s Gateway Node The FCTRY menu displays the version numbers of various compo nents within the device including the radio micro number the LCD number the device s serial number the device s model number and the production date Some of this information is important to know if you call for cus tomer support SureCross Wireless I O ...

Page 18: ...e the results of a Site Survey conduc ted with this Gateway The SITE menu displays the device number of the Node the Site Survey was conducted with as well as the missed green yellow and red received packet count For more information on determin ing what these values represent refer to the Site Survey chapter of this manual The SITE menu is only available on the Gateways SureCross Wireless I O Net...

Page 19: ... Baud and Parity The options for baud rate are 19200 38400 or 9600 For parity select None Even or Odd Extended Address Binding Code Binding Nodes to a Gateway ensures the Nodes only exchange data with the Gateway they are bound to After a Gateway enters binding mode the Gateway automatically generates and transmits a unique extended addressing XADR or binding code to all Nodes within range that ar...

Page 20: ...T ROTARY SWITCH TO SET NODE ADDRESS MANUAL AUTO SET Single click Button 2 Single click B1 XADR Extended Addressing XADR Adjust rotary switch to set XADR Single click Button 2 XXXXXX Single click B1 CONFRM XADR XXXXX NETWRK Single click Button 2 BINDNG Single click Button 1 or 2 Reboot Double click Button 2 BOUND Device Config Single click Button 2 PRIOR NADR XX NEW NADR XX CONFRM NADR XX Single cl...

Page 21: ...vices within the network The Node number that gener ated the error and the error code EC display onscreen Single click button 1 to advance through the menu of CLEAR clear this particu lar instance of the error from the system DISABL disable this particular error from appearing from this specific Node and IGNORE ignore this error but do not remove it from the system After the error messages for a N...

Page 22: ... 31 7 65 0 30 14 67 0 578 DX80 C Gateway and Node The DX80 C Gateways and Nodes have the same external and mounting dimensions 7 9 0 31 80 8 3 18 65 0 2 56 80 3 3 16 65 0 2 56 7 65 0 30 60 2 36 45 7 1 8 101 6 4 SureCross Wireless I O Network Manual 22 www bannerengineering com tel 763 544 3164 rev I ...

Page 23: ...ewayPro The DX80 GatewayPro has the same external and mounting dimensions as the Gateway and Node but does not have any side access holes or glands 65 0 2 56 65 0 2 56 80 3 3 16 80 8 3 18 60 2 36 136 5 35 7 9 0 31 7 65 0 30 14 67 0 578 SureCross Wireless I O Network Manual rev I www bannerengineering com tel 763 544 3164 23 ...

Page 24: ...dge has the same external and mounting dimensions but no side access holes or glands 65 0 2 56 7 9 0 31 80 3 3 16 65 0 2 56 7 65 0 30 60 0 2 36 14 67 0 578 80 8 3 18 136 5 35 SureCross Wireless I O Network Manual 24 www bannerengineering com tel 763 544 3164 rev I ...

Page 25: ...m the Gateway to which they are bound Note All SureCross Performance Gateways and Nodes are preconfigured for extended addressing mode and cannot use rotary dial address mode Skip this step in the installation procedure for all Performance products For all other SureCross DX80 models follow these steps to activate extended address mode After making any changes to DIP switch settings you must cycle...

Page 26: ...ode After binding your Nodes to the Gateway make note of the binding code displayed under the DVCFG menu XADR submenu on the LCD Knowing the binding code prevents having to re bind all Nodes if your Gateway is ever replaced 1 Put the Gateway in binding mode Option Description Two button Gateways Triple click button 2 One button Gateways Triple click the button Gateways without buttons Remove the r...

Page 27: ...l not sample its inputs until it is communicating with the Gateway to which it is bound LED 1 LED 2 Gateway Status Node Status green on Power ON green flashing RF Link OK red flashing red flashing Device Error Device Error yellow flashing Modbus Communication Active red flashing Modbus Communication Error No radio link when flashing once every three seconds For Gateway and Ethernet Bridge systems ...

Page 28: ...conduct a Site Survey with another Node and repeat steps 2 through 6 8 To end the Site Survey double click button 2 9 Change the Gateway s right rotary dial back to 0 The LCD displays the device readings for the Gateway 10 Double click button 2 to move back to the top level menu 11 Single click button 1 to return to RUN mode 12 Install the rotary dial access cover referring to the Installation sec...

Page 29: ...Site Survey send a control code of 32 0x20 and a Node number of 0 0x0 Site Survey Data Holding With Site Survey active registers I O 7 and 8 are Site Survey data holding registers that store the accumulated Site Survey results Error collections in holding register 8 are saved when Site Survey runs and restored after Site Survey is disabled Register 15 8 7 0 I O 7 Red Total Missed Total I O 8 Green...

Page 30: ...he network s antennas higher Using higher gain antennas or Adding data radios to the network Mounting the devices antennas higher allows the radio signal to clear obstacles in the area and improves the line of sight between SureCross devices Higher gain antennas will focus the energy of the radio signal in a specific direction and extend the signal s range Using data radios is another option to co...

Page 31: ...ces to avoid facing intense direct sunlight Mount under an overhang or other source of shade Install indoors or Face the devices north when installing outside For harsh outdoor applications consider installing your radio inside a secondary enclosure For a list of available enclosures refer to the Accessories list Avoid Collecting Rain Mount Vertically to Avoid Collecting Rain When possible mount t...

Page 32: ...ing and tighten using a slotting screwdriver Never apply more than 10 in lbf torque to the plastic plug This is not a lot of torque and is equivalent to the torque generated without using tools If a wrench is used apply only very light pres sure Torquing these fittings excessively damages the device Watertight NPT Plugs Seal the 1 2 NPT port if it is not used To install a watertight NPT plug 1 Wra...

Page 33: ...owing are some quick tips for improving the installation of wireless network components Create a Clear Communication Path Wireless communication is hindered by radio interference and obstructions in the path between the transmitter and receiver To achieve the best radio performance carefully consider the installation locations for the Gateways and Nodes and select locations without obstruc tions i...

Page 34: ...l cable to connect the antenna to the radio When installing a remote antenna system always include a lightning arrestor or coaxial surge suppressor in the system Remote antenna systems installed without surge protection invalidate the warranty of the radio devices Surge suppressors should be properly grounded and mounted at ground level near where the cabling enters a building Install the surge su...

Page 35: ...with rubber splicing tape and electrical tape Step 1 Verify both connections are clean and dry before connecting the antenna cable to the antenna or other cable and hand tightening Step 2 Tightly wrap the entire connection with rubber splicing tape Begin wrapping the rubber splicing tape one inch away from the connection and continue wrapping until you are one inch past the other end of the connec...

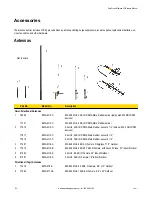
Page 36: ...scription 1 BWA 9O2 C Antenna Omni 902 928 MHz 2 dBd Rubber Swivel RP SMA MALE BWA 2O2 C Antenna Omni 2 4 GHz 2 dBd Rubber Swivel RP SMA MALE BWA 2O5 C Antenna Omni 2 4 GHz 5 dBd Rubber Swivel RP SMA MALE BWA 2O7 C Antenna Omni 2 4 GHz 7 dBd Rubber Swivel RP SMA MALE 2 BWC LMRSFRPB Surge Suppressor Bulkhead RP SMA Type 900 MHz 2 4 GHz 3 BWC 1MRSFRSB02 RG58 Cable RP SMA TO RP SMA Female Bulkhead 0 ...

Page 37: ...MA MALE 2 BWC 1MRSFRSB02 RG58 Cable RP SMA TO RP SMA Female Bulkhead 0 2 m BWC 1MRSFRSB1 RG58 Cable RP SMA TO RP SMA Female Bulkhead 1 m BWC 1MRSFRSB2 RG58 Cable RP SMA TO RP SMA Female Bulkhead 2 m BWC 1MRSFRSB4 RG58 Cable RP SMA TO RP SMA Female Bulkhead 4 m 3 BWC LMRSFRPB Surge Suppressor Bulkhead RP SMA Type 900 MHz 2 4 GHz 4 BWC 1MRSFRSB02 RG58 Cable RP SMA TO RP SMA Female Bulkhead 0 2 m BWC...

Page 38: ...the SureCross device mounted inside the box This configuration may be used either inside or outside the building though a Yagi antenna is usually used in outdoors applications while an omni directional antenna may be used either inside or outside a building 1 3 4 5 6 2 7 8 9 Model Number Description 1 BWA 9Y6 A Antenna Yagi 900 MHz 6 5 dBd N Female BWA 9Y10 A Antenna Yagi 900 MHz 10 dBd N Female B...

Page 39: ...A EF14128 Fiberglass enclosure 14 x 12 x 8 8 BWA PA1412 Internal panel 14 x 12 9 DX81 DX81 FlexPower Battery Supply Module DX81P6 DX81P6 FlexPower Battery Supply 6 Pack This example image depicts a DX80 radio with a 10 30V dc power supply The example installation may also work with the DX70 radios or MultiHop radios However the DX81 and DX81P6 FlexPower Battery Supply Modules can only power FlexPo...

Page 40: ...d of the cable is a RJ45 connector and the other end is an industrial Ethernet connector This cable is designed to be connected directly to a computer Example Layout 1 When connecting a DX80 Gateway to a host system the wireless network must be configured using the User Configuration Tool UCT When you are not using a GatewayPro or Ethernet Bridge you cannot configure the wireless network using the...

Page 41: ...0 GatewayPro device and many be accessed using any Internet browser Before accessing the Web based configuration screens configure the browser for a direct connection to the Internet If you are experi encing problems connecting verify the browser is not set to use a proxy server Note also that a crossover Ethernet cable is required when connecting directly from a host computer to the DX83 Ethernet...

Page 42: ... this page and file for your record More Details About Extended Address Mode During automatic binding the Gateway broadcasts the extended address code to all Nodes currently in binding mode To manually bind enter the extended address code manually into each network device Manually binding is particularly useful when replacing or upgrading network devices Important The extended addressing code is i...

Page 43: ... Single click button 2 to select DVCFG Single click button 1 to select from the available menu options stopping at XADR 6 Single click button 2 to enter the XADR menu AUTO is automatic binding mode and uses the Gateway s serial number as the extended address code 7 Single click button 1 to select manual mode 8 Single click button 2 to enter manual mode MANUAL allows the user to manually enter an e...

Page 44: ...le click button 2 to enter the extended address code entry step The LCD shows SET XADR 000000 10 Use the right rotary switch to begin setting the extended address code Digit selection begins with the left most digit After selecting the first digit single click button 1 to advance right to the next digit All six digits must be filled even if it is with leading zeros For example to use 2245 as the c...

Page 45: ... to the ON position Extended Addressing Mode is activated using DIP switch 1 3 Apply power to the Gateway The Gateway s LCD displays POWER then RUN 4 On the Gateway single click button 1 to advance across the menus stopping at the DVCFG menu The Gateway s LCD displays DVCFG 5 Single click button 2 to select DVCFG Single click button 1 to select from the available menu options stopping at XADR The ...

Page 46: ...d battery ship from the factory in storage mode to conserve the battery To wake the device press and hold button 1 for five seconds To put any FlexPower or integra ted battery SureCross radio into storage mode press and hold button 1 for five seconds The radio is in storage mode when the LEDs stop blinking but in some models the LCD remains on for an additional minute after the radio enters storag...

Page 47: ...es the communication rate between the Gateway and the host system to which it is wired Continuing from the previous menu position follow these steps to set the baud rate 1 Single click Gateway push button 1 to move to the next menu option the BAUD rate 2 Single click Gateway push button 2 to display the current setting Single click Gateway push button 1 to cycle through the available options Stop ...

Page 48: ...e DX80 Gateway device Modbus Timeout Gateway Link Failure with any Node device Node Link Failure with the Gateway Host Link Failure A host link failure is detected when the defined timeout period has elapsed with no communications between the host system or Modbus master device and the DX80 Gateway typically set to four seconds The Gateway places an error code in the Gateway I O 8 register and sen...

Page 49: ... are set to the user defined default state Each Node has a Gateway Link Failure flag that can be set or cleared depending on the particular application In the sample system shown the communication link between the Gateway and Node 1 has failed Node 2 must have its Gateway Link Failure flag set to allow its outputs that are linked to Node 1 are set to the defined default state when the communicatio...

Page 50: ...Selecting Temp C changes the threshold hysteresis and delta units to degrees Celsius Signed values range from 32768 to 32767 and allow for the measurement of negative values Signed values are typically used for measuring temperatures Signed values are stored as two s complement values Unsigned values range from 0 to 65535 and are used to measure values that do not go below zero such as 4 to 20 mA ...

Page 51: ...ault discrete unit LCD ON OFF 4 0 to 10V Volts Analog unit using 0 to 10V instead of current Modbus register contents are scaled such that 0 represents 0V and 65535 represents 10V LCD 0 00V 10 00V 5 Signed Analog 0 to 10V For a signed value such as temperature that is to be converted to a voltage out value Use null to set the start point and span to define the range The null value is the starting ...

Page 52: ... converted to a mA out value Use the null to set the start point and span to define the range The null value is the distance to be associated with 4 mA The span is the entire distance range that is to be associated with 4 to 20 mA LCD 4 00mA 20 00mA Interpreting Register Values in the Banner Wireless System The units conversion table defines the type and range of values for each type of I O The wi...

Page 53: ... registers as two s complement signed numbers Using two s complement allows negative num bers to be stored in Modbus registers Although not technically a sign bit the most significant bit MSB indicates a negative number when the value is set to one 1 When the most significant bit is zero 0 the value is greater than or equal to zero Modbus register values of 32768 through 65535 decimal represent ne...

Page 54: ...d the last temperature will be 50 F 4 mA 20 F 20 mA 50 F This defines the null as 20 F and the span as 70 With an input temperature value of 5 F the output value will be Output Fullscale Span InValue Null Offset Fullscale Span 16 70 0 22857 Value Null 5 20 15 Offset 4 Output 0 22857 15 4 7 42 mA Example Distance Map Map a distance input from a Node to a 0 10V output The starting distance is 200mm ...

Page 55: ...work ID NID assigned to the Gateway and its Nodes Each device within this common network must have a unique Device Address assigned When using Rotary Dial Address Mode set the Network ID on the Gateway and all its Nodes using the left rotary dial Set the Device ID using the right rotary dial 1 Remove rotary dial access covers Turn counterclockwise to remove and clockwise to tighten 2 On the Gatewa...

Page 56: ...econds The LCD shows SEARCH NID 2 1M 0S If the Network ID is not already in use the LCD displays NID OK and enters RUN mode 2 If the Network ID is already in use by another DX80 Gateway device an IN USE message displays Use the left rotary dial to select another ID 3 After selecting a new Network ID click button two once to restart Channel Search Mode The screen cycles between displaying the curre...

Page 57: ...ode 10 to 30V dc Node FlexPower 1 2 3 4 5 1 brown 10 to 30V dc input 10 to 30V dc 2 white RS485 D1 B 3 blue dc common GND dc common GND dc common GND 4 black RS485 D0 A 5 gray Comms gnd 3 6 to 5 5V dc Do not apply more than 5 5V dc to the gray wire 1 Apply power to the Gateway by connecting the 10 to 30V dc cable as shown The Gateway begins in RUN mode displays the current network ID NID then iden...

Page 58: ...w flashing Modbus Communication Active red flashing Modbus Communication Error No radio link when flashing once every three seconds For Gateway and Ethernet Bridge systems active Modbus communication refers to the communication between the Gateway and the Ethernet Bridge For GatewayPro systems the Modbus communication LEDs refer to the communication internal to the Gateway Pro For Gateway only sys...

Page 59: ...s system a DX70 pair is used to map I O in a simple one to one configuration Inputs on one DX70 is mapped to the outputs of the other device DX70 kits are configured at the factory and require no additional set up by the user Item Model No Description 1 DX70G DX70 Gateway 2 DX70N DX70 Node Gateway with Multiple Nodes DX80 In this configuration the Gateway is the master of the wireless network This...

Page 60: ... of the Modbus network This configuration is used when the I O capacity of the Gateway is exceeded The Gateway is configured with a table of mapping entries that allow the DX85 Expanded I O devices as Modbus slaves to be linked to the wireless Nodes The DX85 devices add additional I O points to the network through hard wired fieldbus connections on the Gateway side Note The four inputs eight outpu...

Page 61: ...I O 3 DX80N DX80 Nodes or FlexPower Nodes 81398 User Configuration Tool software included on SureCross documentation CD not shown BWA HW 006 RS 485 to USB adapter cable not shown Modbus RTU SureCross Wireless I O Network Manual rev I www bannerengineering com tel 763 544 3164 61 ...

Page 62: ...etwork collects I O data and sends it back to a Modbus host system Item Model No Description 1 DX80G DX80 Gateway 2 CSRB M1250M125 47M125 73 Cable RS 485 quick disconnect 5 pin Euro male trunk female branches black MQDC1 5 Cable RS 485 quick disconnect 5 pin Euro female single end lengths vary not shown Modbus RTU with Multiple Slave Devices In the example host controlled configuration the Gateway...

Page 63: ...ry not shown Modbus RTU with Multiple Slave Devices Layout 2 In this example host controlled configuration the Gateway is a Modbus slave to the host system but remains the master of the wireless network The Gateway is connected directly to the host system using a field bus connection This system also connects DX85 Expanded I O devices and a third party Modbus slave device to the serial bus to expa...

Page 64: ...s slave device 4 DX80N Nodes or FlexPower Nodes Modbus TCP and EtherNet IP Host Connected DX80 GatewayPro Connect a DX80 GatewayPro to a host system using the industrial Ethernet connection on the DX80 GatewayPro SureCross Wireless I O Network Manual 64 www bannerengineering com tel 763 544 3164 rev I ...

Page 65: ...GatewayPro as a Modbus client device change the configuration using the configuration Web pages Item Model No Description 1 DX80P 6S DX80 GatewayPro Protocol converter or Advanced Config 2 BWA EX2M Ethernet Cable M12 Industrial RJ45 Crossover 2 m using Modbus TCP or EtherNet IP SureCross Wireless I O Network Manual rev I www bannerengineering com tel 763 544 3164 65 ...

Page 66: ...work 1 Fieldbus connection 2 Data radio 3 Modbus master device 4 Modbus slave device Data Radios with DX85 Modbus RTU Remote I O Devices In this example network DX85 Extended Remote I O devices are wired to the data radios and act as Modbus master or slave devices The data radios extend the range of the Modbus network 1 Fieldbus connection 2 DX85 as Modbus master 3 Data radio 4 DX85 as Modbus slav...

Page 67: ...0G DX80 Gateway configured as a Modbus master for this example 2 DX85M DX85 Modbus RTU Remote I O configued as a Modbus slave for this example 3 DX80DR M H MultiHop Data Radio 4 DX80N Nodes or FlexPower Nodes 5 Fieldbus connection SureCross Wireless I O Network Manual rev I www bannerengineering com tel 763 544 3164 67 ...

Page 68: ...e DX80 device to which they are connected The power sources do not have to be the same Discrete Inputs Sourcing Two Wire Sensors Three Wire Sensors DIx PWR 10 30V dc DIx GND dc common PWR 10 30V dc Wiring diagram for a sourcing PNP two wire sensor powered us ing the DX80 device terminal block The sensor s power source might need to be the same as the SureCross device power source Wiring diagram fo...

Page 69: ... sourcing PNP two wire output load powered using the DX80 device terminal block Under certain conditions the dc commons between the load and the DX80 might need to be connected Wiring diagram for a sinking NPN two wire output Under certain conditions the dc commons between the load and the DX80 might need to be connected The sensor s power source might need to be the same as the SureCross device p...

Page 70: ...s Only connect sensor outputs to analog inputs Analog Inputs Powered from Switch Power Two Wire Sensors Three Wire Sensors AIx SPx GND sensor dc common AIx SPx GND sensor dc common Two wire analog sensor or two wire NAMUR proximity sensor us ing a FlexPower Node and powered using the Node s switch power Do not exceed analog input ratings for analog inputs Only connect sensor outputs to analog inpu...

Page 71: ...K red yellow R red black Analog Inputs QT50U Long Range Ultrasonic Sensor QT50U Ultrasonic Sensor sensor power bn dc common bu wh bk QT50U A1 GND SP1 A1 Four wire QT50U sensor using a FlexPower Node and pow ered using the Node s switch power terminal The QT50U output is set to 4 20 mA Do not apply power to the Ax connection Analog Outputs Analog Outputs Three Wire Sensors Powered from the DX80 Ter...

Page 72: ... AI AI Drive motor controllers AOx GND AI AI When the AI can be referenced to ground use this wiring diagram for drive motor controllers When the AI cannot be referenced to ground use this wiring dia gram for drive motor controllers SureCross Wireless I O Network Manual 72 www bannerengineering com tel 763 544 3164 rev I ...

Page 73: ...s unique power management system can operate a FlexPower Node and an optimized sensing device for up to five years on a single lithium D cell The FlexPower Node may be powered from 10 to 30V dc and use an external battery supply module to provide a battery back up solution When a FlexPower Node receives 10 to 30V dc it operates like a standard 10 to 30V dc Node Good applications for FlexPower devi...

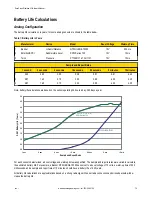
Page 74: ...ed table of DIP switch configurable parame ters The FlexPower switched power management system can operate a FlexPower Node and a sensing device for up to five years on a single lithium D cell Warmup Time 0 Volts Switch Power Sample point Sample point Sample interval Voltage FlexPower with Integrated Battery A few FlexPower devices operate using a 3 6V lithium D cell battery integrated into the ho...

Page 75: ... sensor operating 24 hours a day 365 days a year QT50ULBQ6 75390 PT100R 11 L13 H1131 KPSI Series 700 0 0 0 5 1 0 1 5 2 0 2 5 3 0 3 5 4 0 4 5 5 0 1 sec 2 sec 4 sec 16 sec 64 sec 5 min 15 min Sample and Report Rates DX81 Battery Life Years For each sensor characterized a boost voltage and warmup time was specified The sample and reports rates were varied to calculate the estimated battery life For e...

Page 76: ...ge and warmup time was specified The sample and reports rates were varied to calculate the estimated battery life For example a Banner Optical sensor model SM312DQD 78419 set to a boost voltage of 5 volts a warm up time of 4 milliseconds and a sample and report rate of 16 seconds should have a battery life of just over 6 years The curves for discrete devices represent a worst case as far as batter...

Page 77: ...ery Life To estimate the battery life for a sensor not included in our list use the configuration and cable shown Banner cable BWA HW 010 to measure the current draw of your system 1 Connect the cable to the FlexPower Node and the battery supply module as shown below The cable s male end plugs into the Flex Power Node and the female end plugs into the battery module 2 Connect an averaging Fluke me...

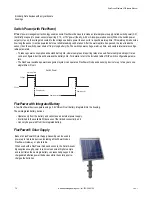
Page 78: ...ered Systems For installations without wired power a solar powered system with an integrated solar controller and rechargeable batteries may be used to power data radios FlexPower Gateways or FlexPower Nodes connected to sensors that require more power than a single battery unit can supply 1 3 4 5 SureCross Wireless I O Network Manual 78 www bannerengineering com tel 763 544 3164 rev I ...

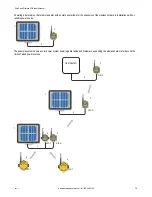
Page 79: ...liable power source 1 2 5 The example system shows a solar power system powering data radios and Gateways expanding the wireless network far beyond the limits of wired power sources Host System 2 5 1 5 2 2 7 1 6 6 8 NID A NID A NID A NID 1 NID 1 NID 1 SureCross Wireless I O Network Manual rev I www bannerengineering com tel 763 544 3164 79 ...

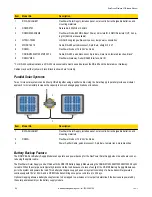
Page 80: ...me challenging applications or locations 2 3 1 Item Model No Description 1 BWA SOLAR 001 FlexPower Solar Supply includes panel solar controller rechargeable batteries and mounting materials 2 DX80N FlexPower Node or 10 to 30V dc Node 3 Power Splitter Cable quick disconnect 5 pin Euro female trunk male branches Battery Backup Feature The DX81P6 6 Pack Battery Supply Module can operate as a power ba...

Page 81: ... 21V courtesy power output 2 3 1 Item Model No Description 1 BWA SOLAR 001 FlexPower Solar Supply includes panel solar controller rechargeable batteries and mounting materials 2 Pressure Transmitter 4 20 mA two wire 3 DX80N9X2S CS1 FlexPower Node for continuous sensor operation Wireless Network Range Extension For extending the range of the wireless network the solar panel and rechargeable battery...

Page 82: ...tteries and mounting materials 2 DX80N FlexPower Node or 10 to 30V dc Node 3 DX80G M2S FlexPower Gateway No I O 4 DX80DR M Data radio 900MHz or 2 4GHz 5 CSRB M1250M125 47M125 73 Cable RS 485 quick disconnect 5 pin Euro male trunk female branches black SureCross Wireless I O Network Manual 82 www bannerengineering com tel 763 544 3164 rev I ...

Page 83: ... ring every time the access cover is removed Replace the o ring when it is damaged discolored or showing signs of wear The o ring should be Seated firmly against the threads without stretching to fit or without bulging loosely and Pushed against the flanged cover When removing or closing the rotary dial access cover manually twist the cover into position Do not allow cross threading between the co...

Page 84: ...facility qualified to accept lithium batteries As with all batteries these are a fire explosion and severe burn hazard Do not burn or expose them to high temperatures Do not recharge crush disassemble or expose the contents to water Replacement battery model number BWA BATT 001 For pricing and availability contact Banner Engineering DX81P6 FlexPower Module Battery Replacement To replace the lithiu...

Page 85: ...ontact Banner Engineering DX99 Battery Replacement DX99 B Housings To replace the lithium D cell battery in the metal housings with integrated batteries follow these steps 1 Unscrew the lid on the back side of the metal enclosure 2 Remove the discharged battery and replace with a new battery Only use a 3 6V lithium battery from Xeno model number XL 205F 3 Verify the battery s positive and negative...

Page 86: ... replacing the battery allow up to 60 seconds for the device to power up When removing the battery press the battery towards the negative terminal to compress the spring Pry up on the battery s positive end to remove from the battery holder Properly dispose of your used battery according to local regulations by taking it to a hazardous waste collection site an e waste disposal cen ter or other fac...

Page 87: ...arameters for sensor supply supply output voltage and warm up time Radio seems only partially powered If your ribbon cable has been unplugged from the radio board verify the ribbon cable is fully seated and that it has been plugged into all pins It is possible to accidentally plug in the ribbon cable and miss the top row of pins shown When the ribbon cable is plugged in incorrectly the radio may p...

Page 88: ...r bad cable Flashing red Node No radio communication There are two settings on every Node device used to synchronize to the Gateway device The Node must be bound to the Gateway Each Node ID within that network must be set to a unique number Solutions 1 If the Gateway and Node are less than two meters apart device communi cation may fail radios may saturate If the Gateway is less than two meters fr...

Page 89: ...d by a Node the Gateway considers the radio link with that Node to be timed out All outputs on the Node in question are set to the user selected default state or the output holds its last state depending on user configuration options set using the User Configuration Tool If the Node s RF link recovers and the Gateway or GatewayPro determines enough acknowledged polling messages have accumulated th...

Page 90: ...hough the LCD and device may appear functional the battery may not have enough capacity to handle the cur rent requirements of RF communications 36 01 Modbus time out A Gateway timeout time of inactivity on the serial channel was detected Decimal value 13825 When the least significant bit is on 1 an error condition exists FE Modbus register 8 device messages are disabled The Modbus register 8 clea...

Page 91: ...ink status of each Node on the network If after a specified number of sequential polling cycles the Node does not acknowledge a message the Gateway considers the link with that Node timed out LCD displays on both the Node and Gateway show ERROR Following a time out the Node de energizes outputs and the Gateway sets all outputs linked to the Node in question to a de energized state Inputs from the ...

Page 92: ...1 4 ships with 2 4 GHz DX80 devices 77817 BWA 2O5 C 2 4 GHz 5 dBi RP SMA Male Rubber swivel 6 1 2 77818 BWA 2O7 C 2 4 GHz 7 dBi RP SMA Male Rubber swivel 9 1 4 3 77481 BWA 9O6 A 902 928 MHz 6 dBd N Female Fiberglass 71 5 Outdoor 4 77819 BWA 9O5 B 902 928 MHz 5 dBd 7 2 dBi N Female with Ground Plane 32 Indoor Outdoor 5 81080 BWA 2O8 A 2 4 GHz 8 5 dBi N Female 24 Indoor Outdoor 6 81081 BWA 2O6 A 2 4...

Page 93: ...screte OUT 79307 10203 DX85M8P4 DX85 Expanded Remote I O 8 Discrete IN 4 Discrete OUT 79966 10205 DX85M0P0M4M4 DX85 Expanded Remote I O 4 Analog IN 4 Analog OUT 0 20 mA Note Add a C to the end of any DX85 model to order that I O mix with an IP20 housing The IP20 models are Class I Division 2 certified All list prices and data sheets remain the same for either the IP67 or the IP20 housing FlexPower...

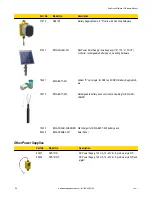
Page 94: ...ttery Supply Mod ule 78473 BWA BATT 003 Rechargeable battery pack controller and wiring for BWA SO LAR 001 10250 BWA SOLAR CHARGER Wall charger for BWA BATT 003 battery pack 83245 BWA SPANEL 001 Solar Panel Other Power Supplies Part No Model No Description 65837 SPS101Q DC Power Supply 120 mA 12 30V dc 5 pin Euro style QD 65848 SPS101QP DC Power Supply 120 mA 12 30V dc 5 pin Euro style QD and pigt...

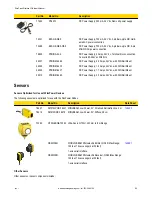
Page 95: ... PSDINM 24 25 DC Power Supply 2 5 Amps 24V dc with DIN Rail Mount Sensors Sensors Optimized for Use with FlexPower Devices The following sensors are optimized for use with the FlexPower Nodes Part No Model No Description Data Sheet 78447 SM312LPQD 78447 MINI BEAM Low Power 5V Polarized Retroreflective 3 m 134420 78419 SM312DQD 78419 MINI BEAM Low Power 5V Diffuse 38 cm 75390 QT50ULBQ6 75390 Ultra ...

Page 96: ...477 BWC LFNBMN DC Surge Suppressor bulkhead N Type dc Blocking Cables Antenna Cables 1 2 3 Part No Model No Description 1 77486 BWC 1MRSMN05 LMR200 RP SMA to N Male 0 5M 77820 BWC 1MRSMN2 LMR200 RP SMA to N Male 2M 2 78544 BWC 1MRSFRSB0 2 RG58 RP SMA to RP SMAF Bulkhead 0 2M 78337 BWC 1MRSFRSB1 RG58 RP SMA to RP SMAF Bulkhead 1M 78338 BWC 1MRSFRSB2 RG58 RP SMA to RP SMAF Bulkhead 2M 77488 BWC 1MRS...

Page 97: ...t No Model No Description 83265 CSRB M1250M125 47M125 73 Splitter cable 5 pin Euro style QD No trunk male two female branches black shown Use to split power between two FlexPower or solar powered devices DO NOT use this cable to connect a FlexPower devi ces to a 10 30V dc powered device 75286 CSB M1240M1241 Splitter cable 4 pin Euro style QD No trunk male two female branches yellow not shown Used ...

Page 98: ...n Euro style single ended male straight 0 5m longer pigtail ends for DX80 C models 51127 MQDC1 506 Cordset 5 pin Euro style single ended female 1 83m 47812 MQDC1 515 Cordset 5 pin Euro style single ended female 4 57m 47814 MQDC1 530 Cordset 5 pin Euro style single ended female 9 14m 51128 MQDC1 506RA Cordset 5 pin Euro style single ended female right angle 1 83m 47813 MQDC1 515RA Cordset 5 pin Eur...

Page 99: ... Box 18 26V dc inputs isolated relay outputs not shown Replacement Parts Part No Model No Description Items 76907 BWA HW 001 Mounting Hardware Kit Screw M5 0 8 x 25 mm SS 4 Screw M5 0 8 x 16mm SS 4 Hex nut M5 0 8mm SS 4 Bolt 8 32 x 3 4 SS 4 76906 BWA HW 002 DX80 Access Hardware Kit Plastic threaded plugs PG 7 4 Nylon gland fittings PG 7 4 Hex nuts PG 7 4 Plug 1 2 NPT Nylon gland fitting 1 2 NPT 76...

Page 100: ... bottom 10 DIN 35 105 DIN Rail section 105 mm long 35 mm design 77161 SMBDX80DIN Bracket assembly DIN rail flat mount 81930 FTH FIL 001 Temperature and Humidity Sen sor Filters Aluminum Grill Filter Cap default filter cap 81931 FTH FIL 002 Stainless Steel Sintered Filter 10 micrometer poros ity 10283 BWA HW 011 Terminal Block Headers IP20 2 pack 10878 BWA HW 012 DX99 Antenna Extension Pack Screw M...

Page 101: ...ation This equipment gen erates uses and can radiate radio frequency energy and if not installed and used in accordance with the instructions may cause harm ful interference to radio communications However there is no guarantee that interference will not occur in a particular installation If this equipment does cause harmful interference to radio or television reception which can be determined by ...

Page 102: ... reasonable protection against harmful interference in a residential installation This equipment gen erates uses and can radiate radio frequency energy and if not installed and used in accordance with the instructions may cause harm ful interference to radio communications However there is no guarantee that interference will not occur in a particular installation If this equipment does cause harmf...

Page 103: ...re designed to provide reasonable protection against harmful interference in a residential installation This equipment gen erates uses and can radiate radio frequency energy and if not installed and used in accordance with the instructions may cause harm ful interference to radio communications However there is no guarantee that interference will not occur in a particular installation If this equi...

Page 104: ...r use in the following countries Radio Modules Country 900 MHz 150 mW 900 MHz 1 Watt 2 4 GHz 65 mW Australia x Austria x Bahamas The x x Bahrain Kingdom of x Belgium x Brazil x Bulgaria x Canada x x x Chile x China People s Republic of x Colombia x x Cyprus x Czech Republic x Denmark x Ecuador x Estonia x Egypt x Finland x France x Germany x Greece x Hungary x Iceland x India x Ireland x SureCross...

Page 105: ...rements of the Canadian Interference Causing Equipment Regulations Operation is subject to the following two conditions 1 this device may not cause harmful interference and 2 this device must accept any interfer ence received including interference that may cause undesired operation Cet appareil numérique de la classe A respecte toutes les exigences du Règlement sur le matériel brouiller du Canada...

Page 106: ...t more than that permitted for successful communication Transmit Power Levels The SureCross wireless products were certified for use in these countries using the standard antenna that ships with the product When using other antennas verify you are not exceeding the transmit power levels allowed by local governing agencies Exporting SureCross Radios It is our intent to fully comply with all nationa...

Page 107: ...roper application or installation of the Banner product THIS LIMITED WARRANTY IS EXCLUSIVE AND IN LIEU OF ALL OTHER WARRANTIES WHETHER EXPRESS OR IMPLIED IN CLUDING WITHOUT LIMITATION ANY WARRANTY OF MERCHANTABILITY OR FITNESS FOR A PARTICULAR PURPOSE AND WHETHER ARISING UNDER COURSE OF PERFORMANCE COURSE OF DEALING OR TRADE USAGE This Warranty is exclusive and limited to repair or at the discreti...

Page 108: ...ice 8F 2 No 308 Sec 1 Neihu Rd Taipei Taiwan 114 Tel 886 0 2 8751 9966 Fax 886 2 8751 2966 www bannerengineering com tw info bannerengineering com tw Banner Engineering India Pune Head Quarters Office No 1001 Sai Capital Opp ICC Senapati Bapat Road Pune 411016 INDIA Tel 91 0 20 66405624 Fax 91 0 20 66405623 www bannerengineering co in india bannerengineering com SureCross Wireless I O Network Manu...

Page 109: ...2 54 G gasket main body 83 glands and plugs 32 ground 32 33 ground wire 34 36 38 107 I I O isolation 34 36 38 input value 52 54 integrated battery 74 L lightning arrestor 34 36 38 link time out 91 M mechanical stress 32 33 Modbus communication parameters 46 N no LCD 89 null 52 54 O offset 52 54 outdoor installations 31 32 overvoltage transients 32 33 P parity 47 polling 91 power 10 to 30V dc 73 Fl...

Page 110: ...ion warrants its products to be free from defects for a period of one year Banner Engineering Corporation will repair or replace free of charge any product of its manufacture found to be defective at the time it is returned to the factory during the warranty period This warranty does not cover damage or liability for the improper application or installation of Banner products This warranty is in l...

Reviews: