background image

60


97654 v.7

4. 

Select "

Stock Final Drive

" to 

input the vehicle's stock final drive 
information. See 

Figure 12-5, B. 

A. 

Scroll 

UP

 or 

DOWN

 to 

adjust the value. 

B.

 Select the desired value to 

save the setting.

5. 

Select "

Current Final Drive

" to 

input the vehicle's current final drive 
information. See 

Figure 12-5, B.

A. 

Scroll 

UP

 or 

DOWN

 to 

adjust the value. 

B.

 Select the desired value to 

save the setting.

6. 

The vehicle speed displayed on the 

iDash 1.8 will now be corrected for the 
current final drive ratio on the vehicle.


This will only correct the 

iDash 1.8 speed reading, it will not 
correct your vehicles instrument 

cluster speedometer

.

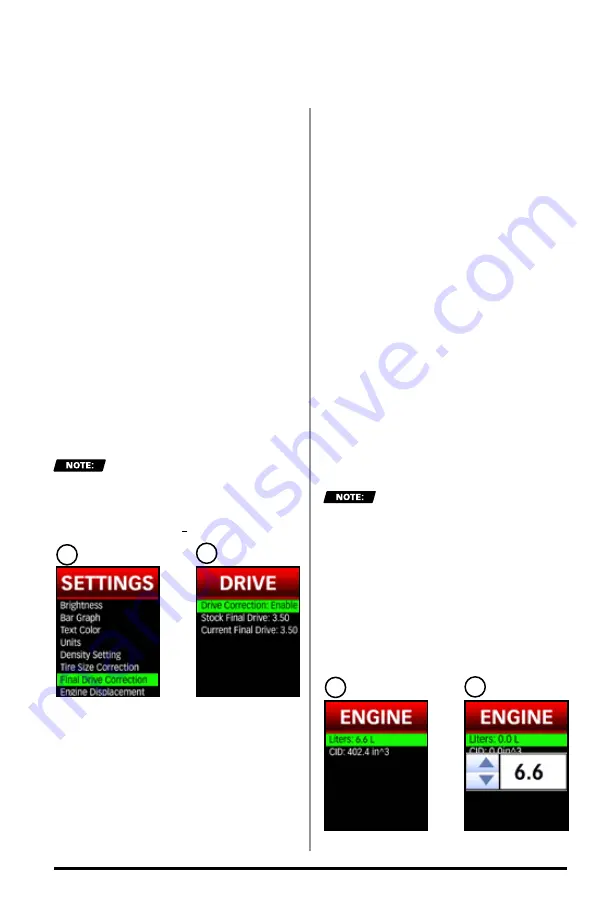
12.8 Engine Displacement

Engine displacement is required to 
calculate the volume of air being 
pumped through the engine (CFM). It 
is also necessary to calculate Cylinder 
Head Efficiency. 
When you first boot-up your new iDash 
1.8, it will prompt you to input this 
information. 

To change the "Engine 

Displacement" setting:

1. 

Select "

Settings

"


from the main 

"

MENU

."

2. 

Select 

"Engine Displacement."

3. 

Either select "

Liters

" or "

CID

(Cubic Inches of Displacement) to input 

the vehicle's engine displacement.  

See 

Figure 12-6, A.

4. 

Scroll 

UP

 or 

DOWN

 to adjust the 

value. See 

Figure 12-6, B.


The "

Liters

" and "

CID

setting are linked. They will update 
to match each other when either 
parameter is changed. The values will 
adjust to the nearest 0.1 Liter.

5. 

Select the desired value to save the 

setting.

6. 

Return to the 

Gauge Screen


when finished.

Figure 12-5


A

B

SETTINGS, 

CONTINUED

Figure 12-6


A

B

Summary of Contents for 61410

Page 1: ...08 B2 Gale Banks Engineering 546 Duggan Avenue Azusa CA 91702 626 969 9600 Fax 626 334 1743 Product Information Sales 888 635 4565 Customer Support 888 839 5600 Installation Support 888 839 2700 bankspower com 2019 Gale Banks Engineering Owner sManual with Installation Instructions See link below for iDash video references overview installation features etc www bankspower com iDash ...

Page 2: ...auges in the display change on screen safety alerts log vehicle data interact with other Banks devices all on the fly and at the touch of a button With the iDash you can also scan and clear OBDII diagnostic codes It gives you virtually endless functionality and fits in an optional mount on your windshield or most mounts with a 52mm 21 16 hole The iDash is a standalone vehicle data system that give...

Page 3: ...97654 v 7 3 ...

Page 4: ...OFTWARE INTRODUCTION AND Interface 20 3 1 Button Navigation 20 3 2 First Start Up 21 3 3 Sleep Mode Wake up 21 Section 4 LAYOUT 28 4 1 Layout Selection 28 4 2 Density Layout 28 4 3 Banks Module Specific Layouts 29 Section 5 GAUGE SELECTION 30 5 1 Parameter Selection 30 Section 6 DATA LOGGING IF EQUIPPED 31 6 1 Change Parameters to be Data Logged 31 6 2 Start Stop Data Log 32 6 3 Auto Log Feature 3...

Page 5: ...12 SETTINGS 53 12 1 Layout 53 12 2 Brightness 53 12 3 Bar Graph 56 12 4 Text Color 58 12 5 Units 58 12 6 Tire Size Correction 59 12 7 Final Drive Correction 59 12 8 Engine Displacement 60 12 9 Vehicle Selection 61 12 10 Wake up 62 12 11 Check Engine Light Quick Clear 62 12 12 SpeedBrake Tuner Auto Switch iDash 1 8 Banks Bus 1 ONLY 63 12 13 Reset 64 Section 13 SYSTEM INFORMATION 65 Section 14 FIRMW...

Page 6: ...o liability regarding the improper installation or misapplication of its products It is the BUYER s responsibility to check for proper installation and if in doubt contact the manufacturer The BUYER is solely responsible for all warranty issues from the automotive manufacturer The use of this device signifies automatic approval of these conditions GALE BANKS ENGINEERING LIMITED WARRANTY Please see...

Page 7: ... to you EXCLUSIONS The following are excluded from the warranty coverage a periodic maintenance and repair or replacement of parts due to normal wear and tear b finishes c installations or defects resulting from installation d any damage caused by i shipping misuse abuse negligence tampering moisture Fluids proximity or exposure to heat or improper use ii disasters such as fire flood wind and ligh...

Page 8: ...AS THIS COULD LEAD TO AN ELECTRICAL SHOCK DO NOT USE the iDash NEAR A NATURAL GAS LEAK Check local regulations for disposal of electronic products COPYRIGHT INFORMATION Products and corporate names appearing in this manual are for identification purposes only These names may or may not be registered trademarks or copyrights owned by these corporations Their use by Gale Banks Engineering is for the...

Page 9: ...ale of and or distribution of copies of this SOFTWARE are strictly forbidden It is a violation of this EULA to sell loan rent lease borrow or transfer the use of copies of the SOFTWARE unless it is permitted by the terms and or conditions of a separate agreement signed by Company 3 DISCLAIMER OF WARRANTY THIS SOFTWARE AND THE ACCOMPANYING FILES AND OR UPDATES ARE DISTRIBUTED and SOLD AS IS AND WIT...

Page 10: ...htning strikes create the risk of electric shock IN VEHICLE PRECAUTIONS Use this unit in 12V DC negative ground vehicles only WARNING 22 F 30 C to 176F 80 C the iDash may be susceptible to damage as a result of extended direct exposure to sunlight heat or extreme cold If the vehicle will be subjected to these conditions we highly recommend that you remove the iDash from its mounting location Gale ...

Page 11: ...ren Failure to do so can cause an injury to the child or others due to mishandling of the iDash Do not install the iDash in a location where it will be splashed by water or subjected to large amounts of humidity dust or oil smoke This can increase the risk of smoke combustion electric shock and accident PRECAUTIONS DURING USE To protect the Liquid Crystal Display LCD avoid exposure to direct sunli...

Page 12: ...ort See Figure 2 1 For some vehicle models the OBDII port may need to be disconnected from its mounting location Unclip or remove factory screws bolts to relocate the OBDII port and allow the Banks OBDII connector to plug into the vehicles OBDII connector without bending or putting stress on the Banks OBDII cable Secure the OBDII port under the dash 3 Route the Banks OBDII Cable to reach the iDash...

Page 13: ...n page 17 5 Secure the Banks OBDII Cable away from any moving parts or sharp edges using the supplied cable ties 2 2 OBDII Connection to Six Gun EconoMind SpeedBrake The OBDII Cable for Banks Bus 1 products has one extra wire coming from the OBDII to connect to Banks Bus 1 Tuners Six Gun EconoMind SpeedBrake See Figure 2 5 FIGURE 2 4 iDash 1 8 Banks Bus 1 FIGURE 2 3 iDash 1 8 Standard 6 Pin OR 8 P...

Page 14: ... See Figure 2 7 3 Route the female red terminal connector to the fuse tap Figure 2 6 For the operation of the Six Gun Economind and Speed Brake refer to 11 3 Six Gun EconoMind Tuner on page 47 11 4 Banks SpeedBrake on page 48 11 5 SpeedBrake Tuner Auto Switching iDash 1 8 Banks Bus 1 ONLY on page 52 FIGURE 2 8 FUSE 22 FIGURE 2 7 MOUNTING CONNECTING THE IDASH CONTINUED 8 Pin Connector to Banks Bus ...

Page 15: ...d route the cables to the iDash 1 8 through See Figure 2 9 2 Connect cables i e OBDII Aftermarket ECU Harness Starter Cable to the iDash 1 8 4 Pin and 6 Pin Ports 3 Insert the iDash 1 8 s studs through the Mounting Sleeve s holes See Figure 2 14 4 Hand tighten the nylon Thumb Nuts See Figure 2 9 If the mount applies too much of a press fit the iDash 1 8 buttons may become unresponsive Untighten or...

Page 16: ...h 1 8 SuperGauge CAN bus 62882 iDash 1 8 Banks Bus 1 CAN Bus 62885 OBD II Cable Standard CAN Bus 61300 35 OBD II Cable Banks Bus 1 CAN Bus Various P N Aftermarket ECU Cable 61301 36 Aftermarket ECU Termination Cable 61301 27 Banks Bus In Cab Cables B Bus Starter Cable 61301 20 B Bus In Cab Terminator Cable HW Rev 1 61301 23 B Bus Termination Jumper HW Rev 2 61300 30 B Bus In Cab Y Adapter 61301 22...

Page 17: ...atures such as Vehicle Diagnostics Reading Clearing Codes and Emissions Readiness Setting wake up sensitivity Data logging Speed correction settings More MOUNTING AND CONNECTING THE IDASH CONTINUED Figure 2 10 OBDII Cable Standard OR OBDII Cable Banks Bus 1 OR Aftermarket ECU Harness NOTICE Only use one In Cab Term for iDash 1 8 Hardware Rev 1 OR one Jumper Block for iDash 1 8 Hardware Rev 2 FIREW...

Page 18: ...ions See Figure 2 12 Only one Jumper Block Terminator is required 3 If you have a HW Rev 1 AND Rev 2 iDash 1 8 s Follow either instructions for Rev 1 OR Rev 2 but only use a single terminator in cab 2 8 Checking B Bus Network Termination Type When using multiple iDash Gauges and or Banks Modules it is very important that there be ONLY one 1 termination in cab Otherwise your iDash 1 8 may have trou...

Page 19: ...97654 v 7 19 MOUNTING AND CONNECTING THE IDASH CONTINUED Figure 2 12 HW Rev 1 HW Rev 2 OR Figure 2 13 ...

Page 20: ...em Holding down the button saves the current selection and returns to the Gauge Screen Use the UP button or DOWN button see Figure 3 1 to change values or scroll through the menus Hold down the button for rapid scroll value change For the iDash 1 8 with Data Logging holding the DOWN for two 2 seconds while viewing the Gauge Screen starts and stops data logging A single press of the BACK button see...

Page 21: ...matically return to the Gauge Screen after one 1 minute of inactivity 3 3 Sleep Mode Wake up When the iDash 1 8 is connected while the vehicle is turned off it will go into Sleep Mode after ten 10 seconds There is no need to unplug the iDash 1 8 To automatically wake up the iDash 1 8 the engine has to be running It is also possible to wake up the iDash 1 8 by pressing any of the buttons while the ...

Page 22: ...ing Item Gauge Layout 5 Gauge 2 Gauge ADD BID s CLEAR ALL BIDs ADD ALL BIDs Auto log 5 Square 6 Gauge 7 Gauge Density 8 Gauge Logging Rate 20 Hz 1 Hz PRIMARY GAUGE ONLY Category Group Field 1 Field 2 Field 8 Gauge Selection Item Save Custom Page Load Custom Page 1 SOFTWARE INTRODUCTION AND INTERFACE CONTINUED ...

Page 23: ...heck Emissions Readiness Alert 1 Alert 11 Vehicle iDash 1 8 Primary iDash 1 8 Secondary Field 1 Field 8 Background Alerts Diagnostics Alerts Set Limit Change Parameter Remove Parameter Group Category Item Alert High Enable Alert Low Enable Alert High Alert Low Injector Balance Rates Alert High Alert Low Alert Low Enable Alert High Enable Stationary Regen Mobile Regen For L5P or LML only Button Fla...

Page 24: ... 1 Alert 11 Change Parameter Remove Parameter Group Category Item Shift Light Shift Light Set RPM Set Shift Llight Background color Set Shift Light Font Color Banks Modules Derringer Ambient Air Density AAD Re Scan for B Bus Modules 3 SOFTWARE INTRODUCTION AND INTERFACE CONTINUED ...

Page 25: ...pplication Aftermarket ECU Screen Auto Dim Sensitivity Level Screen Brightness Button Auto Off Button Brightness Button Color Layout Theme Colors Background Label Text Divider Bar Graph Button Reset Theme to Default Turbo Supercharger Naturally Aspirated Engine Configuration Factory Rated HP RPM at Rated HP Engine Displacement Volumetric Efficiency Fuel Weight Brake Specific Fuel Consumption AFR a...

Page 26: ...it Field 8 Bar Graph Min Bar Graph Max English Metric PSIA BAR KPA PSIG J607 J1349 125 500 Enable Lambda 1 0 AFR Gas 14 7 AFR E85 9 8 AFR Diesel 14 5 AFR Custom 12 0 Set Custom AFR Value Density Standard Density Scale Default Ambient Pressure Air Fuel Ratio Pressure Units 5 SOFTWARE INTRODUCTION AND INTERFACE CONTINUED ...

Page 27: ...condary 1 Derringer iDash 1 8 Secondary 2 iDash 1 8 Secondary 3 PRIMARY GAUGE ONLY Calibrate Ambient Light Sensor CEL Quick Clear Shutdown Type Wake Up Sensitivity Restore All Settings to Default Restart Device Load Config from SD Save Config to SD Current Tire Stock Tire Speed Correction Current Final Drive Stock Final Drive Drive Correction Wheel Diameter Aspect Width Final Drive Correction Tire...

Page 28: ...cally be returned to the Gauge Screen The Layout menu can also be accessed in the Settings menu See 12 1 Layout on page 53 4 2 Density Layout A detailed explanation of the Banks Density System is available in the glossary 15 1 Banks Engine Air Density System Overview on page 70 Section 4 LAYOUT Figure 4 1 2 Gauge Layout 3 Gauge Layout 4 Gauge Layout 5 Gauge Layout 8 Gauge Layout 5 Square Light Lay...

Page 29: ...epresents your current boost air density BAD When displaying BAD only the blue bar graph will be displayed To adjust the scaling on the bar graph shown in Field 1 of the Density layout 1 Select Gauge Selection from the main menu 2 Press select on Density Scale to change the scaling of the bar graph Options are 125 200 300 400 and 500 4 3 Banks Module Specific Layouts For the Derringer B Bus Tuner ...

Page 30: ...meter See Step C 3 Select a GROUP parameter See Step D 4 Select an ITEM parameter to display See Step E 5 Hold the BACK button to return to the Gauge Screen and your new parameter will be displayed See Step F 6 OR select BACK to take you back to Gauge Selection to change another parameter See Step G Gauge units can be changed in Settings see 12 5 Units on page 58 Figure 5 1 Parameter Selection A B...

Page 31: ...xample if you purchased your first gauge without data logging you can enable data logging by adding a data equipped gauge as a secondary All data logging on iDash is referred to as Banks parameter ID s or BID s 6 1 Change Parameters to be Data Logged All iDash 1 8 ship with a preconfigured list of parameters set up for data logging To remove parameters from being recorded 1 Select Data Logging fro...

Page 32: ...SD card 6 2 1 Data Logging Shortcut 1 While viewing the Gauge Screen hold the DOWN button for 2 seconds to start a new data log A banner will appear stating Start Data Logging Log csv once started 2 To then stop the data log while viewing the Gauge Screen hold the DOWN button for 2 seconds A banner will appear stating Stop Data Logging Log csv once stopped 6 2 2 Data Logging Menu Selection Method ...

Page 33: ...ck 4 Configure the Gauge Screen layout Section 4 LAYOUT on page 28 and parameters displayed 5 1 Parameter Selection on page 30 to show the parameters that were recorded See for instructions on set up A useful parameter to display on the Gauge Screen during playback mode is Time Data Log At any time parameters displayed on the Gauge Screen can be changed during play back The data will begin playing...

Page 34: ...mber and description before clearing To save codes to SD card If you have a microSD card installed the codes will also be saved as a CSV file to your microSD card To view freeze frame data If the code has a preceeding it if you click on the code it will pull up the freeze frame data associated with that code To clear all vehicle DTC s present In the vehicle diagnostics menu select Clear Vehicle Co...

Page 35: ...t of supported emissions monitors See Figure 7 2 YES indicates that the monitor has passed its test and the system is operating correctly See Figure 7 4 NO indicates that the monitor has either failed the test or that the test has not completed See Figure 7 4 4 Scroll through the list of monitors and return to the Gauge Screen when finished The following may reset your monitors Clearing diagnostic...

Page 36: ...y towing or high load conditions because engine EGT reach appropriate temperature levels to oxidize or burn the soot captured by the DPF During Manual Regeneration the iDash 1 8 Super Gauge will communicate with the vehicles computer to clean the DPF manually by raising EGT to a suitable level and burning the soot When this occurs the RPM s will automatically be raise above 2000 and the radiator f...

Page 37: ...ss the down arrow see Figure 7 5 A to agree and continue manual regeneration 5 After pressing down to agree to the disclaimer select Yes to proceed with manual regen See Figure 7 5 B This will initiate and display DIAGNOSTICS CONTINUED Performing a stationary Regen will result in tailpipe exhaust gas temperatures greater than 600 F It is important to follow to following safety procedure to ensure ...

Page 38: ...be done at idle on while driving This reduces the likelihood of having a stuck DEF injector 7 4 Injector Balance Rates Check your vehicle s injector operating tolerances If you re experiencing a misfire knock excessive smoke or rough running conditions with no DTCs this diagnostic feature will help identify if injectors are the issue This Diagnostics feature is available on specific GM Chevy Diese...

Page 39: ... on the Gauge Screen and on the Background alerts list Min Max values are recorded regardless if alerts are enabled or disabled The parameter list in the Min Max Log is linked to the Background Alerts and Displayed Alerts lists Adding removing or changing these alerts in one menu will change the alerts in the other To add change parameters in the Min Max Log list 1 Select Min Max Log from the main...

Page 40: ...1 8 9 1 Displayed Gauge Alerts In the Displayed Alerts menu the parameter list will be the same as the Gauge Selection menu To change the parameters of the Displayed Alerts the parameters must be changed from the Gauge Selection menu See Parameter Selection on page 30 for directions If a parameter is already enabled and set up as a background alert its settings will transfer to a displayed gauge a...

Page 41: ... 2 A 3 Select any Alert to change See Figure 9 2 B If the alert is empty it will be skipped to Step 5 4 Select Change Parameter See Figure 9 2 C 5 Select a GROUP parameter See Figure 9 2 D 6 Select an ITEM parameter to change the background alert to see Figure 9 2 E You will be returned to the parameter s alert options To enable and configure background alerts 1 Select Alerts from the main MENU 2 ...

Page 42: ... UP or DOWN see Figure 10 1 B in increments of 100 RPM to set the trigger point at which the shift light will illuminate Due to data communication delay of vehicle OBD II you may need to set your shift light RPM lower than your desired shift point To adjust shift light text and or background color 5 Select Shift Light from the main MENU 6 Select Set Shift Light Font Color to change text color 7 Sc...

Page 43: ...th the sensor 1 Measure air density of ambientair around your vehicle 2 Measure air density of the airbox inlet to evaluate how effective your cold air intake really is 3 Measure the Ram Air effect of an airbox duct location 4 Data log ambient conditions at the racetrack to compare data between different days 5 Ambient relative humidity can be used to evaluate if air will condense out during the i...

Page 44: ...eld to change 3 Select a Group 4 Select an Item to display the parameters 5 Hold the BACK button to return to the gauge screen and your new parameter will be displayed Gauge units can be changed in Settings Figure 11 1 BANKS MODULES IF CONNECTED CONTINUED ...

Page 45: ...Dash 1 8 a new gauge layout called Derringer will be available for selection To access the menu selection refer to 4 1 Layout Selection on page 28 Power Added If connected to an iDash 1 8 while displaying the Derringer layout the vertical bar graph on the right hand side represents in real time how much power the Derringer is adding See Figure 11 2 In Stock Mode there will be no change to the bar ...

Page 46: ... Figure 11 4 A 2 Select the module Derringer for the Derringer Banks Module See Figure 11 4 B 3 Select Power to change the Derringer power level STOCK to LEVEL 6 See Figure 11 4 C BANKS MODULES IF CONNECTED CONTINUED Figure 11 3 Figure 11 4 PRESS to decrease power level PRESS to increase power level A B C ...

Page 47: ...uner is adding See Figure 11 2 In Stock Mode there will be no change to the bar graph and in Level 6 the bar graph will reach 100 under proper operating conditions The Power Added data can also be displayed on ANY layout as a numeric value by selecting it from the Tuner parameter group For information on how to access the menu refer to 5 1 Parameter Selection on page 30 Changing Tuner Settings on ...

Page 48: ...rake is functioning 11 4 1 Safety Features WHEEL SLIP DETECTION The Banks SpeedBrake continuously monitors wheel speed to detect possible slippage caused by braking If this occurs the Banks Speedbrake will shut off until 30 seconds after traction is regained CRUISE CONTROL When utilizing the Banks SpeedBrake while your vehicle s cruise control is enabled cruise control will deactivate once the Spe...

Page 49: ...e Banks SpeedBrake will slow the vehicle to the targeted speed and maintain it The Banks SpeedBrake will become inactive as soon as the vehicle drops below the target speed 11 4 4 Foot Brake Activation The SpeedBrake s Foot Brake feature provides additional braking while using your vehicle s brakes at vehicle speeds greater than 15 mph 24 km h When switching between different modes the Foot Brake ...

Page 50: ...rake is applying See Figure 11 6 Changing SpeedBrake Settings on the SpeedBrake Layout Screen To adjust the SpeedBrake mode hold the UP button until the mode changes The current mode will not be shown but can be determined from the information displayed on the bottom left text of the SpeedBrake layout If it states 1 HI MED or LOW then it is in Manual Mode See Figure 11 7 2 SPD then it is in AUTO M...

Page 51: ...H FB BK P SPD 25 FB PRESS to change SpeedBrake Strength HOLD to change SpeedBrake Mode PRESS to change SpeedBrake Strength PRESS to adjust Speed Setting HOLD to change SpeedBrake Mode PRESS to adjust Speed Setting Figure 11 8 AUTO MODE Figure 11 7 MANUAL MODE ...

Page 52: ...9 B 6 Select FootBrake to enable disable the Foot Brake feature See Figure 11 9 B The Foot Brake feature can only be enabled disabled in this menu 11 5 SpeedBrake Tuner Auto Switching iDash 1 8 Banks Bus 1 ONLY You must have a Banks Tuner and the Banks SpeedBrake connected to the iDash 1 8 Banks Bus 1 to use this feature The Tuner Auto Switch feature allows you to have the Tuner layout and SpeedBr...

Page 53: ... and adjusts the brightness of the buttons and LCD screen If you purchased the iDash 1 8 Hardware Rev 2 you will have the additional feature of changing button color To check if you have this model follow the instructions in Section 13 SYSTEM INFORMATION on page 65 to look at the Hardware Rev 12 2 1 Auto Dimming Auto Dimming can be configured to limit the range of brightness and its sensitivity to...

Page 54: ...d to a defined low brightness setting and high brightness setting for Auto Dimming to adjust between these limits To adjust the LCD Brightness Upper Lower Limit 1 Select Settings from the main MENU 2 Select Brightness See Figure 12 1 A 3 Select LCD Lower Limit See Figure 12 1 B A Scroll UP or DOWN to adjust the LCD screen brightness for dark conditions 0 100 The screen will display the brightness ...

Page 55: ...lue shown 5 Select the desired value to save the setting 6 Return to the Gauge Screen when finished 12 2 6 Button Lighting Only available when Auto Dimming is OFF See Figure 12 1 C This setting will determine the brightness of the buttons when Auto Dimming is off To adjust the button brightness 1 Select Settings from the main menu and then select Brightness See Figure 12 1 A 2 Select Button Lighti...

Page 56: ...ess Yes to select a color The button LEDs will display the described color See Figure 11 3 Pressing No will take you back to the Brightness menu 5 Return to the Gauge Screen when finished 12 3 Bar Graph For layouts 2 Gauge to 5 Square Light there is a bar graph representation of the parameter values on the Gauge Screen In the Bar Graph menu the bar graphs can be disabled enabled have the color cha...

Page 57: ...r graphs select Bar Graph Color See Figure 12 2 C to enter the color selection screen and then select a bar graph color You will be returned to the previous screen 3 Return to the Gauge Screen when finished 12 3 3 Bar Graph Limits Each bar graph can have the maximum and minimum value displayed changed The bar graph limit settings are not saved when the parameter is removed from the Gauge Screen so...

Page 58: ...o select a color Pressing No will take you back to the Settings menu 4 Return to the Gauge Screen when finished 12 5 Units Choose to display your preferred units for parameter values 12 5 1 U S Metric This setting allows you to select whether to view parameter information in U S or Metric units This setting does not affect pressure parameters The units for pressure parameters are set using the Pre...

Page 59: ...ze information A Select Width B Scroll UP or DOWN to adjust the value C Select the desired value to save the setting D Repeat steps 4 A to 4 C for Aspect ratio and Wheel Diameter 5 Select Current Tire to then input the vehicle s current tire size information 6 Repeat steps 4 A to 4 C for Width Aspect ratio and Wheel Diameter in the Current Tire menu 7 The vehicle speed displayed on the iDash 1 8 w...

Page 60: ...placement Engine displacement is required to calculate the volume of air being pumped through the engine CFM It is also necessary to calculate Cylinder Head Efficiency When you first boot up your new iDash 1 8 it will prompt you to input this information To change the Engine Displacement setting 1 Select Settings from the main MENU 2 Select Engine Displacement 3 Either select Liters or CID Cubic I...

Page 61: ...he iDash 1 8 If you connect the iDash 1 8 with the Derringer Tuner the iDash1 8 will be automatically set to your specific vehicle Aftermarket ECU Setting If you are using the iDash 1 8 with an aftermarket ECU reference iDash 1 8 aftermarket ECU setup Owners Manual 97670 for more details New aftermarket ECU s added with new firmware updates Banks Bus 1 Product Setting iDash 1 8 Banks Bus 1 Only Th...

Page 62: ...thin 10 seconds after startup C If it does not automatically wake up press any button to wake Increase sensitivity level by one and repeat the process 12 10 2 Start Stop For vehicles with engine start stop functionality When enabled the iDash 1 8 will not shut off when RPM drops below 600 rpm Instead the vehicle will check for vehicle communication to the ECU to determine if the vehicle is shut of...

Page 63: ...layout and SpeedBrake layout switch automatically while driving When does the SpeedBrake Layout appear The SpeedBrake Layout appears when your vehicle is coasting greater than 0 mph while your foot is off the acceleration pedal 0 APP When does the Tuner Layout appear The Tuner Layout appears when your foot is on the acceleration pedal greater than 0 APP OR when your vehicle is at a stop speed 0 mp...

Page 64: ...the lighting will stay the same for the calibration It should only take 30 seconds Select NO to return to the Reset menu 5 Return to the Gauge Screen when finished The iDash 1 8 will reboot and return to the Gauge Screen if reset To reset all iDash 1 8 settings 1 Select Settings from the main MENU 2 Select Reset 3 Select Reset All Settings 4 Select YES to continue Ensure that the lighting will sta...

Page 65: ...is feature will record onto a text file all the parameters available on your vehicle To access information on a Banks device connected to the iDah 1 8 1 Select System Information from the main MENU 2 Select the desired Banks device See Figure 13 1 A 3 The system information will be displayed as shown in Figure 13 1 B This is the information that will need to be supplied to Banks Tech Support if re...

Page 66: ...ard included if data logging option purchased You can use any microSD card up to 32GB for firmware updates 4 Right click on the appropriate firmware and select Save Link As See Figure 14 3 You can save several updates for multiple products on the same microSD card 5 Navigate to the microSD card drive to save the file This can be found under the Computer section on the left section of the window Th...

Page 67: ...zip file that you just downloaded then click on Extract Here 8 Eject and remove the microSD card from the computer by right clicking on the removable drive and clicking on Eject See Figure 14 6 9 In the vehicle with the iDash 1 8 awake insert the microSD into the iDash 1 8 you will see a notification stating that the microSD card is synced See Figure 14 8 Figure 14 9 IF UPDATING BANKS MODULE S any...

Page 68: ...d See Figure 14 12 The update process will begin and show a progress bar See Figure 14 13 You will get an error if the firmware file you select is not compatible SD Ready DO NOT remove the microSD card OBD II power cable or disconnect anything from the B Bus network while an update is in process Damage will be caused by failing to adhere CAUTION SD Ready SD Ready FIRMWARE UPDATES CONTINUED Figure ...

Page 69: ...up the iDash 1 8 to finish the update When the iDash 1 8 wakes back up it will begin to load new files 30 45 seconds See Figure 14 15 Upon completion a message box will let you know the update is complete It is now safe to remove the microSD card See Figure 14 16 14 Repeat the process Steps 9 16 for all iDash 1 8 s or connected Banks Modules FIRMWARE UPDATES CONTINUED Figure 14 15 Figure 14 16 Fig...

Page 70: ...o read range of typically 0 300 Because the air density changes based on pressure temperature and humidity the power output of your engine will also change based on your current ambient conditions The Society of Automotive Engineers SAE has defined a set of ambient conditions that all engines must be corrected to when measuring Horsepower SAE J1349 which is the most common correction factor uses a...

Page 71: ...ines and it indicates the side of the engine opposite of the number 1 cylinder When there are multiple sensors measuring the same type of data in a system Ex IAT1 IAT2 IAT3 then the number 1 sensor is located furthest upstream in the path of airflow and the highest number sensor available is furthest downstream in the system AIR DENSITY Banks Patented Banks Exclusive Abbreviation Parameter Name AA...

Page 72: ...on Actual position of the intake throttle valve THRREL Throttle Position Relative Position of accelerator pedal VT CMD Turbo Vane Command Commanded position of the turbocharger vanes VT POS Turbo Vane Position Actual Position of the turbocharger vanes WG CMD Wastegate Commanded Commanded position of the wastegate expressed as a Engine Performance Fuel Banks Exclusive Abbreviation Parameter Name AF...

Page 73: ...D Vehicle Speed Speed of vehicle relative to road TEMPERATURE Abbreviation Parameter Name AAT Ambient Air Temp Temperature of air surrounding vehicle CAC1 1 CAC Temp Bank 1 Sensor 1 Temperature of the air at the charge air cooler CAT1 1 Catalyst Temp Bank 1 Sensor 1 Temperature of the catalytic convertor DPFIT1 DPF Inlet Temp Bank 1 Temperature measured at the inlet of the diesel particulate filte...

Page 74: ...ailable engine torque being used TRQREF Engine Reference Torque Maximum Torque value the engine can produce IGN TM Ignition Timing Advance Ignition timing spark advance in degrees before top dead center for 1 cylinder TORQUE Torque Actual Calculated output torque of the engine or indicated torque TRQCMD Torque Commanded Requested torque output of the engine by the driver VOLTAGE Abbreviation Param...

Page 75: ... be able to properly communicate with the iDash 1 8 Check the Vehicle Fitment Chart for iDash 1 8 at www bankspower com If your vehicle does have proper CAN communication call technical support for further assistance If the gauge powers on but all the values report intermittently or consistently 1 Verify that the Vehicle Selection in the Settings menu is set to Standard if using the OBDII Cable or...

Page 76: ...4 v 7 Gale Banks Engineering 546 Duggan Avenue Azusa CA 91702 626 969 9600 Fax 626 334 1743 Product Information Sales 888 635 4565 Customer Support 888 839 5600 Installation Support 888 839 2700 bankspower com ...

Reviews: