background image

30

Adjust and store sound settings

Press to access the 

treble adjustment 

function

Press to access the bass 

adjustment function

Press to access the 

balance adjustment

Press to raise or lower 

the treble or bass levels; 

or adjust the balance 

between the left and 

right speaker

Press to see the status 

of the loudness 

adjustment function – 

LOUDNESS ON or 

LOUDNESS OFF 

Press LOUDNESS again 

to change the setting

Press to accept all 

sound levels – SOUND 

OK? appears on the 

display

Press to store all sound 

levels

If you have not stored your sound 

adjustments…

Press to reset the sound 

levels to their previously 

stored settings

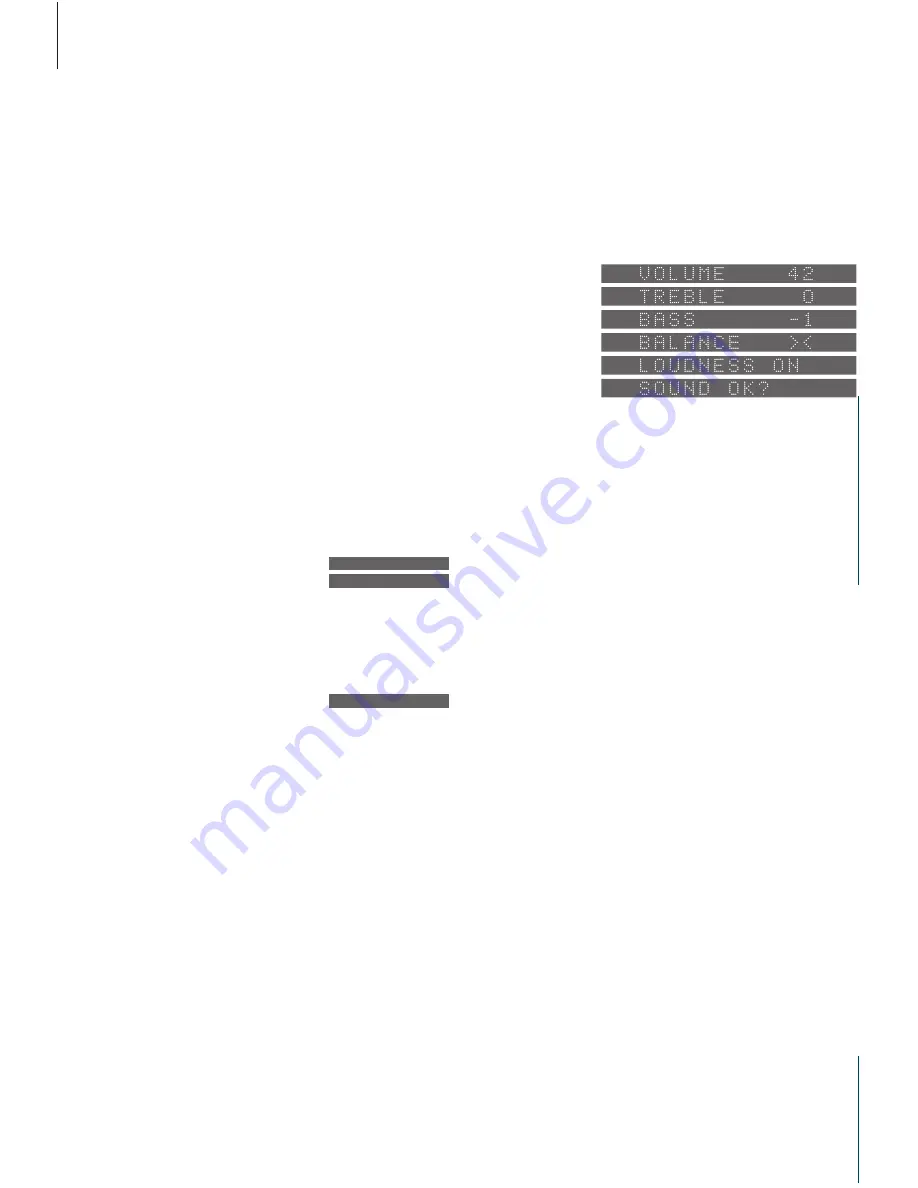
The fi rst four displays are examples of levels that the 

different sound functions can be set to. Volume 

can be adjusted in steps of two within a range of 

00 to 72, treble and bass levels can be adjusted 

within a range of -4 to +4 and the balance setting 

(here neutral) can be adjusted within a range of 8 

to either side. The fi fth example is a display, 

which shows the setting for the loudness function 

– ON if loudness is switched on, and OFF if 

loudness is switched off. The SOUND OK? display 

prompts you to store the current sound setting.

Sound adjustments

If you wish to alter the settings for sound, 

simply access the relevant function, make 

your adjustments and store the new setting. 

All sound levels are set to neutral 

values from the factory, but you can 

make your own sound adjustments 

and store them.

The treble and bass levels can be 

raised or lowered as you like and you 

can alter the balance, i.e. the 

distribution of sound emerging from 

the loudspeakers to suit your listening 

position.

The BeoSound 9000 also features a 

loudness function which you can 

activate or deactivate as you like. The 

loudness function makes the music 

more dynamic. It compensates for 

the human ear’s lack of sensitivity to 

high and low frequencies when 

listening to low music.

You can reset the sound levels to their 

original settings at any time. If you 

change your mind and do not wish 

to store your adjustments, simply 

press a source button on the 

BeoSound 9000 control panel.

Stored sound settings apply each 

time you switch on BeoSound 9000.

TREBLE

BASS

BALANCE

m
p

LOUDNESS

LOUDNESS ON

LOUDNESS OFF

OK

SOUND OK?

OK

RESET

NOTE! When BeoSound 9000 is used in a fully 

integrated setup (see 

Use BeoSound 9000 with a 

video system

), sound must be adjusted as described 

in the guide for your video system. The display on 

the BeoSound 9000 will read TV OPERATED.

Summary of Contents for BEOSOUND 9000

Page 1: ...Reference book BeoSound 9000...

Page 2: ...t from the AC Mains disconnect the power supply cord plug from the AC receptacle This symbol indicates that a dangerous voltage constituting a risk of electric shock is present within this unit This s...

Page 3: ...n and changes tracks and CDs at a formidable pace You will experience six Compact Discs as one piece of music virtually one CD The system can be placed anywhere you want music in traditional placement...

Page 4: ...12 Close up operation panel Set the time 13 Using the built in clock Make BeoSound 9000 start or stop at a specific time 14 Set a Timer 15 Set a Timer for single date 15 Set a weekly Timer 16 Checkin...

Page 5: ...th a video system 32 A fully integrated setup 32 An AV integrated setup 33 Option programming Looking after BeoSound 9000 34 Cleaning BeoSound 9000 35 Handling your CDs The PIN code system 36 Activate...

Page 6: ...noise e g dimmers as this will reduce the sensitivity of the remote control receiver Place the BeoSound 9000 so that ventilation will not be impeded and remember to leave enough space above or in fron...

Page 7: ...ose to place BeoSound 9000 vertically the carriage will move to the top end of BeoSound 9000 If you choose to place the BeoSound 9000 horizontally the carriage will situate itself next to the operatio...

Page 8: ...g a table or shelf When BeoSound 9000 is placed like this the CD mechanism must be centered for a horizontal position Fig 7 The BeoSound 9000 hung low on the wall in a near upright position When BeoS...

Page 9: ...s hung horizontally on the wall as in fig 2 d Use this setting when BeoSound 9000 is placed either flat on a table or in the Bracket as in figs 4 and 5 This is the factory setting How to center the sp...

Page 10: ...emote control Just select A AUX and then operate the extra equipment close up Connect your extra equipment to the socket marked AUX Master Link connection You can connect a video system or BeoLink sys...

Page 11: ...socket compartment Remove the cover in the bottom plate of the BeoSound 9000 to gain access to the sockets The socket compartment contains the socket for the mains cord The cover has two perforated se...

Page 12: ...ration panel Lift off the operation panel by inserting a finger where indicated lift the panel out rotate it and insert it again connectors first When you turn on the BeoSound 9000 a tiny red light ap...

Page 13: ...setting procedure for date and year When you have set or changed the year the display reads CLOCK OK Press to store your new clock setting Press to show the time Press to see the date and year To dis...

Page 14: ...e for your Timer or choose a Timer stand by Press to accept the source Then program when you want the Timer to start and stop Press repeatedly until you have found the exact time for starting a Timer...

Page 15: ...play DAYS appears Press to access a display where you can fill in the days you want to program the Timer for Press to include a weekday Press to exclude a weekday When you have gone through the whole...

Page 16: ...o see your next entry If there are no more entries NO MORE will appear in the display Press clear while information regarding a Timer programming is displayed in the display CLEARED will appear on the...

Page 17: ...y switching the Timer function to ON If you set the Timer function to OFF your speakers will be muted Press to cut in or press again to cut out the loudspeakers When you first press ON OFF TIMER ON or...

Page 18: ...ront of BeoSound 9000 Press to raise the glass door Press to lower the glass door Press to lower the door and start playing If you leave the glass door open it will close automatically after 5 minutes...

Page 19: ...o lower the volume Press to silence the speakers Press again to recall the sound Press to switch to stand by The CD selection buttons can also be used to step through the tracks of your CDs Press the...

Page 20: ...formation about the EDIT function Press to start playback of a CD Press to make SELECT DISC appear Press the direct CD selection buttons next to the CDs you want to include Press to start clearing a s...

Page 21: ...Press to scan the CD EDITING appears on the display Press to start scanning the tracks Press to include a track number in the series or Press to exclude a track number from the series EDITING OK appe...

Page 22: ...n The naming function can also be accessed from your Beo4 remote control Press the blue button for more than 1 5 sec to call up NAMING in the display Press GO and use the and buttons to select charact...

Page 23: ...to the CD to move the carriage Press to select the CD you want to position Press to save the position for the CD while it is playing POSITION OK appears Press to store the position you chose for the C...

Page 24: ...display indication The displays show the name of the CD the number and track number of the CD and the number of the CD along with the elapsed time of the current track in minutes and seconds The BeoS...

Page 25: ...Press to raise the volume Press to lower the volume Press to silence the speakers immediately Press again to recall the sound Extra equipment must be connected to the AUX socket on the back of the Be...

Page 26: ...e tuning function Press to select AM or FM switches from one to the other check display for an indication of which one you have chosen Press to search for a radio station up or down the frequency band...

Page 27: ...d radio programme is displayed e g 11 Press to make the frequency appear in the display e g 88 4 Press to access the fine tuning function The display indicates that you can now fine tune the station P...

Page 28: ...ve character positions blinks indicating that you can start entering a name Press to reveal the characters one by one Press to reveal previously shown characters Press to move to the next character po...

Page 29: ...Press to step through your radio stations Press to switch to stand by Switching between displays The display can give you four different types of information about the radio station you are listening...

Page 30: ...e the current sound setting Sound adjustments If you wish to alter the settings for sound simply access the relevant function make your adjustments and store the new setting All sound levels are set t...

Page 31: ...the function and press to switch it off when the function is displayed Use the number buttons to key in a radio station number or CD number To select a track press LIST until TRACK is shown in the di...

Page 32: ...000 is used in a fully integrated setup the speakers are connected to the video system and the video system takes over some of the functions mentioned in this guide Furthermore all remote control oper...

Page 33: ...9000 is used on its own or when it is connected to active speakers in an AV integrated setup Option 2 Used when the BeoSound 9000 is set up in one room and connected to a video system set up in anoth...

Page 34: ...and works via opto coupling devices built into the two small pegs A When the glass door is opened or if something interrupts the light circuit the carriage slows down in speed and finally comes to a...

Page 35: ...contact your Bang Olufsen retailer Do not attempt to clean the optics of the CD mechanism yourself this must be done by a qualified technician only We do not recommend using special cleaning CDs in Be...

Page 36: ...ered digits Press to start entering from the beginning When the PIN code has been entered Press to accept the PIN code The display shows CONFIRM for 1 5 sec then re enter the PIN code Press to confirm...

Page 37: ...nt source display e g RADIO 1 If an incorrect PIN code is entered the display will show ERROR and you may try again After the fifth try the BeoSound 9000 is turned off and must be left in stand by mod...

Page 38: ...ell us about your experience with your Bang Olufsen product Anything which you consider important positive or negative may help us in our efforts to refine our products Thank you Write to Bang Olufsen...

Page 39: ...harmful interference in a residential installation This equipment generates uses and can radiate radio frequency energy and if not installed and used in accordance with the instructions may cause har...

Page 40: ...www bang olufsen com...

Reviews: