background image

HOW TO SERVICE

Big efforts have been made to introduce the highest quality and a low call rate. 

Therefore this product is suitable for the new Service Strategy which benefi ts the 

customer. In a service situation where there is an electrical fault in a BeoLab 2, the 

fault can be removed during one visit to the customer’s home if you bring a Back-

up suitcase with you. If it is a mechanical fault, the particular part can be replaced 

in the customer’s home.

When the necessary part(s) arrive from service stock, the visit to the customer’s 

home can be arranged.

Front line service

The BeoLab 2 must be serviced in the customer’s home when dealing with electrical 

faulty or the exchange of mechanical parts. In this way, you avoid having to 

transport the heavy subwoofer (18kg) back and forth from the customer (box size: 

L 310 x W 260 x H 315 mm).

In the customer’s home, it is possible to exchange the driver and slave units, the 

electrical chassis or transformer, as well as exchange the cabinet and foot. 

Replacement of the cabinet can be done easily at the customer’s home as it 

contains all the necessary parts. Only the loudspeaker units, the electrical chassis 

and the transformer must be put into the new cabinet.

Electrical parts

For front line service we offer a Back-up suitcase (also applies to BeoLab 1). All the 

needed electrical parts are located in the Back-up suitcase (loudspeaker units and 

electronics).

That means the BeoLab 2 Back-up suitcase must be ordered and returned.

Service documentation

Service documentation for the BeoLab 2 is this guide (with part numbers for the 

Back-up suitcase and mechanical parts) and the User’s Guide.

How to service, English     1.1

Summary of Contents for BeoLab 2 6861

Page 1: ...BeoLab 2 Type 6861 6862 6863 6864 6865 6867 From serial no 19367810 Service Center repair guide English...

Page 2: ...to transport the heavy subwoofer 18kg back and forth from the customer box size L 310 x W 260 x H 315 mm In the customer s home it is possible to exchange the driver and slave units the electrical ch...

Page 3: ...ABL Adaptive Bass Linearization Switch for loudspeaker position Free Wall or Corner Input sensitivity Adjustable by three position switch Corresponding to 83 dB 88 dB or 91 dB for main speakers Connec...

Page 4: ...s 6864 ch ssis lectrique transformateur secteur c ble secteur ESAME TIPOLOGICO Per cambiare l alimentazione elettrica per esempio in occasione di uno spostamento all estero pu essere necessario ordina...

Page 5: ...type 6861 naar Japan type 6864 bestelt u voor het Japanse type 6864 drie artikelnummers elektrisch chassis transformator en netsnoer Type no El chassis Mains Mains cable Mains Used in 999 Module traf...

Page 6: ...e medium grey areas along the walls in the illustration FREE Use this setting if BeoLab 2 is placed more than approx 50 cm 20 from the wall shown by the light grey area in the illustration Never place...

Page 7: ...nnect your rear set of speakers to the sockets marked REAR on your Bang Olufsen system Stereo system Connect one end of the cable to the socket marked IN on BeoLab 2 and the other end to one of the sp...

Page 8: ...ct the two rear loudspeakers to the sockets marked REAR Connect both centre speakers to the socket marked CENTRE in the following manner Connect one loudspeaker to its counterpart and connect the seco...

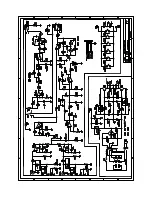
Page 9: ...3 1 Wiring diagram WIRING DIAGRAM 05 NTC 02 LED 03 ICE1000AM 01 LF SUPPLY 0T1...

Page 10: ...3 2 Block diagram Block diagram 3 2 3 2 BLOCK DIAGRAM...

Page 11: ...available parts 4 1 4 1 9001 9002 9003 9004 9005 0T1 9005 9006 9007 9008 9006 9005 9009 9010 05 02 999 incl PCB02 Incl pos nos 9001 and 9009 1 1 1 1 2 3 7 4 5 6 7 4 5 6 9 8 9 9 9 9 10 10 1 1 1 1 1 1...

Page 12: ...E1000A LED USA TWN CND 3358423 El chassis LF Supply ICE1000A LED JAP Survey of screws and washers 1 2054035 Screw 50 x 14mm 2 2056009 Screw 3 5 x 10mm 3 2058038 Screw 8 x 95mm 4 2054030 Screw 50 x 56m...

Page 13: ...4 3...

Page 14: ...of the power supply in the mains trafo If it is possible to switch the BeoLab 2 to ON mode but the sound is distorted missing exchange the bass unit If the mains supply is present but it is still not...

Page 15: ...63 6865 6867 Mains supply 2x75 VAC NTC 25 VAC Th fuse 5 VDC Trafo fuse for type 6864 MEASURING POINTS The mechanical limit for the driver is easily reached when the vacuum tightness in BeoLab 2 is bro...

Page 16: ...r mezzo dell apposito utensile in dotazione con la valigetta di servizio Per proteggere il rivestimento in vernice durante lo smontaggio di BeoLab 2 posizionare l apparecchio sui piedini supplementari...

Page 17: ...ce position ready for voltage measuring Right 7 9 8 WARNING The mechanical limit for the driver is easily reached when the vacuum tightness in BeoLab 2 is broken Special bezel tool STATIC ELECTRICITY...

Page 18: ...6 3 6 3 6 3...

Page 19: ...oltage of 2 5kV ac is obtained Maintain that voltage level for one second then slowly turn it down again During the testing the current must not exceed 10mA Insulation test at the customer Remove the...

Page 20: ...Bang Olufsen DK 7600 Struer Denmark Phone 45 96 84 11 22 Fax 45 97 85 39 11 3538051 06 06...

Reviews: