INSULATION TEST
BeoLab 2 must be insulation tested if it has been dismantled.
Make the test when the BeoLab 2 is reassembled and is ready to be returned to
the customer.
Insulation test at the Service center
Short-circuit the two pins of the mains plug and connect them to one of the
terminals of the Insulation tester. Connect the other terminal of the insulation
tester to ground on the Power Link socket.
To avoid damaging the BeoLab 2, it is essential to ensure that both terminals of
the insulation tester have good contact.
Slowly turn up the voltage control of the insulation tester until a voltage of 2.5kV(ac) is
obtained.
Maintain that voltage level for one second, then slowly turn it down again.
During the testing the current must not exceed 10mA.
Insulation test at the customer
Remove the mains cable from the wall outlet.
Place a jumper across the two AC plug prongs.
Use a multi-meter, set for measurements in the Ohm-area.
Place one lead from the multi-meter on the AC plug and place the other lead on
ground at the Power Link plug.
The resistance during this measurement must be of 1 Mega Ohm or more.
Resistance measured below 1 Mega Ohm indicates an abnormal situation and
corrective action must be taken.
Please note:
Avoid all skin contact with the AC plug and all other metal parts while performing
the test, as this contact may infl uence the measurement.
Insulation test, English 7.1
Summary of Contents for BeoLab 2 6861
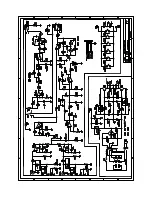
Page 9: ...3 1 Wiring diagram WIRING DIAGRAM 05 NTC 02 LED 03 ICE1000AM 01 LF SUPPLY 0T1...
Page 10: ...3 2 Block diagram Block diagram 3 2 3 2 BLOCK DIAGRAM...
Page 13: ...4 3...
Page 18: ...6 3 6 3 6 3...
Page 20: ...Bang Olufsen DK 7600 Struer Denmark Phone 45 96 84 11 22 Fax 45 97 85 39 11 3538051 06 06...