12
NMLM1000
Getting
Started . . .
Before you start
Assembly
WARNING!
The product must be fully assembled before operation! Do not
use a product that is only partly assembled or assembled with damaged parts!
Follow the assembly instructions step-by-step and use the pictures provided
as a visual guide to easily assemble the product! Ne branchez pas l’outil dans
une alimentation électrique tant qu’il n’est pas complètement assemblé !
Do not connect the product to power supply before it is completely assembled!
NOTE:
making adjustments. Keep them secure to avoid loss.
Wheel assembly
WARNING!
Always check the mounting plates (8b) before assembling the
wheels. Never attach the wheel on a damaged or loose mounting plate. The
wheels must be assembled on the same height level. Using a product with
wheels assembled on different height level may cause damage of the cutting
unit (e.g. cutting device, spindle etc.) or unsatisfactory result.
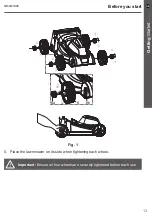
1. Align the axle hole of the wheel (8) with one of the three height adjustment holes in
the mounting plate (8b).
2. Insert the knob with bolt (8a) and tighten it to secure the wheel (Fig. 1).
3. Repeat the assembly for the other three wheel assemblies (8).
4. Ensure the four wheels are assembled on the same height level and rotate smoothly.


