background image

Weather

About the weather feature

The system includes weather functionality that allows the user to view forecast data overlaid
on the chart. This helps gaining a clear understanding of the weather conditions that are
likely to appear.
The system supports weather data in GRIB format, available for download from various
weather service suppliers.
The system also supports weather data from SIRIUS Marine Weather Service. This service is
available only in North America.

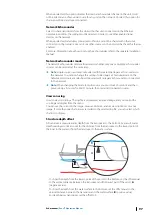
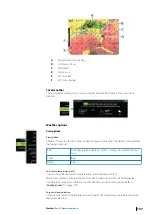
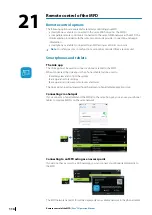
Wind barbs

The rotation of the wind barbs indicate the relative wind direction, with the tail showing the
direction the wind is coming from. In the graphics below, the wind comes from the
northwest.
Wind speed is indicated by a combination of small and large barbs at the end of the wind
tail.

Zero knots / Indeterminate wind direction

Small barb = 5 knots

Large barb = 10 knots

Arrow barb = 50 knots

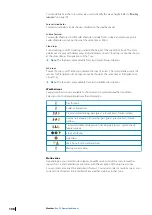
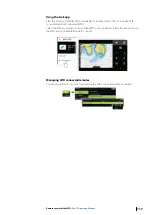
If a combination of 5 and 10 knot barbs are shown on a tail, then add them together to give
you the total wind speed. The example below shows 3 x large barb + 1 x small barb = 35
knots, and 60 knots indicated with 1 x arrow barb + 1 x large barb.

Wind speed: 35 knots

Wind speed: 60 knots

Showing weather details

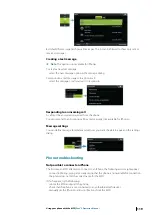
If pop-up is enabled, you can select a weather icon to display the identity of the observation.
If you select the pop-up, detailed information about the observation is displayed. You can
also display the detailed information from the menu when the weather icon is selected.

GRIB weather

A GRIB file contains forecast information for a set number of days. It is possible to animate the
weather data, which shows how weather systems are developing.

17 

104

Weather

| Zeus³S Operation Manual

Summary of Contents for Zeus3S

Page 1: ...ENGLISH Zeus3 S Operator Manual www bandg com...

Page 2: ......

Page 3: ...ion of the Documentation the English language version of the Documentation will be the official version of the Documentation Trademarks Navico is a registered trademark of Navico Holding AS B G is a r...

Page 4: ...cause harmful interference to radio or television reception which can be determined by turning the equipment off and on the user is encouraged to try to correct the interference by one or more of the...

Page 5: ...oftware releases The latest available manual version can be downloaded from the following website www bandg com Translated manuals Available translated versions of this manual can be found on the foll...

Page 6: ...ivating features and applications 21 Password Protection 21 H5000 integration 22 Charts 22 The Chart panel 22 Chart data 22 Selecting chart source 22 Showing dual chart sources 22 Vessel symbol 23 Zoo...

Page 7: ...e plot panel 56 The Wind Plot panel 59 PredictWind 59 PredictWind weather 63 PredictWind weather routing and departure planner 67 Autopilot 67 Safe operation with the autopilot 67 Selecting active aut...

Page 8: ...Genesis 93 Customizing the image 94 Advanced options 95 More options 96 Echosounder settings 99 ForwardScan 99 About ForwardScan 99 The ForwardScan image 100 Setting up the ForwardScan image 100 More...

Page 9: ...ions 119 Phone troubleshooting 120 Managing Bluetooth devices 121 Simulator 121 About 121 Retail mode 121 Simulator source files 121 Advanced simulator settings 122 Tools and settings 122 The toolbar...

Page 10: ...134 Naviop 135 Appendix 135 Touchscreen operation 136 Keyboard operation 137 Mouse operation 137 Status bar icon definitions 10 Contents Zeus S Operation Manual...

Page 11: ...to display the active panel s menu E Rotary knob Turn to zoom or scroll the menu press to select an option F Enter key Press to select an option or to save settings G Exit key Press to exit a dialog...

Page 12: ...nsfer or copy files to a chart card Doing so can damage chart information on the chart card The protective door should always be securely shut immediately after inserting or removing a card in order t...

Page 13: ...a favorite page button to open the page Favorite pages can be single or multiple panel pages The unit display size determines the number of application panels that can be included on a favorite page T...

Page 14: ...l C Menu button D Control bar Application panels An application panel shows the application and provides a menu with customize options The application panels and the menu options are further explained...

Page 15: ...an select the predefined bar to be shown and you can change the information displayed in the predefined bar Refer to Customizingtheinstrumentbar on page 19 Control bar The control bar contains buttons...

Page 16: ...n also be connected to the unit and remotely control the unit For information about how to connect smart devices to remotely control the unit refer to Remote controloftheMFD on page 116 System control...

Page 17: ...en to prevent accidental operation of the system You lock the touch screen from the system controls dialog When the touch lock is active you can still operate the unit from the keys or from a remote c...

Page 18: ...y on the front of the unit To configure the Wheel key select Configure WheelKey on the System Setting dialog Customizing the long press feature You can specify if the long press on the panel opens the...

Page 19: ...he page Select the tool icon on a favorite button to display the page editor dialog Customizing the instrument bar Note You must activate the instrument bar in the application to access the instrument...

Page 20: ...n appears on the multiple panel page 4 Select the adjustment icon and move the split to the desired position 5 Use menu options to save or discard your changes Enabling or disabling features A compati...

Page 21: ...e is entered in the unit the feature is available for use Note The feature unlock option is only available if your unit supports a locked feature Password Protection You can set a PIN code to prevent...

Page 22: ...isplayed until you re insert the card or manually switch back to the preloaded cartography Selecting chart source Available chart sources are listed in the menu If you have identical chart sources ava...

Page 23: ...Displays the chart with north upward Heading up Displays the chart with the vessel s heading A directed upward Heading information is received from a compass If heading is not available then the COG...

Page 24: ...the cursor on the panel then press and hold your finger on the screen to switch the cursor symbol to a selection circle appearing above your finger Without removing your finger from the screen drag t...

Page 25: ...e 3D option provides a three dimensional graphical view of land and sea contours Note All chart types work in 3D mode but without 3D cartography for the appropriate area the chart appears flat When th...

Page 26: ...u can add overlays on the chart panel When an overlay is selected the chart menu expands to include basic menu options for the selected overlay Information about the overlay menu options are described...

Page 27: ...urrent data can be viewed by zooming inside a 1 nautical mile zoom range At that range the Current icon changes to an animated dynamic icon that shows the speed and direction of the current Dynamic ic...

Page 28: ...n the charts used Shaded relief Shades seabed terrain No contours Removes contour lines from the chart Depth palette Controls the Depth palette used on the map Navigation Color shades depth areas base...

Page 29: ...ical settings that are available in 3D mode only Exaggeration is a multiplier applied to the drawn height of hills on land and troughs in water to make them look taller or deeper Note This option is g...

Page 30: ...dden by the photo Minimumtransparency Maximumtransparency Chart shading Shading adds terrain information to the chart Fishing range Select a range of depths between which Navionics fills with a differ...

Page 31: ...nics com SonarChart Live SonarChart Live is a real time feature where the device creates an overlay of depth contours based on your own live sonar soundings When you select SonarChart Live overlay the...

Page 32: ...sed when tide is falling Note All numeric values are shown in the relevant system units unit of measurement set by user Rock filter level Hides rock identification on the chart beneath a given depth T...

Page 33: ...es in the selected time period If no options are turned on for the vessel then no extension lines are shown Your vessel heading is based on information from the active heading sensor and the COG is ba...

Page 34: ...lines Note This option is only available if Boat is not selected Targets Defines the target for a given TWS True Wind Speed The targets can be read from an H5000 CPU Polar table live measurements manu...

Page 35: ...ng refer to PredictWindweatherroutinganddeparture planner on page 63 SonarChart Live tide correction When selected the tide correction feature uses information from nearby tide stations if available t...

Page 36: ...ar image Each waypoint has an exact position with latitude and longitude coordinates A waypoint positioned on the echosounder image has a depth value in addition to position information A waypoint is...

Page 37: ...routes and tracks before deleting them refer to Maintenance on page 128 Waypoint alarm settings You can set an alarm radius for each individual waypoint you create The alarm is set in the Edit Waypoin...

Page 38: ...sh waypoint is the finish line Select Save to save your settings Edit a route from the chart panel 1 Select the route to make it active 2 Select the route edit option in the menu 3 Position the new ro...

Page 39: ...on your boat s size Before you can start using this feature the boat draught width and height must be entered into the system The boat settings dialog is automatically displayed if the information is...

Page 40: ...out PredictWind weather and PredictWind routing refer to PredictWind on page 59 The edit route dialog You can manage routes and routepoints and change route properties using the Edit Route dialog This...

Page 41: ...ravelled Example of the Tracks dialog Recording and displaying tracks When the recording of a new track is started the old one is hidden to de clutter the chart panel If Display is enabled on the old...

Page 42: ...e made up of a series of points connected by line segments whose length depends on the frequency of the recording You can select to position track points based on time settings distance or by letting...

Page 43: ...ign in credentials Auto Synchronize synchronizing occurs periodically in the background when connected to the internet Synchronize now synchronizing occurs immediately Waypoints routes and tracks Zeus...

Page 44: ...u can start navigating to a cursor position on any chart radar or echosounder panel Position the cursor at the selected destination on the panel and then select the go to cursor menu option Note The g...

Page 45: ...a system with autopilot functionality you are prompted to set the autopilot to navigation mode Note The prompt to set the autopilot to navigation mode is disabled if the boat type is set to SAIL in t...

Page 46: ...lot start the heading change in due time to make a smooth turn onto the next leg The figure below may be used to select the appropriate waypoint circle when creating the route Note The distance betwee...

Page 47: ...o set the geographic coordinate system used on your system Phantom Loran Enables use of Phantom Loran positioning system Defines Loran chains GRI and preferred station for waypoint entry cursor positi...

Page 48: ...you get to the exact angle 8 Bearing to current waypoint 9 Active next waypoint ID routepoint ID or cursor 10 Rudder angle Note Only visible if a valid rudder source is available on the system 11 Magn...

Page 49: ...and off in the Chart setting dialog Note If both the SailSteer image and autopilot compass overlays are enabled then only the SailSteer overlay is shown Note SailSteer overlay is not shown when the c...

Page 50: ...CPU on your network start line data is calculated by the H5000 CPU Otherwise the data is calculated in the MFD Viewing the start line on the chart panel allows the navigator to assess around the start...

Page 51: ...ta numbers are calculated on the H5000 CPU and sent across the network There is only one start line If you set the start line on the MFD it will show on the H5000 Graphic Display and vice versa Note B...

Page 52: ...t panel and move the cursor to the position in the chart where you want the port end point to be 2 Open the menu and select Start line Port end and then Set at cursor 3 Repeat steps 1 and 2 for the st...

Page 53: ...ne to the starboard start line end point 8 Advantage gained by starting at favored end 9 Port tack layline to the starboard start line end point 10 Race Timer 11 Starboard tack laylines to the port st...

Page 54: ...ind or tide in current and future legs of the course Deselect Live and enter parameters for the wind tide or both to see how data might change for the leg For example if you can see the sea breeze bui...

Page 55: ...imer counts down If the start value is set to zero 00 00 when the timer is started the timer begins counting up recording the elapsed time To stop the timer from counting select Stop Reset Resets the...

Page 56: ...dging the missing data Selecting data Each data field can be changed to show the preferred data type and the time range 1 Select the edit option from the menu 2 Activate the field you want to edit 3 C...

Page 57: ...e Trend line A low setting shows the highest detail closest to the raw data lowest amount of damping and a high setting shows a smoother trend highest amount of damping A medium setting is a good bala...

Page 58: ...ntal line A across the tack bar representing the time the race timer will reach zero When the race timer reaches zero the white line will change to the appropriate color according to your point of sai...

Page 59: ...it on the chart refer to SpecifyPredictWindGRIBoverlay file on page 62 Download PredictWind files to a portable storage device connected to a PC and then import a file from the storage device into th...

Page 60: ...o download a PredictWind weather file manually select the Download forecast option in the Chart menu to display the Select forecast type dialog Use the Select forecast type dialog to specify the type...

Page 61: ...shore area rectangle choose the select option Specify the settings for the offshore lower resolution GRIB download refer to PredictWind downloadsettings on page 61 PredictWind download settings Model...

Page 62: ...GRIB file which is currently displayed on the chart If no file is displayed on the chart then the menu option does not show a GRIB file GRIBfiledisplayedonthechart NoGRIBfiledisplayedonthechart Selec...

Page 63: ...imal route is as accurate as possible Set up and usage 1 Connect your unit to the internet Refer to Internetconnection on page 114 2 Enter your PredictWind credentials in the PredictWind settings dial...

Page 64: ...route in the list to open the Edit Route dialog Select the route on the chart This lists the selected route in the menu Select the route in the menu and then Details in the expanded menu to open the E...

Page 65: ...the time you want to space the departures 1 hour 3 hours 6 hours 12 hours or 24 hours and the forecast model GFS ECMWF or PWE PWG you want PredictWind to use Destination Forecast Select this option to...

Page 66: ...Additional summary information is available for wind current route and swell Select Follow to sail the route 66 PredictWind Zeus S Operation Manual...

Page 67: ...and reduce speed in due time to avoid hazardous situations Autopilot alarms For safety reasons it is recommended to turn on all autopilot alarms when operating the autopilot For more information refe...

Page 68: ...Select the standby button When the autopilot is in standby the boat must be steered manually Autopilot indication The status bar shows autopilot information as long as an autopilot computer is connec...

Page 69: ...e heading by a fixed tack angle either to port or starboard The rate of turn during the tack gybe is set by the tack time in the autopilot settings dialog Refer to Autopilotsettings on page 71 To init...

Page 70: ...ext waypoint in a route If the required course change to the next waypoint is less than the course change limit the autopilot will automatically change the course If the required course change to next...

Page 71: ...installation and commissioning of the autopilot system User settings can be changed for various operational conditions or user preferences Installation settings are defined during commissioning of the...

Page 72: ...l changes before increasing the response setting Normal The autopilot will need to sense moderate environmental changes before increasing the response settings Sport The autopilot will be most sensiti...

Page 73: ...options allow for manually changing low speed and high speed parameters that were set during the commissioning of the autopilot computer For more details refer to the separate documentation for the a...

Page 74: ...k distance Track approach angle Defines the angle used when the vessel is approaching a leg This setting is used both when you start navigating and when you use track offset Course change confirm angl...

Page 75: ...a Broadband radar are transmitting at the same time on the same boat We recommend to only transmit on one radar at a time For example transmit Broadband radar for typical navigational usage or pulse...

Page 76: ...can also put the radar in standby mode from the System Controls dialog Transmit The scanner is on and transmitting Detected targets are drawn on the radar PPI Plan Position Indicator Note You can also...

Page 77: ...ange For example you can have Offshore mode for range A and Weather mode for range B However interaction between ranges occurs in some cases When using Bird mode for both ranges maximum range is restr...

Page 78: ...cursor position window is activated Go to cursor You can navigate to a selected position on the image by positioning the cursor on the panel and then using the go to cursor menu option The cursor assi...

Page 79: ...oost The target boost control increases pulse length or reduces radar bandwidth to make targets appear larger in range and increase radar sensitivity Radar view options View menu options vary dependin...

Page 80: ...essel s B path C A B D 1 2 3 0 4 5 1 2 3 4 5 0 The examples show the target movement 1 5 over 5 radar scans with the radar in relative motion mode In example C own vessel COG is 0 and speed is 0 knots...

Page 81: ...to own ship heading obtained from the compass When the ship turns the heading line changes its direction according to the ship s heading while the radar image remains stabilized The North up orientati...

Page 82: ...PPI Look ahead The Look ahead option is used to maximize the view ahead of the vessel When selected the PPI center is placed at 70 of the radius of the PPI 180 opposite the top of the display Note Loo...

Page 83: ...arget enters or exits the zone Defining a guard zone 1 Ensure that the cursor is not active 2 Activate the menu select Guard zones then select one of the guard zones 3 Select the shape for the zone Th...

Page 84: ...n targets are being tracked the radar menu expands to include options for cancelling individual targets or to stop the tracking function Cancel tracking individual targets by selecting the target icon...

Page 85: ...e data bar can show up to 3 targets arranged with the most dangerous targets on top You can select to show MARPA targets on top and before any AIS targets even if the AIS targets are closer to your ve...

Page 86: ...e enabled to see the vessel s name Refer to Chart settings on page 32 Searching for AIS vessels You can search for AIS targets by using the find option in the menu If the cursor is active the system s...

Page 87: ...SOG with the position data This allows for correct orientation of the icon When receiving a distress message you will see an alarm box informing you that a message has been received This can be read...

Page 88: ...route towards the AIS SART position Note If the AIS stops receiving the AIS SART message the AIS SART remains in the vessels list for 10 minutes after it receives the last signal Vessel alarms You can...

Page 89: ...lter the icons based on security settings distance and vessel speed Extension lines Defines the length of course over ground and heading extension lines for your own vessel and for other vessels The l...

Page 90: ...be used to indicate speed and course for targets either as absolute true motion or relative to your vessel AIS icon orientation Sets the orientation of the AIS icon either based on heading or COG inf...

Page 91: ...h arches D Range scale E Depth F Temperature G Frequency Multiple sources You can specify the source for the image in the active panel You can display different sources simultaneously using a multi pa...

Page 92: ...panel The history bar shows the image you are currently viewing in relation to the total image history stored You can view history by panning the image To resume normal scrolling clear the cursor Reco...

Page 93: ...menu to customize the image When the cursor is active some options in the menu are replaced with cursor mode features Select the clear cursor option to return to the normal menu Range The range setti...

Page 94: ...ng transducers at the same frequency can cause interference For source setup information refer to the Zeus S Installation Manual Measuring distance The cursor can be used to measure the distance betwe...

Page 95: ...zoom The range zoom bars on the right side of the display shows the range that is magnified If you increase the zooming factor the range is reduced You see this as reduced distance between the zoom b...

Page 96: ...lay DownScan images on the regular Echosounder image When overlay DownScan is activated the Echosounder panel menu expands to include basic DownScan options Pause Pauses the image allowing you to exam...

Page 97: ...ld be selected if no legacy echosounder is connected to the network Note When changing the mode to multi source you must wait 30 seconds and then power down all sources for Wait 1 minute then restart...

Page 98: ...factory supplied defaults Use network depth and temp data Selects from which network source depth and temperature data is shared on the NMEA 2000 network ForwardScan installation Available when the F...

Page 99: ...sonar module or another unit which has built in sonar shared over the network If you have both a sonar CHIRP and a ForwardScan transducer connected to different sonar modules or another unit which ha...

Page 100: ...Refer to Criticalforward rangeandCriticaldepth on page 101 More options Pause Pauses the image allowing you to examine the image in detail The pause function stops the echosounder from pinging The sy...

Page 101: ...installation dialog Critical forward range and Critical depth Critical Forward Range and Critical Depth are user selected thresholds that define a critical zone forward of your vessel If the alarm is...

Page 102: ...distort depth data increasing the risk of striking underwater obstructions Depth offset All transducers measure water depth from the transducer to the bottom As a result water depth readings do not ac...

Page 103: ...g CZone are present on the network Customizing the Instruments panel You can customize the Instruments panel by changing the data for each of the gauges in the dashboard by changing the dashboard lay...

Page 104: ...large barbs at the end of the wind tail Zero knots Indeterminate wind direction Small barb 5 knots Large barb 10 knots Arrow barb 50 knots If a combination of 5 and 10 knot barbs are shown on a tail t...

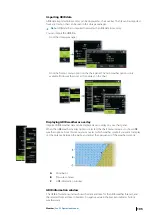
Page 105: ...as overlay Imported GRIB weather data can be displayed as an overlay on your chart panel When the GRIB weather overlay option is selected the chart menu increases to show GRIB weather options From thi...

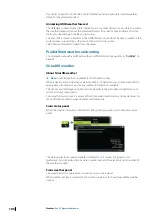
Page 106: ...is available for North America only When a Navico satellite weather receiver module is connected to your system and with the appropriate subscription Sirius marine weather information is available The...

Page 107: ...tensity Rain From light green light rain yellow orange to dark red heavy rain Snow Blue Mixed Pink Sea surface temperature SST You can show the sea surface temperature as color shading or as text When...

Page 108: ...ho tops cannot be shown at the same time as Precipitation or Cloud Tops Note This feature is only available for certain SiriusXM subscriptions Weather icons Several weather icons are available to show...

Page 109: ...ds on the amount of weather activity the more complex it is the less time is available for animation You can animate the past or the future depending on which weather view you have turned on with prec...

Page 110: ...deo panel Areas not covered by the image are colored black Setting up the video panel Video source If more than one source is available you can select to view one channel source only or to cycle the i...

Page 111: ...e audio source to another A Control bar B Audio controller small and large displays C Maximize button expands the audio controller D Source and source information E Control buttons F ON OFF button The...

Page 112: ...such as a smart phone or tablet Using an AM FM radio Selecting the tuner region Before using FM AM or a VHF radio you must select the appropriate region for your location Radio channels To tune in to...

Page 113: ...age through favorite channels select the up or down audio control button Locking channels You can lock selected Sirius channels from being broadcasted A user selected 4 digit code must be entered to l...

Page 114: ...nnect the unit to wireless devices such as smart phones and tablets The smart phones and tablets can then be used to remote view and control the unit For more information refer to RemotecontroloftheMF...

Page 115: ...wireless network DHCP Probe The wireless module contains a DHCP server that allocates IP addresses for all the MFDs and devices in a network If integrating with other devices such as a 3G modem or sat...

Page 116: ...k app must be used to connect a phone or tablet to the MFD When connected the Link app on the phone or tablet can be used to Remotely view and control the system Back up and restore settings Back up a...

Page 117: ...d not connected MFDs Select the MFD you want to control If the MFD is not connected follow the instructions on the MFD and on the table phone to connect Managing WiFi connected remotes You can change...

Page 118: ...120 Note You must always connect to a phone from the MFD not the other way around Use the phone icon in the toolbar to connect your phone to the MFD When the icon is selected the following happens Blu...

Page 119: ...sage not available for iPhones Message settings You can define message templates and set how you want the alert to appear in the settings dialog Phone troubleshooting Not possible to connect an iPhone...

Page 120: ...ere is no sound on the phone when talking See details for how to display the device details in ManagingBluetoothdevices on page 120 To change the alert setting for the phone notifications see Messages...

Page 121: ...demonstration pauses After a time out period retail mode resumes Note Retail mode is designed for retail showroom demonstrations Simulator source files You can select which data files that are used b...

Page 122: ...n accumulation of logged trip data that occurs on today s calendar date Logging occurs when enabled and while the vessel exceeds the threshold speed set for Today Trip 1 Trip 1 shows an accumulation o...

Page 123: ...points routes tracks etc Phone Used for connecting a phone to the MFD See UsingyourphonewiththeMFD on page 118 Store Connects to the Navico internet store At the store you can browse purchase acquire...

Page 124: ...ny of the following are selected After the correct PIN code is entered all of them can be accessed without re entering the PIN code Settings activated from the home page or system controls dialog Alar...

Page 125: ...on and technical information for this unit The Support option accesses the built in service assistant refer to Servicereport on page 130 Services Used for accessing web sites that provide feature serv...

Page 126: ...ils for the alarm If more than one alarm is active at the same time the alarm pop up can display 3 alarms The alarms are listed in the order they occur with the last activated alarm at the top The rem...

Page 127: ...emain active until the alarm is acknowledged or the reason for the alarm is removed Alarms history Lists the alarm history with time stamp The alarms remain in the list until they are manually cleared...

Page 128: ...h a dash of liquid dish soap or detergent Avoid using abrasive cleaning products or products containing solvents acetone mineral turpentine etc acid ammonia or alcohol as they can damage the display a...

Page 129: ...be notified if new software updates are available You can also manually start the update s from the Updates dialog Update the software from a storage device You can download the software update from...

Page 130: ...g the report you can enter an incident number to assist with tracking You can attach screenshots and log files to the report Note There is a 20MB limit for the report attachments The report can be sav...

Page 131: ...h This is the format most used on the web that shares among most GPS systems Use this format if you are taking data to a competitor s unit Export all waypoints The export option is used for exporting...

Page 132: ...rning Importing system settings overwrites all existing system settings 1 Connect a storage device to the unit 2 Browse the memory and select the desired backup file to start the import 132 Maintenanc...

Page 133: ...e established For instructions on how to configure your specific FLIR camera model refer to FLIR documentation Note Only one FLIR camera can be connected to the Ethernet network When you activate a vi...

Page 134: ...r on the Home page when a CZone system is available on the network A separate manual is provided with your CZone system Refer to this documentation and to the unit s Installation manual for how to ins...

Page 135: ...enu Refer to Customizingthelongpressfeature on page 18 On the Instrument bar to open the Choose data dialog On a panel button on the home page to see available split screen options On a favorite butto...

Page 136: ...rol to next monitor connected to the unit USB port must be set to switchable Note This is not applicable for all units Ctrl B Centers the chart on vessel position Ctrl D Switches between panels on a m...

Page 137: ...icons can appear on the status bar Icon Definition Alarm a standard yellow important orange or critical red alarm is sent To remove the icon in the status bar acknowledge the alarm in the Alarms dial...

Page 138: ...option in the Radar page menu Radar is transmitting If you want to pause the radar select the pause option in the Radar page menu A compatible remote controller is connected to the unit The system is...

Page 139: ......

Page 140: ...988 12586 001...

Reviews: