


Revision 2 December 2013
2.13 CENTRE LIFT LOCK
NYLOFELT
LEGS G O UNDER
NYLOFELT AND
SNAP OVER
CURTAIN EDGE
LEGS
(a)
(b)
HOOK
THIS END FIRST
LOCK C ORRUGATIO N
(c)
DOUBLE SIDED
ADHESIVE TAPE
LOCK BODY
LOCK ARM
CUT-
LOCK BAR COVER
LOCK BAR COVER
FACEPLATE
(c)
(g)
(f)
(i)
(d)
LOCK BAR
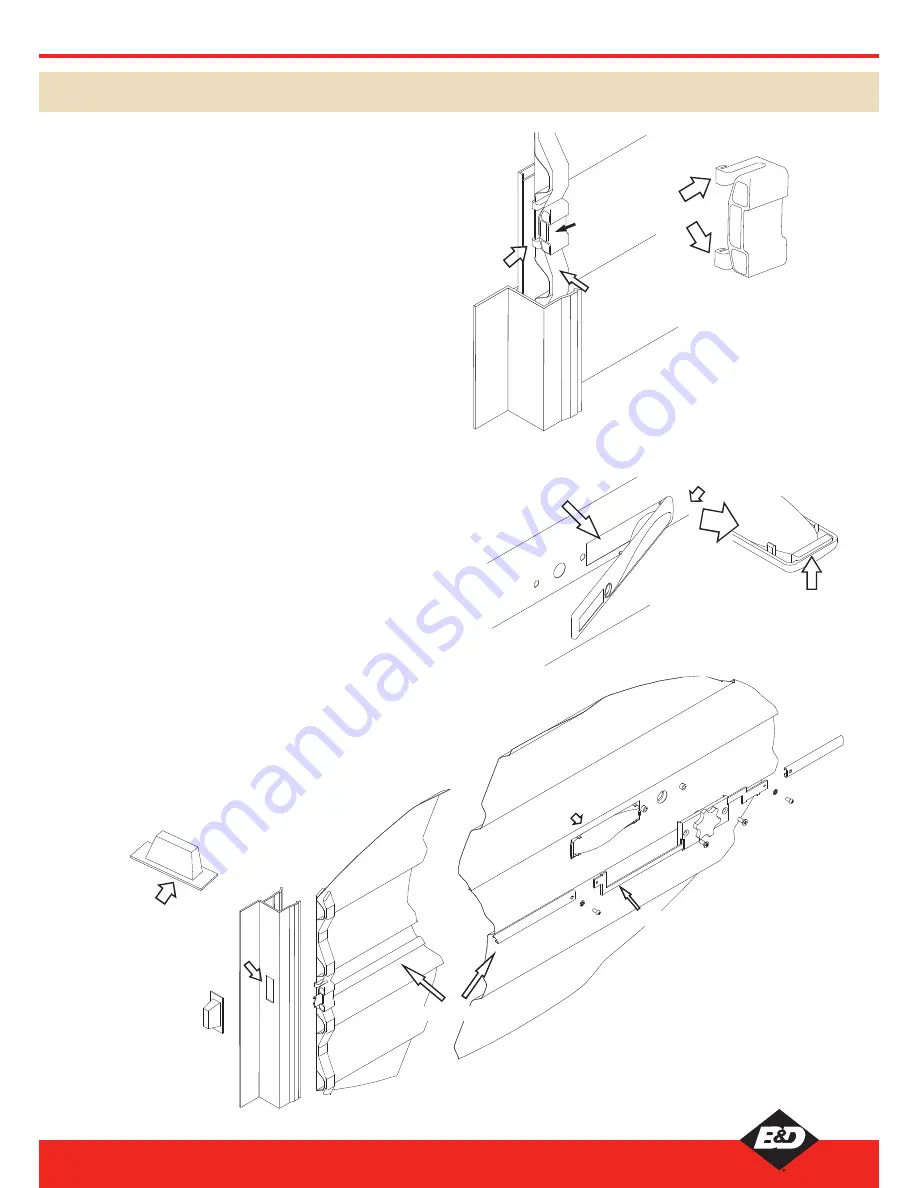
a) Raise the curtain until the lock corrugation is visible above
the door guides.
b) Install locking bar retainer in line with lock corrugation by
pushing retainer towards door edge, sliding the legs under
the Nylofelt
®
and hooking them over the curtain edge (it is
easier to hook legs one at a time). Ensure lock bar retainers
sit squarely on door curtain. See Fig (b).
c) Fit faceplate to outside of door where the hook will latch
onto curtain edge, then slide faceplate as far to the right as
possible. Use adhesive tape on outside to hold in position.
d) Attach the lock body to the faceplate from the inside, using
the mounting screws and washers. Do not over tighten the
screws. See Fig (d).
e) With the door in the closed position slide the end of the
locking bars through the locking bar retainers, and while
holding the bars level mark the side of the guides.
f) Drill and file out a rectangular slot no longer than 25mm
and no wider than 10mm. Ensure top of slot remains in line
with top of locking bar.
g) Slide bars through the guide slot, then back onto lock arms.
Screw on securely using the 4mm x 6mm screws supplied.
Ensure that locking bars do not protrude more than 20mm
beyond guide when engaged in locked position. It may be
necessary to adjust the length of the bars.
h) Ensure a clean and dry guide surface. Wipe guide with
clean rag.
i) Peel off lining from lock bar cover and position over hole.
Check that the movement of the locking bar is free.
Note: the fitting of the lock bar covers is important to
prevent possible finger entrapment - particularly important
when the door is fitted with an automatic garage door opener.
14
Series 1 Windrated Installation Instructions


