background image

4

english

BTL7-A/C/E/G_ _ _-M_ _ _ _-A/B/Y/Z(8)-S32/S115/S135/S140/KA_ _/FA_ _
Micropulse Transducer - Rod Style

Calibration using teach-in 

18

Calibration using adjustment 

19

Calibration using online setting 

21

10 

Resetting all values (reset) 

22

11 

Technical data 

23

11.1  Accuracy 

23

11.2  Ambient conditions 

23

11.3  Supply voltage (external) 

23

11.4  Output 

23

11.5  Input 

23

11.6  Dimensions, weights 

24

12 

Accessories 

25

12.1  Magnets 

25

12.2  Mounting nut 

25

12.3  Connectors and cables 

26

12.3.1 BKS-S32/S33M-00, freely configurable 

26

12.3.2 BKS-S232/S233-PU-_ _, preassembled 

26

12.3.3 BKS-S115/S116-PU-_ _, preassembled 

27

12.3.4 BKS-S135/S136M-00, freely configurable 

27

12.3.5 BKS-S140-23-00, freely configurable 

27

12.3.6 Plug-in system, 8-pin 

28

13 

Ordering code 

29

14 

Appendix 

30

14.1  Converting units of length 

30

14.2  Part label 

30

Summary of Contents for BTL7 Series

Page 1: ...Betriebsanleitung deutsch BTL7 A C E G_ _ _ M_ _ _ _ A B Y Z 8 S32 S115 S135 S140 BTL7 A C E G_ _ _ M_ _ _ _ A B Y Z 8 KA_ _ FA_ _...

Page 2: ...www balluff com...

Page 3: ...ss 9 4 1 Einbauvarianten 9 4 2 Einbau vorbereiten 9 4 3 Wegaufnehmer einbauen 10 4 3 1 Einbauempfehlung f r Hydraulikzylinder 10 4 4 Elektrischer Anschluss 11 4 4 1 Steckverbinder S32 Kabelanschluss 1...

Page 4: ...ungsversorgung extern 23 11 4 Ausgang 23 11 5 Eingang 23 11 6 Ma e Gewichte 24 12 Zubeh r 25 12 1 Positionsgeber 25 12 2 Befestigungsmutter 25 12 3 Steckverbinder und Kabel 26 12 3 1 BKS S32 S33M 00 f...

Page 5: ...folgenden Fachgrundnormen EN 61000 6 1 St rfestigkeit EN 61000 6 2 St rfestigkeit EN 61000 6 3 Emission EN 61000 6 4 Emission und folgende Produktnorm EN 61326 2 3 Emissionspr fungen Funkst rstrahlung...

Page 6: ...er Betreiber hat die Verantwortung dass die rtlich geltenden Sicherheitsvorschriften eingehalten werden Insbesondere muss der Betreiber Ma nahmen treffen dass bei einem Defekt des Wegmesssystems keine...

Page 7: ...g des Wegaufneh mers sind St be mit Nennl ngen von 25 mm bis 7620 mm lieferbar 10 2 mm Nennl nge von 25 mm bis 7620 mm 8 mm Nennl nge von 25 mm bis 1016 mm D mpfungszone Messtechnisch nicht nutzbarer...

Page 8: ...der D mpfungszone absorbiert Die zum Anfang des Wellenleiters laufende Torsionswelle erzeugt in einer Abnehmerspule ein elektrisches Signal Aus der Laufzeit der Welle wird die Position bestimmt Je na...

Page 9: ...durchmesser bei Einbau in einen Hydraulikzylinder 4 2 Einbau vorbereiten Einbauvariante F r die Aufnahme des Wegaufnehmers und des Positionsgebers empfehlen wir nichtmagnetisier bares Material Waagere...

Page 10: ...liegt in der Verantwortung des Zylinderherstellers Der Werkstoff des Gleitelements muss auf den Belastungs fall das eingesetzte Medium und die auftretenden Tempe raturen abgestimmt sein M glich sind...

Page 11: ...D rot La Programmiereingang 5 GN gr n 0 10 V 10 10 V nicht belegt1 8 WH wei Lb Programmiereingang BTL7 _1_ _ BTL7 _5_ _ 6 BU blau GND2 GND2 7 BN braun 20 bis 28 V 10 bis 30 V 1 Nicht belegte Adern k n...

Page 12: ...binder S140 S140 Pin Schnittstelle BTL7 A B C J K G H E D F Bild 4 12 Pinbelegung S140 Draufsicht auf Stecker am Wegaufnehmer 10 poliger Rundstecker A_10 G_10 C_00 C_70 E_00 E_70 A 0 V B nicht belegt...

Page 13: ...Kabelschirm erden mit dem Schutzleiter verbinden Magnetfelder Das Wegmesssystem ist ein magnetostriktives System Auf ausreichenden Abstand des Wegaufnehmers und des Aufnahmezylinders zu starken exter...

Page 14: ...en oder Systemher stellers beachten 1 Anschl sse auf festen Sitz und richtige Polung pr fen Besch digte Anschl sse tauschen 2 System einschalten 3 Messwerte und einstellbare Parameter pr fen und ggf d...

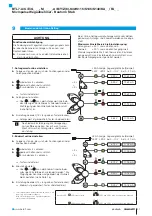
Page 15: ...ster 2 Programmiereingang auf 20 bis 28 V BTL7 _1_ _ bzw 10 bis 30 V BTL7 _5_ _ entspricht Taster gedr ckt high aktiv Automatische Deaktivierung Werden ber die Programmiereing nge ca 10 min keine Sign...

Page 16: ...Bild 6 5 Neuer Endwert vorher nachher Endpunkt Neue Endposition justieren nderung der Steigung der Kennlinie 6 3 3 Online Setting Die detaillierte Vorgehensweise f r das Online Setting ist auf Seite 2...

Page 17: ...Programmiereing nge oder automatisch nach 10 min beendet wurde Wertetabelle f r Teach in und Justieren Die Darstellung in den nachfolgenden Einstell beispielen beziehen sich auf die Wegaufnehmer mit S...

Page 18: ...angezeigt 4 00 V 12 00 mA n loslassen Aktueller Positionswert wird angezeigt 5 39 V 9 15 mA 3 Nullpunkt einstellen Positionsgeber an den neuen Nullpunkt bringen 1 04 V 4 82 mA n mindestens 2 s dr cke...

Page 19: ...onswert wird angezeigt 5 39 V 9 15 mA 3 Anfangswert justieren Positionsgeber in die Anfangsposition bringen 1 04 V 4 82 mA n mindestens 2 s dr cken 2 s 1 Kennung Anfangswert justieren wird angezeigt 0...

Page 20: ...e pr fen Die Einstellungen von Anfangswert und Endwert beeinflussen sich abh ngig von der Messposition gegenseitig Schritte 3 und 4 so oft wiederholen bis die gew nschten Werte exakt einge stellt sind...

Page 21: ...ei konstant siehe Seite 16 4 84 V 11 74 mA Einstellung beenden 15 s lang keinen Taster dr cken Anfangswert ist gespeichert Taster sind deaktiviert 4 84 V 11 74 mA Nach jedem Einstellvorgang die Verrie...

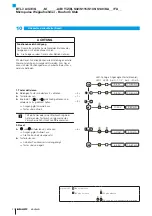
Page 22: ...V 10 80 mA Taster loslassen 1 s Innerhalb 1 s n und d gleichzeitig dr cken und mindestens 3 s gedr ckt halten 3 s 1 2 Ausgang gibt Errorwert aus 10 50 V 3 60 mA Taster sind aktiviert Tritt ein Fehler...

Page 23: ...cker in verschraub tem Zustand IP 67 Kabel IP 683 2 11 3 Spannungsversorgung extern Spannung stabilisiert4 BTL7 _1_ _ BTL7 _5_ _ 20 bis 28 V DC 10 bis 30 V DC Restwelligkeit d 0 5 Vss Stromaufnahme be...

Page 24: ...4 16UNF Anzugsdrehmoment max 100 Nm BTL7 KA_ _ Kabelmaterial PUR cULus 20549 80 C 300 V internal wiring Kabeltemperatur 40 C 90 C Kabeldurchmesser max 7 mm zul ssiger Biegeradius feste Verlegung 35 mm...

Page 25: ...TL P 1013 4S BTL P 1012 4R enthalten Distanzst ck 8 mm Material Polyoxymethylen POM Positionsgeber BTL5 P 4500 1 Elektromagnet Gewicht ca 90 g Geh use Kunststoff Betriebstemperatur 40 C bis 60 C BTL P...

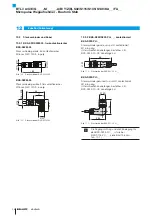
Page 26: ...nder gerade umspritzt konfektioniert M16 8 polig Unterschiedliche Kabell ngen bestellbar z B BKS S232 PU 05 Kabell nge 5 m Bild 12 4 20 66 Steckverbinder BKS S232 PU _ _ BKS S233 PU _ _ Steckverbinder...

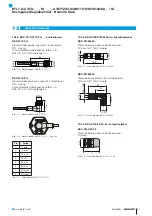
Page 27: ...S116 PU_ _ Abgang Pin Farbe 1 YE gelb 2 GY grau 3 PK rosa 4 RD rot 5 GN gr n 6 BU blau 7 BN braun 8 WH wei Tab 12 1 Pinbelegung BKS S115 116 PU _ _ 12 3 4 BKS S135 S136M 00 frei konfektionierbar BKS S...

Page 28: ...ild 12 12 Vierkantflansch M12 Kontakteinsatz Stecksystem am Beispiel Einbau des Wegaufnehmers in einen Hydraulikzylinder Baureihe ZA10 Material Vierkantflansch Messing vernickelt BTL7 KA00 2 ZA10 PUR...

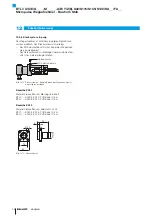
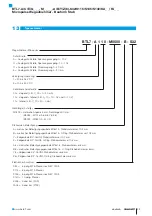
Page 29: ...version Befestigung A metrisches Befestigungsgewinde M18x1 5 Stabdurchmesser 10 2 mm B metrisches Befestigungsgewinde M18x1 5 O Ring Stabdurchmesser 10 2 mm Y Zollgewinde 3 4 16UNF Stabdurchmesser 10...

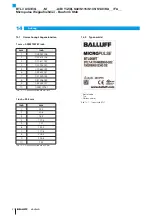
Page 30: ...71 10 0 393700787 Tab 14 1 Umrechnungstabelle mm inch 1 inch 25 4 mm inch mm 1 25 4 2 50 8 3 76 2 4 101 6 5 127 6 152 4 7 177 8 8 203 2 9 228 6 10 254 Tab 14 2 Umrechnungstabelle inch mm 14 2 Typensch...

Page 31: ...ny Balluff GmbH Schurwaldstrasse 9 73765 Neuhausen a d F Phone 49 7158 173 370 Fax 49 7158 173 691 service balluff de US Service Center USA Balluff Inc 8125 Holton Drive Florence KY 41042 Phone 859 72...

Page 32: ...User s Guide english BTL7 A C E G_ _ _ M_ _ _ _ A B Y Z 8 S32 S115 S135 S140 BTL7 A C E G_ _ _ M_ _ _ _ A B Y Z 8 KA_ _ FA_ _...

Page 33: ...www balluff com...

Page 34: ...ion guidelines 9 4 2 Preparing for installation 9 4 3 Installing the transducer 10 4 3 1 Installation recommendation for hydraulic cylinders 10 4 4 Electrical connection 11 4 4 1 Connector type S32 ca...

Page 35: ...3 Supply voltage external 23 11 4 Output 23 11 5 Input 23 11 6 Dimensions weights 24 12 Accessories 25 12 1 Magnets 25 12 2 Mounting nut 25 12 3 Connectors and cables 26 12 3 1 BKS S32 S33M 00 freely...

Page 36: ...e immunity EN 61000 6 2 noise immunity EN 61000 6 3 emission EN 61000 6 4 emission and the following product standard EN 61326 2 3 Emission tests RF emission EN 55016 2 3 industrial and residential ar...

Page 37: ...to the work to be done The operator is responsible for ensuring that local safety regulations are observed In particular the operator must take steps to ensure that a defect in the position measuring...

Page 38: ...onnector see Ordering code on page 29 BTL housing Aluminum housing containing the processing electronics Mounting thread We recommend assembling this transducer on the mounting thread BTL7 A B M18 1 5...

Page 39: ...ion The component of the torsional wave which arrives at the beginning of the waveguide is converted by a coil into an electrical signal The travel time of the wave is used to calculate the position D...

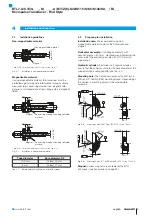
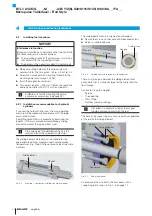
Page 40: ...transducer and magnet Horizontal assembly If installing horizontally with nominal lengths 500 mm we recommend tightening the outer rod at the end only possible with 10 2 mm or supporting it Hydraulic...

Page 41: ...detailed solutions is the responsibility of the cylinder manufacturer The sliding element material must be suitable for the appropriate load case medium used and application temperatures E g Torlon Te...

Page 42: ...TL7 _1_ _ BTL7 _5_ _ 6 BU blue GND2 GND2 7 BN brown 20 to 28 V 10 to 30 V 1 Unassigned leads can be connected to the GND on the controller side but not to the shield 2 Reference potential for supply v...

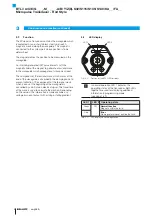
Page 43: ...Connector type S140 S140 Pin Interface BTL7 A B C J K G H E D F Fig 4 12 Pin assignment of S140 view of connector pins of transducer 10 pin circular plug 1 Unassigned leads can be connected to the GN...

Page 44: ...fields The position measuring system is a magnetostrictive system It is important to maintain adequate distance between the transducer cylinder and strong external magnetic fields Cable routing Do no...

Page 45: ...tem manufacturer 1 Check connections for tightness and correct polarity Replace damaged connections 2 Turn on the system 3 Check measured values and adjustable parameters and readjust the transducer i...

Page 46: ...2 Programming input at 20 to 28 V BTL7 _1_ _ or 10 to 30 V BTL7 _5_ _ corresponds to button depressed high active Automatic deactivation If no signals are sent over the programming inputs for approx 1...

Page 47: ...rt value Null point Before After New end value Before After End point 6 3 3 Online setting The detailed procedure for online setting is described on page 21 Setting start and end values while the syst...

Page 48: ...ttons the programming inputs or automatically after 10 min have expired Value table for teach in and adjustment The following examples refer to transducers with 0 to 10 V or 4 to 20 mA output For all...

Page 49: ...Teach in is displayed 4 00 V 12 00 mA Release n Current position value is displayed 5 39 V 9 15 mA 3 Set null point Bring magnet to the new null point 1 04 V 4 82 mA Hold down n for at least 2 s 2 s...

Page 50: ...ition value is displayed 5 39 V 9 15 mA 3 Adjust start value Bring magnet to start position 1 04 V 4 82 mA Hold down n for at least 2 s 2 s 1 Indication for Adjust start value is displayed 0 00 V 4 00...

Page 51: ...19 00 mA Check values The settings for the start value and end value have a mutual effect depending on the measuring position Repeat steps 3 and 4 until the desired values are exactly set 5 Exit adju...

Page 52: ...ge 16 4 84 V 11 74 mA Exit setting do not press a button for at least 15 s The start value is saved the buttons are deactivated 4 84 V 11 74 mA After each calibration procedure you must wait for the l...

Page 53: ...3 s 2 1 5 39 V 10 80 mA Release button 1 s Within 1 s hold down n and d simultaneously for at least 3 s 3 s 1 2 Output indicates error value 10 50 V 3 60 mA Buttons are activated If an error or an in...

Page 54: ...Connector when attached IP 67 Cable IP 683 11 3 Supply voltage external Voltage stabilized4 BTL7 _1_ _ BTL7 _5_ _ 20 to 28 V DC 10 to 30 V DC Ripple d 0 5 Vss Current draw at 24 V DC d 150 mA Inrush...

Page 55: ...8 1 5 or 3 4 16UNF Tightening torque Max 100 Nm BTL7 KA_ _ Cable material PUR cULus 20549 80 C 300 V internal wiring Cable temperature 40 C to 90 C Cable diameter Max 7 mm Permissible bending radius F...

Page 56: ...1013 4R BTL P 1013 4S BTL P 1012 4R magnets includes Spacer 8 mm material polyoxymethylene POM BTL5 P 4500 1 magnet solenoid Weight Approx 90 g Housing Plastic Operating temperature 40 C to 60 C BTL P...

Page 57: ...molded preassembled M16 8 pin Various cable lengths can be ordered e g BKS S232 PU 05 Cable length 5 m Fig 12 4 20 66 Connector type BKS S232 PU _ _ BKS S233 PU _ _ Angled connector molded preassembl...

Page 58: ...type BKS S116 PU_ _ outlet Pin Color 1 YE yellow 2 GY grey 3 PK pink 4 RD red 5 GN green 6 BU blue 7 BN brown 8 WH white Tab 12 1 BKS S115 116 PU _ _ pin assignment 12 3 4 BKS S135 S136M 00 freely con...

Page 59: ...Fig 12 12 Square flange M12 contact insert Plug in system based on the example installing the transducer in a hydraulic cylinder Series ZA10 Square flange material Nickel plated brass BTL7 KA00 2 ZA10...

Page 60: ...M0025 to M1016 A8 B8 Y8 Z8 M0025 to M7620 A B Y Z Rod version fastening A Metric mounting thread M18x1 5 rod diameter 10 2 mm B Metric mounting thread M18x1 5 O ring rod diameter 10 2 mm Y 3 4 16UNF...

Page 61: ...10 0 393700787 Tab 14 1 Conversion table mm to inches 1 inch 25 4 mm inches mm 1 25 4 2 50 8 3 76 2 4 101 6 5 127 6 152 4 7 177 8 8 203 2 9 228 6 10 254 Tab 14 2 Conversion table inches to mm 14 2 Pa...

Page 62: ...any Balluff GmbH Schurwaldstrasse 9 73765 Neuhausen a d F Phone 49 7158 173 370 Fax 49 7158 173 691 service balluff de US Service Center USA Balluff Inc 8125 Holton Drive Florence KY 41042 Phone 859 7...

Reviews: