Page 4
54371-03_97_A
Basic System Features and Functions
Basic System Features and Functions
Any time you change a DIP Switch, other than A1, you must reset Persistent
Memory for your new DIP Switch Settings changes to take effect. If you do
not reset Persistent Memory, your system may function improperly.
To reset Persistent Memory:
s
Power down by disconnecting power source from spa.
s
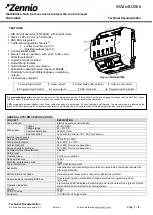
Put a jumper across J43, covering both pins. (See illustration below)
s
Power up by connecting power source to spa.
s
Wait until “
” is displayed on your panel.
s
Power down again.
s
Remove jumper from J43 (May also move to cover 1 pin only)
s
Power up again.
About Persistent Memory and Time of Day Retention:
This system uses memory that doesn’t require a battery to store a variety of
settings. What we refer to as Persistent Memory stores the filter settings,
the set temperature, and the heat mode.
Persistent Memory is not used for Time of Day. Only models with a
Serial Deluxe panel installed (VS5xxDZ and GS5xxDZ) can display the
time. However, during power loss to the spa, the system will lose the
correct time, and reset to 12:00 PM when power is restored.
Power Up Display Sequence
Upon power up, you should see the following on the display:
s
Three numbers in a row, which are the SSID (the System Software
ID). The third display of these numbers is the Software Version,
which should match the version of your system. For example, if these
three numbers are
, that is a VS511SZ at version 38.
s
Displayed next is: “
” (indicating the system is configured for
a heater between 3 and 6 kW) or “ ” (indicating the system is
configured for a heater effectively* between 1 and 3 kW).
“
” should appear for all VS models running at 240VAC.
“ ” should appear for all VS models running at 120VAC, as well
as all GS models. (*A heater which is rated at 4 kW at 240VAC will
function as a 1 kW heater at 120VAC.)
s
“
” will appear to signal the start of Priming Mode.
At this point, the power up sequence is complete. Refer to the Reference
Card for the VS or GS System model of your spa for information about how
the spa operates from this point on, including how to adjust the Time of
Day if using a Serial Deluxe style panel.
G
C
G
C
G
C
G
C
C
G
T1
SWITCHBANK
BALBOA INSTRUMENTS, INC.
VS500Z
P/N 22972 REV D
MADE IN U.S.A
COPYRIGHT 2005
J7
J8
J44
J22
U4
FUSE .3A 250V
FUSE 20A 250V
FUSE 3A 250
V
E
.GN
D
F4
K6
K1
K8
K9
K5
J23
J46J46
F1
J29
J47
J50
F7
J17
/26
J20
J1A
J10
J13
J2A
AUX. F
SEN. A
SEN. B
VAC
V
V
W1
W7
J1
J2
W2
W3
G
C
W4
K2
K3
F2
J12
1
2 3
J43
2-SPD
EXT RLY
J1
8
SWITCHBANK A
S1
J6
E.GND
TST
J43
J43 on VS5xxZ and VS300 Series Main Board Shown.
J43 on GS5xxZ Series is located in approximately the same position.
G
C
SWITCHBANK
P
/N 22964
_
B
MA
DE
IN
U
.S
.A.
VS100
©
200
6
S1
K3
K5
K4
K1
PUMP
K2
J7
J8
U4
T0.25A 250V
F2
J23
G
C
OZONE
J29
HEATER
A
A
J9
J20
SEN. A
SEN. B
J1
B
albo
a
F4
G
C
J26
J58
J57
J50J50
J13J13
J12J12
J90J90
LINE
NEUTRAL
NEUTRAL
WHT AC
BLK AC
W1
J18
SWITCHBANK A
TST
RST
J43
J6
J43 on VS100/GS100 Series Main Board Shown.