7. CLEANING
When the oven is new, operate it for at least one hour at a setting of at least 500°F (250ºC). Due to normal
manufacturing processes, a small amount of steam and/or smoke will exit the oven from moisture and oils
on the oven components. Shut off and allow the oven to cool.
After cooling wipe down the interior of the oven with a clean damp cloth. Brushing of the baking hearth is
recommended.
It is recommended that a regular cleaning schedule bemaintained to keep your oven operating and looking
its best. Spills should be cleaned immediately.
The oven should always be allowed to cool sufficiently before cleaning. Exterior surfaces should be wiped
with a soft cloth and mild detergent. Stubborn stains may be cleaned with a light weight, non-metallic
cleaning pad. Apply only light pressure and rub in the direction of the surface grain.
The control panel surface is easily cleaned with a soft cloth and mild detergent. Do not use abrasives,
solvent cleaners or metallic scouring pads on the control panel. They may scratch or damage the label
surface.
Internal metallic surfaces should be allowed to cool before cleaning. Wipe interior surfaces with a wet cloth
or light weight scouring pad.
Food particles or spills that accumulate on the baking hearth may be brushed off with a normal oven brush.
Stubborn spills should be heated to a maximum temperature for approximately one hour to burn the spill so
it will crumble and easily brush out afterwards.
Do not use oven cleaners, caustic solutions or mechanical means that may damage the interior of your
oven.
Exterior Cleaning
Never spray steam or water directly onto or into the oven. This could adversely affect the ceramic
cooking hearth and/or electrical components.
Interior Cleaning
!
!
Caution:
Disconnect all ovens from electrical supply before servicing.
8. MAINTENANCE
Users are cautioned that maintenance and adjustments should only be performed by authorized service
agents using Baker's Pride replacement parts.
Minor periodic maintenance to your oven should providemanyyears of useful service to you. Any time the
unit is serviced it is recommended all components be checked and their performance verified. At least
once each year your oven should be inspected by a qualified service provider to insure your oven is
operating at its peak performance.
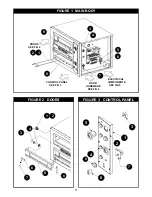
Enclosed in this booklet are diagrams of likely replacement parts that may be required for normal
maintenance.
Specifications are subject to change without notice.
Be sure to verify the current
specification with your qualified service provider or Bakers Pride before ordering replacement parts.
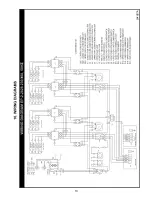
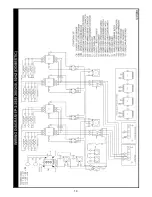
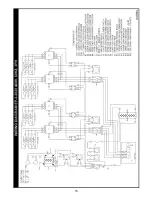
The current wiring diagram at the date of your oven's manufacture was affixed to the unit for reference.
Copies of the proper wiring diagrams effective on the date this booklet is printed are enclosed.
Specifications are subject to change without notice. If there is any uncertainty or discrepancy between the
wiring diagram and your oven refer to Bakers Pride Technical Service for clarification.
Replacement Parts
Wiring Diagrams
9


