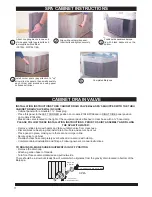
Attach coupling blocks to one end
of side panel with toggle bolts and
tool supplied with cabinet.
(PS 1042, WW 1067/ 68)
1
Align with another side panel.
Insert bolts and tighten securely.
2
Position side panels under spa
lip with black kickboard on the
bottom.
3
4
Install corner posts (pay attention to "up"
arrows) to side panels, then small panels to
each corner post around spa using panel
bolts and bolt driver.
5
Completed Baja spa.
CABINET DRAIN VALVE
SPA CABINET INSTRUCTIONS
17
_
_
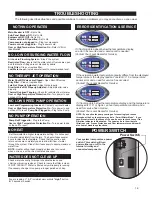
Secure Nut
to Cabinet
Clamp to
Hose/Barb
Turn Counter
Clockwise & Pull Out
_
3/4” Clear Hose to Spa Gravity Drain
INSTALLATION INSTRUCTIONS THRU CABINET DRAIN VALVE BAJA SPA'S EQUIPPED WITH THE THRU
CABINET DRAIN VALVE WILL INCLUDE:
- Cabinet panel with removable 1 ½” black plug .
- Place this panel in the LEFT CORNER position on models # 1044/67/68and in RIGHT SIDE panel position
on models # 1042/46.
- Black drain valve located to the right of the equipment pack, attached to clear hose with a ¾” hose clamp.
PLEASE FOLLOW THESE INSTALLATION INSTRUCTIONS, PRIOR TO SKIRT ASSEMBLY AND FILLING
THE SPA WITH WATER:
- Remove / slide clamp with pliers and take out drain valve from clear hose.
- Discard black cabinet plug and install drain thru hole and secure back nut.
- Place panel in place, making sure there are no crimps in line.
- Secure valve to cabinet.
- Re-attach clear hose completely over barbs and re-secure with clamp.
- Complete cabinet installation and fill spa. Following owner’s manual instructions.
TO DRAIN SPA- MAKE SURE EQUIPMENT IS IN OFF POSITION
- Remove the drain cap.
- Attach a garden hose to threads.
- Turn front face counter-clockwise and pull outwards.
There should be a slow but steady flow of water which originates from the gravity drain located in bottom of the
Baja spa.
Summary of Contents for Whitewater XS
Page 20: ...NOTES SPA SCHEMATIC 19...

