


3 - 6
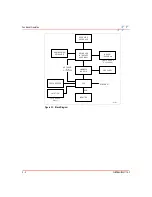
WBPEEUI220771A0
Software Installation and Start-up
Connections
Wiring connections vary depending on the model. Procedure
details the connections for the various models.
NOTE: AC outlets are only for external peripheral equipment listed in this
instruction. Do not connect motors, lights or test equipment to the AC outlets.
Electrical noise may cause data to be lost or changed.
Communications Wiring
The auxiliary terminal supports Ethernet communications.
Access
Ethernet wiring access varies depending on the model. Proce-
dure
details access for the various models.
Connections
Ethernet wiring connections vary depending on the model. Pro-
cedure
details the connections for the various models.
Grounding
This instruction does not discuss the details of grounding sys-
tems. Good grounding practices prevent problems and reduce
system downtime. A complete and properly grounded electrical
system is vital for personnel safety, equipment protections and
normal process system operation. Digital process control sys-
tems require a single-point grounding system that has two
paths: One path for an alternating current ground (safety
ground) and one path for a direct current ground (system
common).
For detailed information on system grounding, refer to
Software Installation and Start-up
After installing the main workstation and all auxiliary worksta-
tions, install the software and configure the system. Refer to
the appropriate instructions listed in Table
to load the soft-
ware, configure and operate the system.
Summary of Contents for C-I-CV42C
Page 1: ...Bailey Hartmann Braun TM Instruction Conductor Conductor VMS Series 42 Auxiliary Terminal ...
Page 15: ...WBPEEUI220771A0 ...
Page 43: ...WBPEEUI220771A0 ...
Page 53: ...WBPEEUI220771A0 ...
Page 67: ...WBPEEUI220771A0 ...
Page 77: ...WBPEEUI220771A0 ...
Page 93: ...PR1 2 WBPEEUI220771A0 Procedure 3 Turn each end latch turn 4 Open the door ...
Page 97: ...WBPEEUI220771A0 ...
Page 107: ...WBPEEUI220771A0 ...
Page 113: ...WBPEEUI220771A0 ...
Page 123: ...WBPEEUI220771A0 ...
Page 125: ...WBPEEUI220771A0 ...
Page 133: ...WBPEEUI220771A0 ...
Page 137: ...WBPEEUI220771A0 ...
Page 141: ...WBPEEUI220771A0 ...
Page 143: ...WBPEEUI220771A0 ...
Page 145: ...WBPEEUI220771A0 ...
Page 147: ...WBPEEUI220771A0 ...
Page 151: ...WBPEEUI220771A0 ...
Page 177: ...PR27 6 WBPEEUI220771A0 Procedure 7 Install all cables onto the CPU ...
Page 181: ...WBPEEUI220771A0 ...
Page 185: ...WBPEEUI220771A0 ...
Page 195: ...WBPEEUI220771A0 ...
Page 197: ...WBPEEUI220771A0 ...
Page 213: ...WBPEEUI220771A0 ...


