


WBPEEUI220771A0
PR9 - 1
PR9
Keyboard Interface Device
Installation
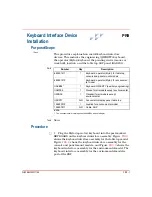
Purpose/Scope
This procedure explains how install keyboard interface
devices. This includes the engineering (QWERTY) keyboard,
the operator (Mylar) keyboard, the pointing device (mouse or
trackball), joystick, and the table top ADP panel (IIADP01).
Parts
Tools
None.
Procedure
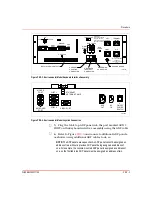
□
1. Plug the Mylar (operator) keyboard into the port marked
KEYBOARD on the keyboard interface assembly. Figure
shows the keyboard interface assembly for the table top model,
Figure
shows the keyboard interface assembly for the
console and panel mount models, and Figure
shows the
keyboard interface assembly for the environmental model. The
keyboard interface assembly for the environmental model is
part of the PEP.
10 min.
Number
Qty
Description
6638514?1
1
Keyboard, operator (Mylar) for table top,
console and panel mount models
6638514?2
Keyboard, operator (Mylar) for environmen-
tal model
IIAKB04
1
1
Keyboard, QWERTY (auxiliary engineering)
IIAMS04
1
Mouse for all models except environmental
IIATB05
1
Trackball for all models except
environmental
IIADP01
A/R
Annunciator display panel, table top
1948803?2
1
Joystick for environmental model
1948978?1
A/R
Cable, ADP
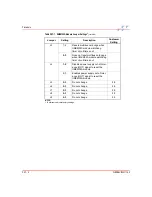
NOTE:
1. The environmental model requires the IIAKB04 without adapter.
Summary of Contents for C-I-CV42C
Page 1: ...Bailey Hartmann Braun TM Instruction Conductor Conductor VMS Series 42 Auxiliary Terminal ...
Page 15: ...WBPEEUI220771A0 ...
Page 43: ...WBPEEUI220771A0 ...
Page 53: ...WBPEEUI220771A0 ...
Page 67: ...WBPEEUI220771A0 ...
Page 77: ...WBPEEUI220771A0 ...
Page 93: ...PR1 2 WBPEEUI220771A0 Procedure 3 Turn each end latch turn 4 Open the door ...
Page 97: ...WBPEEUI220771A0 ...
Page 107: ...WBPEEUI220771A0 ...
Page 113: ...WBPEEUI220771A0 ...
Page 123: ...WBPEEUI220771A0 ...
Page 125: ...WBPEEUI220771A0 ...
Page 133: ...WBPEEUI220771A0 ...
Page 137: ...WBPEEUI220771A0 ...
Page 141: ...WBPEEUI220771A0 ...
Page 143: ...WBPEEUI220771A0 ...
Page 145: ...WBPEEUI220771A0 ...
Page 147: ...WBPEEUI220771A0 ...
Page 151: ...WBPEEUI220771A0 ...
Page 177: ...PR27 6 WBPEEUI220771A0 Procedure 7 Install all cables onto the CPU ...
Page 181: ...WBPEEUI220771A0 ...
Page 185: ...WBPEEUI220771A0 ...
Page 195: ...WBPEEUI220771A0 ...
Page 197: ...WBPEEUI220771A0 ...
Page 213: ...WBPEEUI220771A0 ...


