background image

7

  BF-UM-C-DP C171-EN November 2019

USER MANU

AL FOR DISPL

A

Y

7.6.5  Walk Assistance

The Walk assistance can only be activated 
with a standing pedelec.

Activation: Briefly press (<0.5S) the 


button until to level null, and then press 
(<0.5s) the 

 button, the 

 symbol is 

displayed. Now hold down the 

 button 

and the Walk assistance will activate. The 

 symbol will flashes and the pedelec 

moves approx. 6 km/h. After releasing the 
button, the motor stops automatically and 
switches back to level null (if no any option 
be activated in 5 second). If no speed signal 
is detected, it shows 2.5km/h.

7.6.6  Battery capacity indication

The battery capacity is showed in ten bars. 
Each full bar represents a remaining capacity 
of the battery in a percentage, if the frame 
of indicator blinks that means to charge. (as 
shown in the figure below):

Bars

Charge in Percentage

10

≥90%

9

80%≤C<90% 

8

70%≤C<80%

7

60%≤C<70%

6

50%≤C<60%

5

40%≤C<50%

4

30%≤C<40%

3

20%≤C<30%

Bars

Charge in Percentage

2

10%≤C<20%

5%≤C<10%

Blinking

C<5%

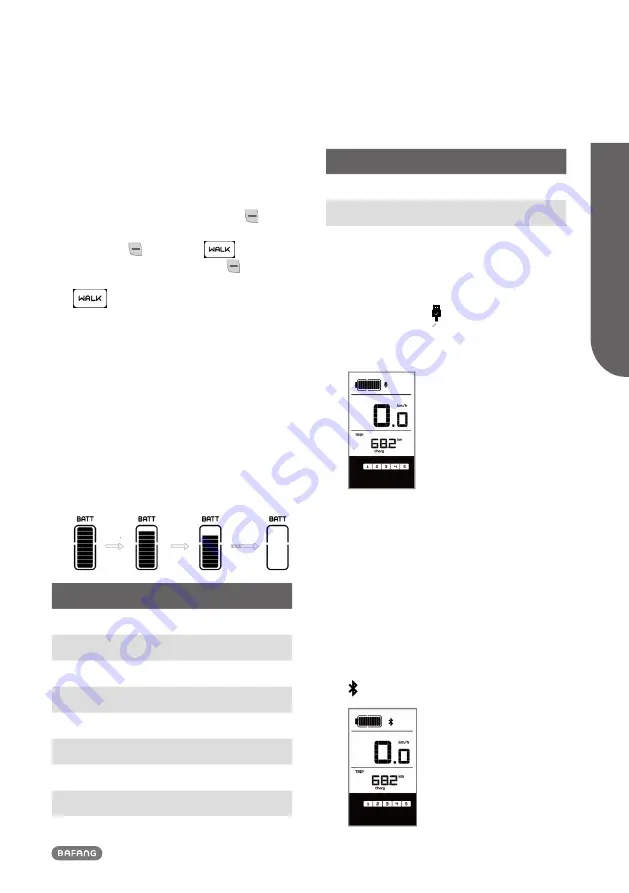
7.6.7  USB charge function

If an external USB device is connected to the 
display, the icon   appears, the device will 
be charged. The maximum charging voltage 
is 5V and the maximum charging current is 
500mA.

7.6.8  Bluetooth function

This display can connect via Bluetooth 
to mobile phone and communicate with 
Bafang Go APP. The Information of motor, 
display, battery, sensor and controller infor-
mation can be displayed on mobile phone, 
and it can update the firmware of Pedelec by 
using APP via mobile phone.

If open the APP and connect the display, 
after connected to the mobile, the Bluetooth   

 indicator will be lighted as shown below:


Summary of Contents for DP C171.CAN

Page 1: ...w 3 7 4 Display 4 7 5 Key Definition 5 7 6 Normal Operation 5 7 6 1 Switching the System ON OFF 5 7 6 2 Selection of Support Levels 5 7 6 3 Selection mode 6 7 6 4 Headlights backlighting 6 7 6 5 Walk...

Page 2: ...update 7 1 IMPORTANT NOTICE If the error information from the display cannot be corrected according to the inst ructions please contact your retailer The product is designed to be waterproof It is hi...

Page 3: ...ttery capacity indicator Automatic sensors explanation of the light ing system Brightness setting for backlight Indication of performance support Walk assistance Kilometer stand including single trip...

Page 4: ...eed AVG 6 Kilometer stand Daily kilometers TRIP Total kilometers TOTAL 7 Data Display data which corresponds to the current mode 8 Walking assistance 9 USB charging indicator displays the icon if an e...

Page 5: ...ystem If the automatic shutdown time is set to 5 minutes it can be set with the Auto Off function See Auto Off the display will automatically be turned off within the desired time when it is not in op...

Page 6: ...ghting Hold 2S the button to activate the headlight and backlight Hold 2S the button again to turn off the headlight and backlight The brightness of the backlight can be set in the display settings Br...

Page 7: ...he battery in a percentage if the frame of indicator blinks that means to charge as shown in the figure below Bars Charge in Percentage 10 90 9 80 C 90 8 70 C 80 7 60 C 70 6 50 C 60 5 40 C 50 4 30 C 4...

Page 8: ...desired selec tion press 0 3S the button twice to save and return to the main screen or you can press 0 3S the button once to save and enter next item Selection of unit in km Miles NOTE If the daily...

Page 9: ...Off 7 7 1 5 Set Auto Off When the system is on quickly press 0 3S the button twice to access the MENU interface repetitively press the button until the OFF appears on the display as shown below And th...

Page 10: ...as shown below Once you have viewed your desired informa tion press 0 3S the button twice to save and return to the main screen or you can press 0 3S the button once to enter next item Controller hard...

Page 11: ...item Display software info 7 7 2 6 Display software info When the system is on quickly press 0 3S the button twice to access the MENU interface repetitively press the button until the dSc Display Soft...

Page 12: ...e check appears on the display as shown below Once you have viewed your desired informa tion press 0 3S the button twice to save and return to the main screen or you can press 0 3S the button once to...

Page 13: ...Discharge A b07 Remaining Capacity A h b08 Total Capacity A h b09 Relative SOC b10 Absolute SOC Content Explanation b11 Charging cycles number b12 Maximum not charging time Hr b13 Recently not chargi...

Page 14: ...ck in its correct position Check the throttle can adjust back into its correct position if the situation does not improve please change to a new throttle only with this function 07 Overvoltage protect...

Page 15: ...or connector is connected correctly 4 If the error persists please contact your retailer 25 Torque signal Error 1 Check that all connections are connected correctly 2 If the error persists please cont...

Page 16: ...tailer 44 Voltage of the single cell is too high Please contact your retailer 45 Temperature from the battery is too high Please contact your retailer 46 The temperature of the battery is too low Plea...

Reviews: