background image

● CHG/STY - power charge indicator:

red when charging, green when the
battery is full

Charging

If there is a manual, replicate the charging instructions. Add external battery charging

Channel Configuration

TBD BH

Programming FCC Call Sign

TBD BH

Bluetooth Connection

In order for Bad Elf Flex to operate as a base or rover, you
must establish a bluetooth pairing between the radio and the
Flex.

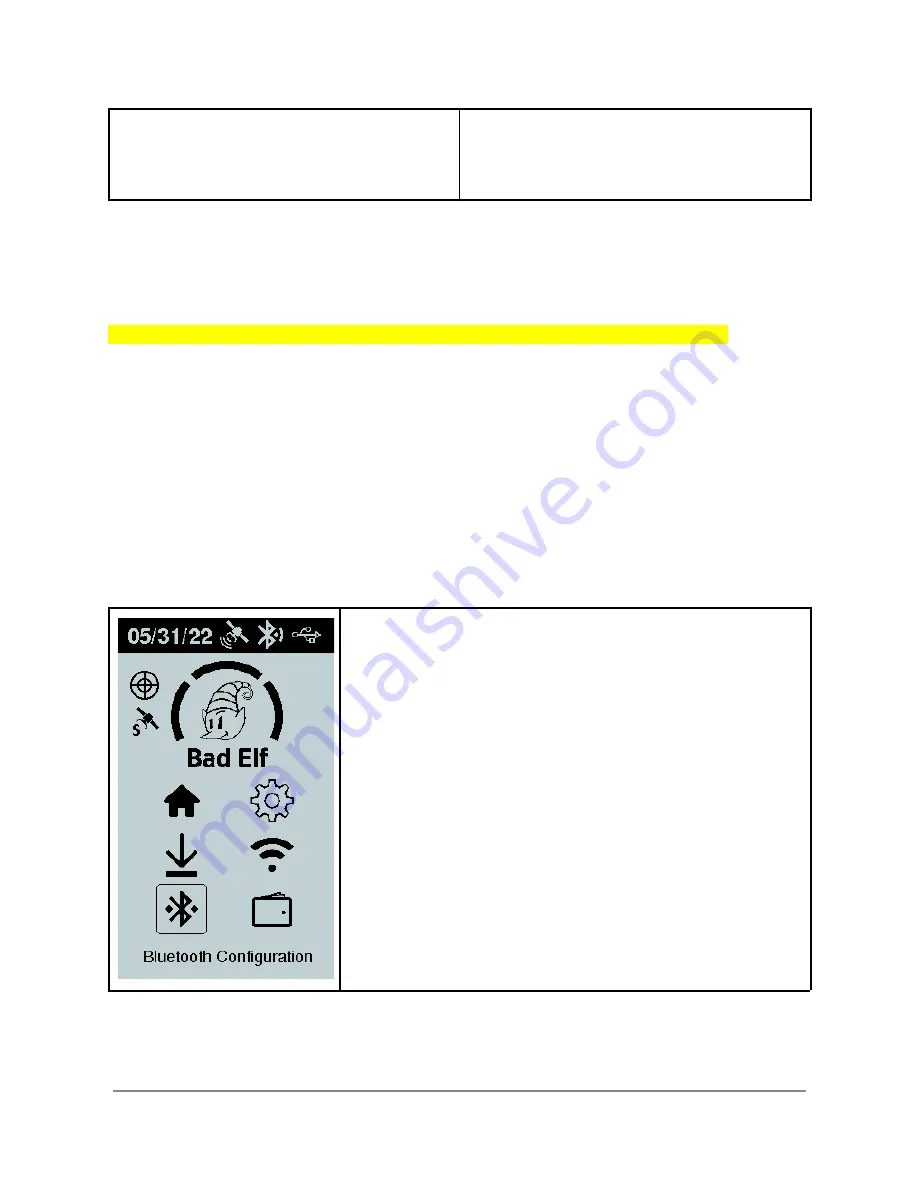
Select the Bluetooth Configuration option from the main menu
of the Bad Elf Flex.

Tip: Your Bad Elf Flex will remember the last radio it was
paired with. We suggest using color coded stickers on the
radio and the Flex as a reminder of which radio is already
paired with the Flex.

Copyright © 2022. Bad Elf, LLC.

6

All Rights Reserved.

Summary of Contents for Flex

Page 1: ...Bad Elf Base Rover Configuration Manual Version 1 x ...

Page 2: ...figuration 12 Standalone Configuration 12 Navigating the Rover feature 12 Starting the Rover 12 Stopping the Rover 16 Rover Status Screen 17 Error Conditions 18 Bad Elf Flex App 19 Flex Rover Mode Checklist 20 Flex Token Screen 21 Rover Pole Height Configuration 22 Flex mode confirmation 24 Activating Rover Mode 26 Deactivating Rover Mode 27 Rover Mode Confirmation 28 Error Conditions 29 Usage Lim...

Page 3: ...Mode Checklist 40 Base Pole Height Configuration 41 Base Tilt Calibration 42 Establishing Base Reference Point 43 Base Reference Point Capture 43 Base Reference Point Established 43 Using a Known Base Reference Point 43 Activating Base Mode 44 Deactivating Base Mode 44 Confirming Base Mode Operation 45 Error Conditions 45 Usage Limitations 47 Data Recordings 47 Project Contents 47 What s in the zi...

Page 4: ...to radio frequency energy 49 Limited Warranty Terms and Conditions 50 Warranty 50 Limitations and Remedies 51 How to Obtain Warranty Service 51 Limitation of Liability 51 Document Version 52 Trademarks 52 Copyright 2022 Bad Elf LLC 3 All Rights Reserved ...

Page 5: ...ore Flex units operating as rovers A Flex radio connects via Bluetooth to Flex and requires no additional cables What s in the Box The following items are included in the standard Flex radio kit Harxon Radio HX DU1603D UHF Antenna Rugged carrying case AC wall charger Charging Serial Cable Survey pole mount Base and Rover Overview What is a Base What is a Rover Limitations Radio Preparation Harxon ...

Page 6: ...ssion in applications of GNSS RTK surveying Radio Controls and Indicators Buttons Up Down Left Right Power Confirmation Powering On Off Long press the power button for 3 5 seconds to boot Power indicator light shows red Long press the power button for 3 seconds to shutdown LED Indicators T RX wireless transceiver indicator light green when receiving red when transmitting BT green when Bluetooth on...

Page 7: ...ction In order for Bad Elf Flex to operate as a base or rover you must establish a bluetooth pairing between the radio and the Flex Select the Bluetooth Configuration option from the main menu of the Bad Elf Flex Tip Your Bad Elf Flex will remember the last radio it was paired with We suggest using color coded stickers on the radio and the Flex as a reminder of which radio is already paired with t...

Page 8: ...ey and select using the enter button Note Ensure your radio is powered on before you select the New pairing function The New Pairing feature will scan for devices and indicate the number of bluetooth devices in range This process typically takes from 10 15 seconds Copyright 2022 Bad Elf LLC 7 All Rights Reserved ...

Page 9: ...highlighted the the radio you want to pair with select using the enter button Your Flex starts the pairing process and provides a status indicator that the pairing is in process The radio serial number is shown for confirmation The pairing process typically takes 5 10 seconds If the serial number shown does not match the radio you want to pair with press the back button to cancel Copyright 2022 Ba...

Page 10: ...at this process in the future Should you want to determine which Bluetooth devices have established a piring with your Flex select the Paired Devices function from the Bluetooth Configuration feature Press the up and down arrows to select a paired device Press the enter button to view an item s status or delete a pairing Press the back button to cancel Wired Connection Copyright 2022 Bad Elf LLC 9...

Page 11: ...d position solution of your Flex Rover is dependent on decent line of sight connectivity with the base Note be aware that once your Bad Elf Flex begins to receive corrections it will adopt the datum used by the base once a fix is achieved Prerequisites For Flex to operate as a rover the following items are required Flex Extreme or Flex Standard Radio kit Optional range pole or equivalent To preven...

Page 12: ...gurations before consuming a token Configuration Standalone Configuration via LCD The Bad Elf Flex supports operating in rover mode without the use of a connected app A standard checklist interface provides for quick startup and configuration of Flex as an RTK Rover Starting the Rover feature enables a high accuracy collection mode using the standard Flex logging options include point and track lo...

Page 13: ...ttings icon and click the enter button Select Correction Mode using the enter button Replace this image Use the up and down arrow buttons to scroll to the Rover function To start the Rover checklist press the enter button Copyright 2022 Bad Elf LLC 12 All Rights Reserved ...

Page 14: ...mode press No using the back button In a radio is not connected the Bad Elf Flex automatically attempts to restore the Bluetooth connection with the last radio it used The display shows the radio it is searching for and the serial number for reference This process takes 5 10 seconds and requires the radio to be on If you want to pair with a different radio or are having any issues pairing with you...

Page 15: ...on your phone or tablet to change the default pole height Once you have confirmed the pole height the Bad Elf Flex confirms unit tilt Ensure your Bad Elf Flex is mounted tightly on the pole and that the pole is level and completely vertical If you need to adjust the tilt calibration pressing the enter button provides a feature to adjust and calibrate the internal bubble level If your calibration i...

Page 16: ...Detected mode To exit starting the rover feature press the back button Once the base is detected and the Bad Elf Flex determines a viable corrections feed you may start the rover The Bad Elf Flex displays the serial number of the Bad Elf Flex base unit and the name of the point used for its reference position Actions Press the enter button to start the rover Press the back button to exit starting ...

Page 17: ...utton to confirm the action Actions Press the enter button to stop the rover Press the back button to return to the rover status pages rover remains active You may also cancel rover mode by navigating to Settings Corrections and choosing any correction mode other than Rover Copyright 2022 Bad Elf LLC 16 All Rights Reserved ...

Page 18: ...e current fix Horizontal an estimate of the horizontal accuracy based on the corrections source Distance approximate distance between the base and the rover Secondary Rover Status Page Remote Base Information Name remote base name Reference Point reference point used for base Here means base is using a named point Otherwise name references a point selected from base or created on base Datum the ba...

Page 19: ...pe changes to the current fix type of the standalone GNSS engine Bad Elf Flex App The Flex app provides a UI rich experience to manage and activate the Rover feature of Flex The Rover mode feature is accessed under the unified corrections mode function of the Flex app To begin a Rover session select the Corrections function of the Flex app Copyright 2022 Bad Elf LLC 18 All Rights Reserved ...

Page 20: ...e Rover Mode Checklist To enable rover feature usage from the Flex app follow the steps below From the main menu tap Correction Mode Tap the row labeled Rover Mode Copyright 2022 Bad Elf LLC 19 All Rights Reserved ...

Page 21: ... information and all operating parameters are correct Setup Section 1 Confirmation of bluetooth connection with Flex 2 Activation requirements section 3 Pole height confirmation and editing tap the arrow on the right to adjust pole height 4 Battery check displays battery level and external power availability Rover mode cannot start unless there is XX power available or externally charging 5 Radio ...

Page 22: ...reen to confirm or add additional tokens Note you do not need to purchase or use a token to operate the checklist The checklist allows you to confirm all required setup and configuration necessary to operate in Rover mode is correct When the checklist is complete you may choose to use a token and enter Rover mode Copyright 2022 Bad Elf LLC 21 All Rights Reserved ...

Page 23: ...eight for a Rover Ensure the correct value for your range pole is entered in the pole height field If the pole height is correct tap the row to move to the next step in the checklist To change the pole height value tap the icon on the right side of the row Copyright 2022 Bad Elf LLC 22 All Rights Reserved ...

Page 24: ... pole enter a value of 0 in the pole height Or you may use a value that represents the height of the Flex above ground For example if holding the Flex in your hand you may wish to use a value of 1 meter Copyright 2022 Bad Elf LLC 23 All Rights Reserved ...

Page 25: ...es one final check for a token only if your unit is a Standard Flex If you want to operate in Rover mode you must consume a Bad Elf Flex token to continue Pressing on the takes you to the Flex token screen where you can activate Extreme mode Copyright 2022 Bad Elf LLC 24 All Rights Reserved ...

Page 26: ...Copyright 2022 Bad Elf LLC 25 All Rights Reserved ...

Page 27: ... the Activate Rover Mode button Upon successful activation the status line changes to a green check If an error occurs upon activation the status line displays the error condition preventing activation Copyright 2022 Bad Elf LLC 26 All Rights Reserved ...

Page 28: ... of data received during this session To deactivate the Rover click the Deactivate RoverMode button Upon deactivation the Flex reverts back to standalone GNSS configuration If a token was used the remaining time still counts down You may at any time restart the rover as long as the token is still valid Copyright 2022 Bad Elf LLC 27 All Rights Reserved ...

Page 29: ...n is Rover mode Rover Mode press the on right to view and confirm data flowing from the Base Logging press the on right to use any of the standard logging functions Radio press the on right to see the status of the connection with your radio Copyright 2022 Bad Elf LLC 28 All Rights Reserved ...

Page 30: ...in Rover Mode the Rover Mode item is highlighted Error Conditions When using the Bad Elf Flex App error conditions from the Base or the Rover are reported to the app If the error is a checklist item that item is highlighted and may include additional information about the problem Copyright 2022 Bad Elf LLC 29 All Rights Reserved ...

Page 31: ... base reference point must remain stable any tilt condition can seriously affect the reliability of all data collected Before continuing confirm the Base is mounted in a stable location or has not been tilted or fallen over Copyright 2022 Bad Elf LLC 30 All Rights Reserved ...

Page 32: ... to the Base Flex not receiving enough satellites to provide corrections Ensure the Base receiver has a very clear sky portrait and no vehicles or machinery are parked nearby Usage Limitations Standalone Third party Apps Data Recordings Metadata Specification Copyright 2022 Bad Elf LLC 31 All Rights Reserved ...

Page 33: ...a Known Point File on Flex Standalone Configuration The Bad Elf Flex supports operating in Base mode without the use of a connected app A standard checklist interface provides for quick startup and configuration of Flex as an RTK Base Starting the Base feature enables wireless transmission of a high accuracy corrections feed via a Flex radio Note Many of the Flex UI options are disabled while the ...

Page 34: ...ct the settings icon and click the enter button Select Correction Mode using the enter button Use the up and down arrow buttons to scroll to the Base function To start the Base checklist press the enter button Copyright 2022 Bad Elf LLC 33 All Rights Reserved ...

Page 35: ...by pressing the back button and use the Bluetooth feature from the menu of the Bad Elf Flex to establish a new pairing Once the Bad Elf Flex confirms Bluetooth pairing with a radio the checklist displays a confirmation of pole height If your pole height is correct use the right button to proceed to the next item in the checklist If your pole height is incorrect cancel the checklist by pressing the...

Page 36: ...ablished for the transmission of corrections The reference point must be within ft m or an error condition occurs and the Base cannot start There are three options to establish a Base reference point 1 Here point this is a position derived from the current GNSS location and mode of operation 2 Last collected point this is a position derived from the last collected point through the use of the stan...

Page 37: ... shown on the confirmation dialog To start the Base feature press the enter button To exit starting the base feature press the back button Upon confirmation of Base feature startup Flex completes final internal checks and begins transmitting corrections data over the UHF radio link Copyright 2022 Bad Elf LLC 36 All Rights Reserved ...

Page 38: ...ase Ref Point the reference point in use as established during the base reference point selection Bytes Sent a counter of corrections bytes sent since startup of this Base session This field updates every second Stopping the Base Actions Press the enter button brings up a popup menu with an option to stop the Base Press the enter button to confirm the action Copyright 2022 Bad Elf LLC 37 All Right...

Page 39: ... the future or confirm the known point used A recording of less than 15 minutes may not contain enough data to reliably post correct If you don t plan to use this data it is safe to cancel Base operation by clicking the enter button to stop the Base Should you require this additional recording simply press the back button to return to the Base status page and let more than 15 minutes elapse on the...

Page 40: ...fied corrections mode function of the Flex app To begin a Base session select the Corrections function of the Flex app Starting the Base Mode Checklist To enable Base mode from the Flex app follow the steps below From the main menu tap Correction Mode Tap the on the line labeled Base Mode Copyright 2022 Bad Elf LLC 39 All Rights Reserved ...

Page 41: ...of bluetooth connection with Flex 8 Pole height confirmation and editing tap the arrow on the right to adjust pole height 9 Tilt check confirmation tap the arrow on the right to calibrate bubble level 10 GNSS fix confirmation displays type of fix and system being used 11 Battery check displays battery level and external power availability Base mode cannot start unless there is XX power available o...

Page 42: ...ent used as part of the information transmitted to connected Rovers Ensure the correct value for your range pole is entered in the pole height field Note if you are not using a pole enter a value of 0 in the pole height Copyright 2022 Bad Elf LLC 41 All Rights Reserved ...

Page 43: ...ghtly on the pole and that the pole is level and completely vertical If you need to adjust the tilt calibration pressing the calibrate button adjusts internal bubble level If your calibration is correct use the Base Mode link at the top left to proceed to the next item in the checklist Copyright 2022 Bad Elf LLC 42 All Rights Reserved ...

Page 44: ...sition derived from the last collected point through the use of the standalone point collection feature of Flex 3 Known point a list of known points is provided if available Known points are loaded into the Flex app by Base Reference Point Capture The default method used to establish a base reference point is a Here point Pressing the Capture button starts a timed point recording Base Reference Po...

Page 45: ...enting activation Deactivating Base Mode While active the indicator at the bottom of the screen displays the number of RTCM packets sent and the number of kilobytes of data transmitted during this session To deactivate the base click the Deactivate Base Mode button Upon deactivation the Flex closes the recorded logging session and notifies connected rovers of a deactivation event Copyright 2022 Ba...

Page 46: ...NEX file Radio press the on right to see the status of the connection with your radio Error Conditions Errors are either indicated in the checklist section associated with the problem or in the status section Should the unit tilt more than X degrees a tilt error is reported Loss of GPS fix results in reporting a NO Fix error Other status errors such as loss of radio connection appear in the Status...

Page 47: ...cating Must be connected to radio is shown Possible scenarios under which this may occur include Bluetooth connection lost between Flex and radio Radio powered off Radio Bluetooth disabled Radio out of range with the Flex Copyright 2022 Bad Elf LLC 46 All Rights Reserved ...

Page 48: ... occur include 1 Base isn t transmitting corrections 2 Radios are on different channels Usage Limitations Standalone Third party Apps Disabled functionality Data Recordings Project Contents What s in the zip file Metadata Specification Breakout of metadata contents Specifications HX DU1603D Copyright 2022 Bad Elf LLC 47 All Rights Reserved ...

Page 49: ...0bps SATEL 9600bps 19200bps Trans EOT 9600bps TrimTalk450S 9600bps TrimMark3 19200bps Battery and Power Internal Battery Non replaceable 7 26V 6700mAh 48 642Wh Lithium ion Battery Life 8hrs high power mode hrs low power mode External Power Power supply 7 9V DC or 12VDC via external battery adapter Mechanical Dimensions 147 6L 83W 31 5H mm Weight 612g Antenna Interface TNC Female Antenna Impedance ...

Page 50: ...ncrease the separation between the equipment and the Bad Elf Flex Consult Bad Elf for help Changes and modifications not expressly approved by the manufacturer or registrant of this equipment can void your authority to operate this equipment under Federal Communications Commission rules Human exposure to radio frequency energy Like any other mobile device the Bad Elf Flex emits radio frequency ene...

Page 51: ...rom the date of purchase Within this period Bad Elf will at its sole option repair or replace any components that fail in normal use Such repairs or replacement will be made at no charge to the customer for parts or labor This warranty does not apply to i cosmetic damage such as scratches nicks and dents ii consumable parts such as batteries unless product damage has occurred due to a defect in ma...

Page 52: ...py of the original sales receipt which is required as the proof of purchase for warranty repairs Write the tracking number clearly on the outside of the package Send the device to the Bad Elf warranty service station Online Auction Purchases Products purchased through online auctions that means purchases not made through bad elf com on eBay from bad elf llc on Amazon from Bad Elf LLC or an approve...

Page 53: ...QUIRED IN SUCH A CASE PLEASE CONTACT YOUR BAD ELF DEALER FOR APPLICABLE WARRANTY INFORMATION Document Version This document was published on XXX XX 2022 All specifications and usage information are subject to change without notice at Bad Elf LLC s discretion Trademarks 2020 Bad Elf LLC Bad Elf Flex is a registered trademark of Bad Elf LLC Google Play and the Google Play logo are trademarks of Goog...

Page 54: ...gh accuracy GNSS solution RTK Real Time Kinematics UHF Ultra High Frequency Standard mode The configuration of a Bad Elf Flex that is operating in single frequency mode Extreme mode The configuration of a Bad Elf Flex that is operating in multiple frequency mode with RTK services enabled Extreme unlocked A Bad Elf Flex that has the services required for Extreme mode permanently enabled Copyright 2...

Reviews: