background image


CHAPTER 5 – 

Controls and use 

Chap. 5  

21

/48 - 

5.4


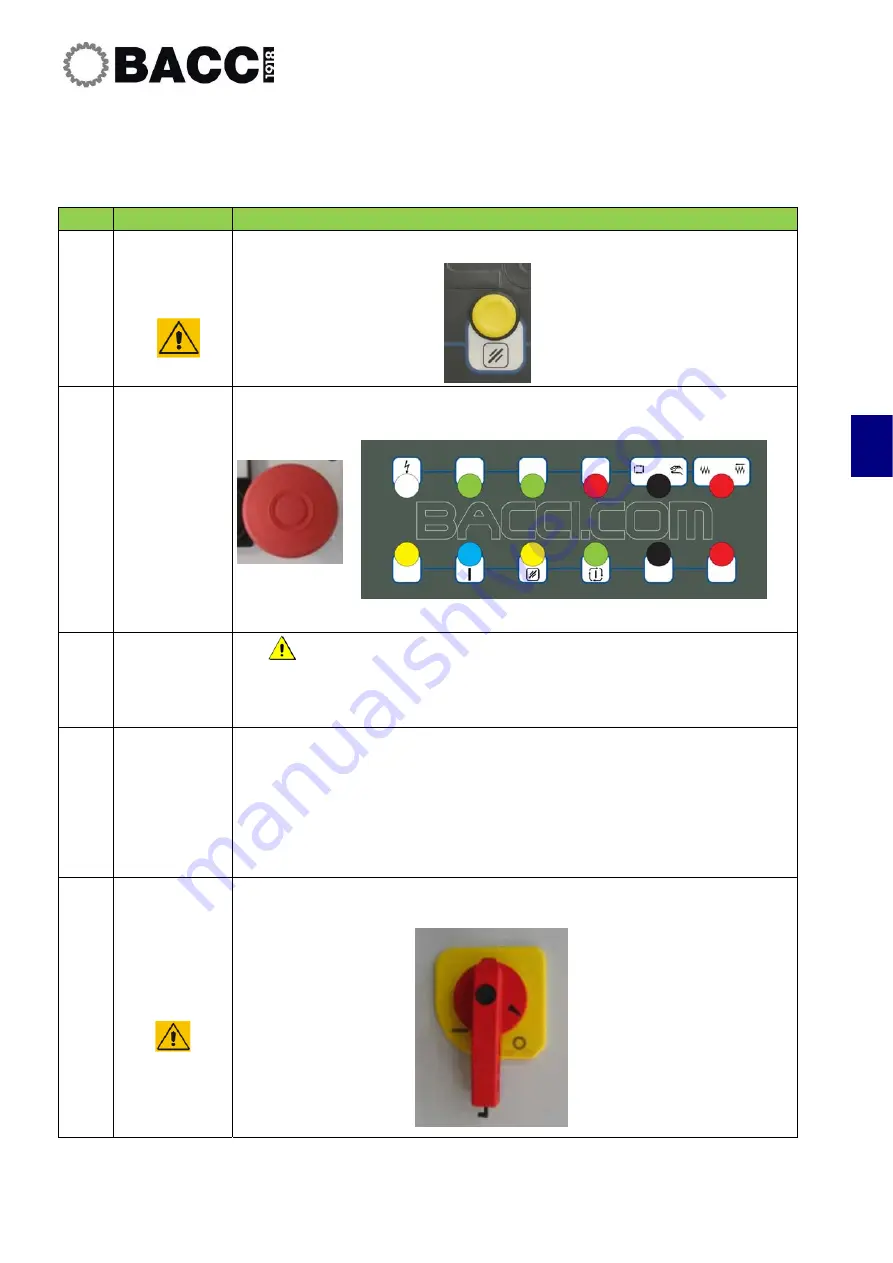
Machine turn off procedure 

To turn off the machine, proceed as described following. 

STEP 

ACTION 

DESCRIPTION 


Machine 

Reset 


Press the "Reset" button. 


Emergency 
Pushbutton  

Press one of the Emergency pushbuttons located on the pushbutton panels.


Exit submenus


 Exit the submenus of the interface panel and return to the main 

page. 


Turn off 

windows 

Turn off the Windows operating system:  

  Click on START 

  Click on CLOSE SESSION 

  Click on STOP SYSTEM 

  Click on OK 

 
The following message will appear: “You may now turn off the machine.” 

Cut-off power 

to the 

machine. 


Turn the main switch to "0" 


Summary of Contents for Twin

Page 1: ...MACHINING CENTER Mod TWIN Use and maintenance instruction manual translation of original instructions Document MAN_ TWIN1213R0en Edition 12 2013 Rev 0 Data 16 12 2013 ...

Page 2: ...TWIN Use and maintenance instruction manual Cap 0 II 4 Instruction manual for the machine models and the versions listed below MACHINE MODELS AND VERSIONS DESCRIBED IN THE MANUAL MODEL DESCRIPTION ...

Page 3: ...GENERAL INDEX Cap 0 III 4 General index 0 Foreword 1 Safety information 2 Machine description and technical data 3 Installation 4 Controls and use 5 Maintenance 6 Attached documents and diagrams 7 ...

Page 4: ...TWIN Use and maintenance instruction manual Cap 0 IV 4 Page intentionally left blank ...

Page 5: ...CHAPTER 1 Foreword Chap 1 1 14 CHAPTER 1 Foreword ...

Page 6: ... deadlines and abbreviations adopted 7 1 2 2 Symbols adopted glossary of terms and illustrations 7 1 3 Glossary of safety terms 9 1 4 Use and conservation of documentation 10 1 5 Update of the manual 10 1 6 How to request additional copies 11 1 7 Manufacturer s Identification and Contact Details 11 1 8 Customer service 12 1 8 1 How to request spare parts 13 ...

Page 7: ...CHAPTER 1 Foreword Chap 1 3 14 Page intentionally left blank ...

Page 8: ...ent and or maintenance interventions Exclusively abide by the instructions provided and in case of doubt always contact the manufacturer This manual provides basic information that the user must know before using the machine Furthermore it contains information on machine maintenance needed to keep it efficient and safe over time For proper machine use please also consult the Software User Manual a...

Page 9: ...tric electronic maintenance men Personnel with specific electrical skills capable of carrying out the tasks of the operators and work with the machine in standard operating conditions with disabled protection guards for maintenance and or repair work Not authorised to work on mechanical parts D Mechanical support technicians Qualified personnel with specific mechanical skills capable of carrying o...

Page 10: ... are not authorised to operate the machine but may be close to the premises for different reasons G Common Individual Non qualified individuals who are not suitable for carrying out any tasks intended for the professionals described under items A B C D E F and thus not authorised to operate the machine INFORMATION Remember that information training and supervision of common persons par G is up to ...

Page 11: ...ormation marked by the symbol on the left and this style denote situations that may damage the machine INFORMATION The information marked by the symbol on the left and this style denote useful suggestions and recommendations for the user ENVIRONMENTAL INFORMATION The information marked by the symbol on the left refer to environment related information such as handling hazardous substances waste or...

Page 12: ...ncerning the safety of exposed persons If the illustrations of this manual are used to explain certain machine functions they could differ from the functions of your machine or they could be incomplete If necessary and in addition to the instructions of this manual it is advisable to consult the specific design of the component or unit on which intervention is required For the specific design e g ...

Page 13: ...nt materials Portable devices for the identification and reporting of risks and harmful factors WORKER A person who is hired by an employer to perform labour except people in charge of domestic and family services even with a special subordinate work relationship Partners of cooperatives or companies who perform their job on behalf of companies and organisations and users of school university and ...

Page 14: ...l or partial reproduction is forbidden without prior authorisation If you need additional copies of the documentation intended for machinery users please send a request to Paolino Bacci S r L If doubts arise during consultation of this manual please contact Paolino Bacci S r L before performing any operation Paolino Bacci S r L reserves the right to modify the characteristics of the product and co...

Page 15: ...r purchase order to Paolino Bacci S r L 1 7 Manufacturer s Identification and Contact Details Company name Paolino Bacci S r l Address Viale Palermo 32 56021 CASCINA PI ITALIA Tel 39 050 754 91 Fax 39 050 754 975 Fax assistance 39 050 975 E mail general information bacci info bacci com E mail assistance service bacci com E mail spare parts service bacci com Website www bacci com ...

Page 16: ...talled on the machinery Spare parts support Office service provided by qualified operators who can be contacted to request spare parts for the machinery Support services are open during the working hours and days mentioned in the following tables The office hours outlined in the tables below are based on the time zone of Rome GMT 1 00 h WEEKDAYS FROM MONDAY TO FRIDAY HOURS ACTIVE SERVICE 8 00 18 0...

Page 17: ...achine Should these data not be available contact Paolino Bacci S r L DANGER You must use original spare parts The replacement of parts with non original parts or parts that have not been previously authorised by Paolino Bacci S r L is at the customer s own risk and shall result in the immediate expiry of the warranty and of the certification pursuant to applicable community directives Machine per...

Page 18: ...TWIN Use and maintenance instruction manual Chap 1 14 14 Page intentionally left blank ...

Page 19: ...CHAPTER 2 Safety information Chap 2 1 52 CHAPTER 2 Safety information ...

Page 20: ...ions 28 2 11 Safety regulations for spindle use and maintenance 31 2 12 Safety regulations for use and maintenance of mechanical components 31 2 13 Safety regulations for programming 32 2 14 Safety regulations for electrical maintenance 32 2 15 Safety regulations for pneumatic maintenance 34 2 16 Residual risks 34 2 16 1 Residual risks present during any stage 35 2 16 1 1 Passing through or statio...

Page 21: ...ring height work 49 2 16 11 1 Height work Risk ID 16 01 49 2 16 12 Residual risks during adjustments with laser devices 50 2 16 12 1 Adjustments with laser devices Risk ID 17 01 50 2 16 13 Residual risks present during safeguarding work 51 2 16 13 1 Safeguarding work Risk ID 18 01 51 2 16 14 Residual risks during interventions of telephone support and remote assistance 52 2 16 14 1 Telephone suppo...

Page 22: ...tors maintenance personnel and technicians for definitions see chapter 00 is exclusively made up of Expert Persons EXP and Informed Persons INFP and not Common Persons COMP INFORMATION Remember that it is up to the employer to inform and train the personnel who is going to run the machine this must be done on the basis of available knowledge information and instructions before working activities a...

Page 23: ...nings located next to the dangerous areas Use suitable clothing for the tasks to perform avoid clothing with flapping parts and do not use any hooking accessories to avoid entanglement and dragging Always use Personl protective equipment PPE such as safety boots gloves googles etc if necessary in accordance with the specific instructions of the manual and company standards Before performing any op...

Page 24: ...mediately replace parts that are worn or damaged Do not perform maintenance or lubrication operations while the machine is moving Perform all the operations foreseen for the machine to be safe Use appropriate tools to repair the machine Remove all tools used for maintenance from the work area Restore all protections and safety devices that have been removed and check that they function correctly ...

Page 25: ...ctives 80 1107 EEC 82 605 EEC 73 477 EEC 86 188 EEC and 88 642 EEC The use of PPE is indicated in the manual and on the machine with the symbols listed below Symbol Explanation You are obliged to use protective clothing You are obliged to use PVC protective clothing You are obliged to use safety boots You are obliged to use protective gloves against general mechanical risks You are obliged to use ...

Page 26: ...ve equipment PPE the employer is required to provide comprises the following devices Symbol Explanation You are obliged to wear safety clothing You are obliged to wear safety shoes You are obliged to wear safety gloves against general mechanical risks You are obliged to wear hearing protection or earmuffs It is indispensable as a minimum requirement that the operator uses the Personl protective eq...

Page 27: ...nce from the indicated zones to prevent snagging and dragging hazards with the product or moving belts and consequent dragging Follow the safety provisions Dragging Keep a safe distance from the areas indicated so as to avoid dangers of dragging between rollers and rotating components Follow the safety provisions Snagging and dragging Keep a safe distance from the indicated zones to prevent snaggi...

Page 28: ...d clean the floor from substances Tripping and falls Watch out for foreign matter laying on the floor that could cause tripping Immediately remove the obstacles Danger of falling from above In case of overhead work Comply with the safety dispositions and adopt the appropriate PPE safety belt Danger of falling due to height differences Watch out for any differences in the height of different machin...

Page 29: ...ts Flammable agents Flammable agents Machine with automatic start up Machine with automatic start up Radio controlled components Radio controlled components Residual electrical energy Pay attention to the presence of residual energy in all or part of the circuit Always disconnect the electricity before performing maintenance work Use the charts to disconnect parts of the installation when necessar...

Page 30: ...ense magnetic fields Pay attention to the intense magnetic fields near the pictogram Persons wearing pacemakers must maintain a safety distance from the machine or parts of it when it is dismantled for maintenance Suspended loads Check that there are no potentially falling objects or cables that could become entangled Do not stand or move during the load lifting and handling steps Follow the safet...

Page 31: ...or adjust moving parts It is forbidden to perform repair operations and or adjustments to the machine or components when it is moving Follow the safety provisions Prohibition to use water to extinguish fires No water should be used for extinguishing fires due to the presence of live components Use powder extinguishers or similar devices for the extinguishing operations in the event of a fire Follo...

Page 32: ...e blocking of the supply or access to the machine It is mandatory to use Personl locks to block the electrical system pneumatic supplies etc or to access the machine and avoid untimely start ups during works Using Personl protective equipment PPE Please refer to the paragraph 2 4 Use of Personl protective equipment PPE 2 4 4 Description of miscellaneous and customised symbols MISCELLANEOUS AND CUS...

Page 33: ... cut proof gloves Located near the head AP05 This symbol may be accompanied by the following warning CLASS 2 LASER WARNING DO NOT STAND NEAR THE LASER BEAM Pay attention and never look directly into the laser beam Located near the laser regulation devices AP06 Take heed of moving parts that are protected by safety measures fixed and removable guards but may be reached in case of improper conduct o...

Page 34: ...taneous use by two or more operators is forbidden Recipe settings and parameters are set using the HMI device installed on the electrical control panel Access to hazard areas for any task required for machine operation are limited by safety requirement conditions access to these areas must be carried out in conformity with the instructions provided in this manual and in all annexed documents The m...

Page 35: ...nformed in advance as regards all residual risks and trained regarding safety issues Using the machine without the proper Personal protective equipment PPE as required by the instructions and by the laws in force in the country of use By passing machine safety device even temporarily Using the machine even if it shows signs or malfunction or is partially malfunctioning Failure to respect the techn...

Page 36: ...adequately illuminated for the operations to be performed shady areas disturbing glare and stroboscopic effects must be avoided Abide by the current standards on illumination of work environments Please note that the lack of adequante lighting could pose risks for the persons exposed The machine must run in a properly aerated environment 2 7 2 Dust removal system The machine is not supplied with a...

Page 37: ...mm diameter HM hard metal milling cutter 18mm diameter Milling cutter for tenoning Rough milling cutter 30mm diameter Measured without the use of a dust removal system NOISE EMISSION VALUE Background noise 68 5 dB A Empty run 74 6 dB A Work run 78 8 dB A During machining especially when the tool enters the materials noise peaks up to 109 8 dB A were reached The above mentioned noise values are emi...

Page 38: ...button panel On the portable pushbutton panel Pressing the emergency stop immediately stops the machine and cuts off power to dangerous machine components M02 LOCK OUT TAG OUT All power sources may be blocked in the OFF position using clamps and padlocks Compressed air valve Before carrying out any maintenance on the machine power sources must be locked and tagged out using the appropriate padlock...

Page 39: ...ards named A B C D for use in machines with Y1 Y2 axes table The opening closing pattern is such that the coordinated opening closing of the guards allows access to loading unloading areas in which dangerous movements are safely blocked but does not allow access to other areas where the operating cycle continues to be performed An example of such operating pattern is the following LOADING C OPEN A...

Page 40: ...e gauge Clamp opening and closing is controlled by a foot pedal control protected against involuntary operation M11 FIXED GUARD Central protection located between the piece support devices axes Y1 and Y2 The protection must be exclusively removed by the maintenance technician for performing machine setup for tandem processing The tandem processing requires a machine setup by the maintenance techni...

Page 41: ... installation of the dust extraction system QE01 LOCK OUT TAG OUT All power sources may be blocked in the OFF position using clamps and padlocks Electrical board switch Before carrying out any maintenance on the machine power sources must be locked and tagged out using the appropriate padlocks and clamps QE02 ELECTRICAL BOARD KEY Lock and key to access the electrical board The key must be used onl...

Page 42: ...emergency pushbutton Turn the emergency pushbutton clockwise and check that it releases Check that the machine will now start up NOTE Both tests must be repeated for each emergency pushbutton on the machine 2 8 1 2 Fixed and removable guard checks Every time the machine is used carry out the following checks Visually check that the guards are in place before using the machine For removable guards ...

Page 43: ...horn check At each use carry out the following checks Regularly check that the lights and horns are working properly 2 8 1 5 Key management check The employer is required to set up a key management procedure The keys may be used only by skilled and qualified personnel aware of machine risks Always check That the keys are used only for the time required by the intervention Once the intervention is ...

Page 44: ...interventions on live and sectioned parts only by skilled and authorized personnel Z02 Material loading unloadin g zone Area at the front of the machine where the operator stations for material loading and unloading This is the main workstation where the operator stands during machine operation Z03 Inside the machine Area inside the machine where machining of the pieces loaded on the clamps is car...

Page 45: ...ators who have been specifically trained and have read the instructions contained in this manual thoroughly Instructions warnings and general accident prevention regulations contained in this manual must be followed scrupulously 2 9 3 Responsibilities of the operator in charge of loading unloading the machine Before starting the work cycle the operator in charge of loading unloading the machine mu...

Page 46: ...rk cycle 01 Operation carried out by the operator to start up the machine The operation is carried out using the electrical control panel and standing at a distance from the machine danger areas safety devices reset From this moment on the machine is ready for all operating modes Use Stopping the work cycle 02 Operation carried out by the operator to stop the machine working stop This operation is...

Page 47: ... mechanical technicians Use SINGLE PIECE loading unloading work cycle 12 Material loading unloading with the operator standing in front of the machine manually loading and unloading the piece s on from the support devices located on the table Once the piece is placed it is locked by pressing the pedal button then the loading operation is confirmed for the machine to bring the piece in working posi...

Page 48: ...processing cycle occurs in the manner described for the SINGLE STEP loading unloading processing cycle Use Jam removal Scrap removal 14 Operator interventions to remove pieces that have become jammed during machining Use HOLD TO RUN controls portable pushbutton panel 15 Machine movements carried out only by skilled and authorized personnel using the portable pushbutton panel inside the all around ...

Page 49: ...cabin make sure that the doors are closed and that none is standing inside the enclosure Check the conditions of the tools and make sure that they are not chipped or deformed Make sure that the tools spacers and tool holding shafts meet the specifications contained in the machine instructions Before bringing the spindle to the programmed revolving speed start the spindle turning slowly and check b...

Page 50: ...of first aid procedures for electrical accidents is required Before starting maintenance on electrical circuits the person in charge of the work must check that all safety regulations have been respected Comply with current national laws and regulations regarding work on electrical systems All work must be carried out using only suitable and isolated tools Respect safety signs Do not remove the sa...

Page 51: ... devices may be used only for the purpose envisaged Do not modify circuits components etc nor the software Upon completion of any maintenance and repair work tighten all the screws on electrical connections in the area involved in maintenance Upon completion of any maintenance or repair work check the safety devices Keep live electrical components dry and do not expose them to humidity Before clea...

Page 52: ...and location of the anchor points Please consult the specific instructions contained in the Installation chapter Before starting the system check for defects Make sure that the machine safety devices are present and functioning Do not remove safety devices or other safety equipment If safety devices must be dismantled for example for maintenance or repair work they must be replaced immediately upo...

Page 53: ...ct with toxic and noxious elements used during machine operation Risk of permanent damage to hearing apparatus due to high noise and prolonged exposure to noise sources Body part Entire body RESIDUAL RISK Common persons who have not been instructed may be exposed to various risks deriving from both the machine and the work environment The employer must limit access to dangerous areas on behalf com...

Page 54: ...ISK Fire hazard deriving from contact between dust and machining residues with live flames or parts of the electrical system LIMITATION MEASURES Mechanical Arrange for connection to a centralized dust removal system SAFETY MEASURE M13 Electrical Informative Connect the machine to a vacuum system with a capacity equal to that specified in the technical data Periodically remove dust and machining re...

Page 55: ...cer Situation Dust emissions into the air Event Respiratory difficulties deriving from the presence of dust in the air cause by material machining Body part Breathing apparatus RESIDUAL RISK Respiratory difficulties deriving from the presence of dust in the air cause by material machining LIMITATION MEASURES Mechanical Arrange for connection to a centralised dust removal system SAFETY MEASURE M13 ...

Page 56: ...machine parts being handled and surrounding structures plant other machines Body part Entire body upper limbs hands RESIDUAL RISK Various risks crushing shearing deriving from machine or machine parts assembly Crushing Under falling parts being handled Between machine parts being handled and surrounding structures plant other machines Between machine parts being handled and cables or straps used f...

Page 57: ...urrounding structures plant other machines Body part Entire body upper limbs hands RESIDUAL RISK Various risks crushing shearing deriving from machine or machine parts disassembly Crushing Under falling parts being handled Between machine parts being handled and surrounding structures plant other machines Between machine parts being handled and cables or straps used for hoisting Cutting or shearin...

Page 58: ...n machine parts being handled and surrounding structures plant other machines Body part Entire body upper limbs hands RESIDUAL RISK Various risks crushing shearing deriving from handling of machine or machine parts Crushing Under falling parts being handled Between machine parts being handled and surrounding structures plant other machines Between machine parts being handled and cables or straps u...

Page 59: ...achine cleaning Event Various risks 7 9 POISONING 7 10 SENSITISATION deriving from the type of substance use to clean the machine due to both skin contact or inhalation of dangerous fumes eg accidental mixing of detergents Body part Entire body RESIDUAL RISK During machine cleaning risks of POISONING and SENSITIZATION remain resulting from the kind of chemicals used for cleaning the machine from c...

Page 60: ...s may be opened only with a key entrusted to maintenance personnel SAFETY MEASURE Q02 The door to the electrical cabinet cannot be opened when the switch is in the ON position Electrical Informative Work on the electrical instruments be they powered or not may be carried out only by expert personnel EXP and informed persons INFP as per the definition provided for in CEI 11 27 CEI EN 60204 1 standa...

Page 61: ...dards SAFETY MEASURE Q03 Electrical cabinet doors may be opened only with a key entrusted to maintenance personnel SAFETY MEASURE Q02 The door to the electrical cabinet cannot be opened when the switch is in the ON position Electrical Informative Work on the electrical instruments be they powered or not may be carried out only by expert personnel EXP and informed persons INFP as per the definition...

Page 62: ...oning 7 10 sensitisation deriving from skin or eyes coming into contact with lubricants or ingestion of lubricants Risk of environmental pollution deriving from lubricant spills Body part Entire body RESIDUAL RISK Risk of poisoning or sensitisation deriving from skin or eyes coming into contact with lubricants or ingestion of lubricants Risk of environmental pollution deriving from lubricant spill...

Page 63: ...wo protection measures are implemented for reducing the risk and remedy to any misconducts by redundancy These measures are Adjusting of the piece support devices carried out by the maintenance technician during machine setup Two different pressure values PROTECTION MEASURE M10 during loading unloading and processing stages Electrical Check of the closing pressure of the piece support device Infor...

Page 64: ...falling from the table Body part Hands fingers feet lower limbs RESIDUAL RISK Risk of crushing and collision resulting from the piece falling from the clamps LIMITATION MEASURES Mechanical Electrical Informative The piece must be loaded by correctly placing it on the specific support device After checking the stability of the piece lock it by stepping on the specific pedal located near the table T...

Page 65: ...it by tool fragments or the tool itself projected outward as a result of a breakup if in the course of the setup procedure the central guard for the two axes Y1 Y2 is not reassembled PROTECTION MEASURE M11 REDUCTION MEASURES Mechanical The perimeter protections PROTECTION MEASURE M04 the access doors PROTECTION MEASURE M05 the central protection installed between the piece support devices axes Y1 ...

Page 66: ...TATION MEASURES Mechanical The controls are located on a pushbutton panel that is enabled while the operator is standing inside the safety guards The internal moving parts are protected by special fixed buards SAFETY MEASURE M08 Electrical Hold to run controls that allows moving one axis at a time SAFETY MEASURE M09 The controls are located on a portable panel and must be enabled by pressing the r...

Page 67: ...uipment and or machine structures Body part Entire body head RESIDUAL RISK There is a risk of slipping tripping and falling when climbing descending or standing on ladders scaffolding and or permanent footbards LIMITATION MEASURES Mechanical There is no permanent access equipment Electrical Informative It is forbidden to climb onto machine structures from any point that is not equipped for climbin...

Page 68: ...near the laser adjustment device Event Risk of injury to eyes looking directly into the laser beam Body part Eyes RESIDUAL RISK Risk of injury to eyes looking directly into the laser beam LIMITATION MEASURES Mechanical The photocells are positioned in such a way as to avoid the laser beam from pointing directly into the operator s eyes Electrical Informative Take care never to look directly into t...

Page 69: ...ous risks deriving from the unexpected start up of machine moving parts Body part Entire body RESIDUAL RISK Various risks deriving from the unexpected start up of machine moving parts LIMITATION MEASURES Mechanical The access doors are designed to avoid involuntary closing Electrical The door once it has been closed must be reset by pressing the relative reset pushbutton Informative In case of bec...

Page 70: ...onnected to teleservice lines with possibility of remote control Event Various hazards arising from unexpected machine movements Body part Whole body RESIDUAL RISK During troubleshooting interventions via telephone support with the manufacturer s customer service and machine control logic possibly connected to teleservice lines with possibility of remote control several residual risk remains resul...

Page 71: ...Chap 3 1 28 CHAPTER 3 Machine description and technical data CHAPTER 3 Machine description and technical data ...

Page 72: ... OPTIONAL 16 3 7 9 TGV TRC Rotating Variable Geometry Tables OPTIONAL 16 3 7 10 TGV CN Numerically Controlled Variable Geometry Tables OPTIONAL 16 3 7 11 Tilting TGV shelves OPTIONAL 17 3 7 12 Headstock tailstock NC device OPTIONAL 17 3 7 13 Standard workpiece locking 18 3 7 14 Optional workpiece locking 18 3 7 15 Electrical cabinet 20 3 7 16 Numerical control 20 3 7 17 Centralized grease lubricat...

Page 73: ...r wide sideways movements of the heads X axis The elevated dynamics of the TWIN work station derives from the use of precision reducers with no backlash and that require no periodic adjustments as well as from the perfect automatic lubrication from the inside out In addition to traditional programming systems the DOUBLE JET work station may be programmed using the exclusive Bacci PITAGORA Software...

Page 74: ... of the tools and the space taken up by the other groups present on the working unit Before starting machining always check that the piece is held firmly and blocked properly Minimum sizes are easy to define in that the gripping intensity of the vacuum holding system depends on piece porosity thickness and size Moreover the minimum gripping intensity is different for each type of tool used In any ...

Page 75: ...Chap 3 5 28 CHAPTER 3 Machine description and technical data MACHINING FIGURE Flat surface milling within distance Vertical and horizontal milling 4 5 axis milling within distance Cutting ...

Page 76: ...parate controls for each station The machine is composed of the following main groups or units Single strut machine body Z axis carriage Y axis carriage X axis Work heads electric spindles Numerical control Centralized lubricating and greasing system Electrical cabinet External safety enclosure The optional units that may be provided on request with the machine are described here following ...

Page 77: ...WIN The axes controlled by the machine are X axis Transversal axes of the Y axis carriage Vertical Z axes of the Z axis carriages Rotating A axes of the operating heads Rotating B axes of the operating heads Each axis has a positive and a negative direction The diagram shows the positive direction for each axis All movements take place on over sized bearing skids that ensure solidity and reliabili...

Page 78: ... carriage of the machining head along the X axis 4 Piece support devices axes Y1 and Y2 Piece support devices that allow processing along the Y axis 5 Tables Units on which the piece support devices slide 6 Enclosure an all around safety guard that includes the entire machine Access inside the enclosure takes place through doors fitted with safe access micro switches 7 Lubrication system automatic...

Page 79: ... Z axis The strut 1 Z axis is the set of devices that allow the tools to machine the workpiece It is made up of a support and movement structure for the revolving spindle holder machining head 2 on which the tools are mounted The head slides along the vertical direction and rotates around its A and B axes Such rotating movements are continuous and interpolated and are controlled without any backla...

Page 80: ...trol sensors during the travel As for the rotating axes the two rotating movements of the head B and C axes are continuous and interpolated and are controlled without any backlashes or periodical calibrations by two precision gearmotors 3 7 3 Machining heads B A axis Type 2 2 It consists of two electrospindles with double exit per side arranged in superimposed cross Each electrospindle has at the ...

Page 81: ...t coplanar electrospindles each equipped with tool fitting and preset stop Available versions 10 0 HP ER 32 12 5 HP ER 40 Type 4 Prismatic It consists of four independent coplanar staggered electrospindles each equipped with tool fitting and preset stop Available versions 10 0 HP ER 32 12 5 HP ER 40 ...

Page 82: ...ts of three independent coplanar spindles plus a double exit electrospindles All of them are equipped with tool fitting and preset stop Available versions 10 0 HP ER 32 12 5 HP ER 40 Spindles reliability and their duration over time are guaranteed by standard ceramic bearings ...

Page 83: ...ximum diameter and maximum length of the tool depending on configuration Please refer to the annexed data sheet Standard configuration 4 ring nuts for ER32 or ER 40 grippers 4 ER32 or ER 40 grippers 2 x φ 20 mm 1 x φ 16 mm 1 x φ 10 mm 3 7 4 BCK tool holding shaft OPTIONAL The high rigidity and high precision BCK shaft with taper shank is fitted onto the spindle without the use of a clamp It is sup...

Page 84: ...y controlled tool changer additional interpolated axis without any pneumatic movement in order to ensure maximum precision and reliability The tool holder movement occurs without any kind of backlash or interference thanks to an extremely accurate gearmotor the same used for the rotating movements of the machining head The maximum diameter of the tools which can be housed in the tool changer is 20...

Page 85: ...ong sides of the shelf two dovetail millings exist that allow anchoring of the pneumatic presser easily adjustable along the Y axis for optimal locking This solution allows by adjusting the shelves at a distance less than the length of the workpieces to process the ends of short elements without having to lift the pieces to avoid collision by distancing the shelves to the maximum to let the machin...

Page 86: ...mm and their length is 1130 mm Due to the rotation all the 4 sides of the table may be turned toward the machining head therefore it is not only possible the complete machining of the 5 sides of a workpiece but also the positioning of more details on the same counterprofile hence reducing the setup time The rotating table also allows to increase the contouring dimensional capacity up to 1800 mm 3 ...

Page 87: ...kpieces concave or convex without the need for complex piece holders By automatically tilting also the pressers fitted to the tilting shelves the piece can be locked perfectly in line without any need for marking its surfaces 3 7 12 Headstock tailstock NC device OPTIONAL In place of one of the tilting TGV shelves on the machine tables a headstock tailstock device can be mounted with numerically co...

Page 88: ...dovetail guides for optimal locking 3 7 14 Optional workpiece locking For special applications press curved wood specific pneumatic pressers can be supplied with holding power up to 2000 kg They also can be positioned on the long sides of the TGVs Further possibilities for special applications are special pneumatic pressers adjustable in height for locking the pieces without any need for making co...

Page 89: ...re easily placed along the TGV arm by means of the dovetails grooves If necessary the suction cups may also be equipped with a little lifting piston to avoid scratching the workpiece Finally vacuum pumps are available of several sizes 100 165 200 250 m3 h and characteristics compatible with the kind of applications required ...

Page 90: ...ing 3 7 16 Numerical control The numerical control is a characteristic of tooling machines called numerical control machines or CN machines The machining movement of these machines during tooling is directed by a computer built into the machine itself that controls movements and functions based on a specifically defined work machining program A CN machine simply executes the program that has been ...

Page 91: ...ricates all the connected points at the preset greasing intervals with the grease in the greasing tank 1 POS NAME 1 Grease tank 2 Grease pump 3 Pressure gauge for working pressure The pump 2 is connected to the lower part of the tank and is controlled by a simple effect piston driven by compressed air Return to starting position is censure by a spring A spring with a presser disk is installed insi...

Page 92: ... Pressure gauge for working pressure 3 7 19 Safety guards and devices Safety guards and devices are installed on the machine to protect mechanical moving parts for example chains gears transmissions and moving organs described in the chapter 2 Machine safety devices paragraph 2 8 Safety measure The efficiency of the safety devices must be assessed after the machine has been installed at the end us...

Page 93: ...interpolated axes 6 Axis strokes Longitudinal X axis standard 2200 mm Longitudinal X axis optional 3400 4400 mm Transverse Y axis 1800 mm Contouring capacity along Y direction 1200 mm Z vertical axis 1250 mm B rotating axis unlimited C rotating axis 400 Speed X axes 100 m min Y and Z axes 60 m min Spindles Rated power S1 10 Hp 7 5 kW Rotation speed 0 24 000 1 min Direction of rotation Clockwise an...

Page 94: ...tic system data compressed air The pneumatic system to which the machine is connected must meet the following requirements The machine will work efficiently only if all the specifications are met TYPE DESCRIPTION Recommended diameter for the compressed air pipe line 1 2 Connection diameter for rubber pipe 25 mm external 17 mm internal Air consumption at 6 bar Based on the model Optimal line pressu...

Page 95: ...e the machine may be installed and started up Space requirements for use and maintenance are shown in the main layout drawing see ANNEX B TECHNICAL DIAGRAMS AND GENERAL INFORMATION 3 8 8 Tool technical characteristics Use only tools having the diameters and weights shown in the table below COUPLING SIZE MAX TOOL SHAFT DIAMETER MM ROTATION SPEED RPM MAX TOOL DIAMETER MM MAX TOOL WEIGHT KG ER40 25 6...

Page 96: ...ines marketed and sold within the European Community accompanied by the relative EC declaration of conformity as per annex II A of the Machinery Directive 98 37 CE The symbol is not present on machines marketed and sold in countries that do not belong to the European Community INFORMATION Do not remove the machine or electrical board identification plates If the plates are damaged always contact t...

Page 97: ...of said declaration below EU DECLARATION OF CONFORMITY according to 2006 42 CE THE MANUFACTURER PAOLINO BACCI S R L VIA PALERMO 32 56021 CASCINA PISA ITALY Represented by Mr AGOSTINO BACCI Legal Representative HEREBY DECLARES THAT THE MACHINE NAME FUNCTION TYPE MODEL TRADE NAME SERIAL NUMBER YEAR OF MANUFACTURE IS CONFORMANT TO ALL THE PROVISIONS OF DIRECTIVES 2006 42 EC MACHINERY 2004 108 EC EMC ...

Page 98: ...TWIN Use and maintenance instruction manual Chap 3 28 28 Page intentionally left blank ...

Page 99: ...CHAPTER 4 Installation Chap 4 1 20 CHAPTER 4 Installation ...

Page 100: ...arding shipment and delivery 8 4 2 3 Packaging and shipment precautions and tactics 9 4 3 Preparing the machine for shipment 11 4 3 1 Disconnecting the electrical cabinet 11 4 3 2 Mechanical preparations for transport 12 4 4 Component and load group identification and handling 13 4 5 Loading transportation and unloading 16 4 6 Installation site requirements 17 4 6 1 Floor specifications 17 4 6 2 A...

Page 101: ...all the necessary information on the installation step of the machine This step includes the preparation loading and unloading of the machine for transport purposes Furthermore it describes the positioning of the machine components and its fastening to the floor Finally it illustrates how to assemble the components removed in order to facilitate transport and connect the machine to the electric an...

Page 102: ...ry unless otherwise agreed all the material must be available in the installation site LOADS HANDLING EQUIPMENT 1 of 1 EQUIPMENT Crane Stacker Rocker arm Galvanized screw pin shackles Hoisting accessories e g chains belts lashing ropes INFORMATION The choice of the means to use for handling loads must be based on the evaluation of the mass to hoist and the existence of environmental limitations su...

Page 103: ... machine 4 1 3 Installation preparations made by the customer The installation site must be equipped with the following 220 volt power supply points close to the machine assembly site to which the different work equipment drills welding machine etc can be connected A telephone line with Internet access Any necessary civil works must be implemented and the foundations and or installation site must ...

Page 104: ... is OBLIGATORY to abide by the following rules IT IS OBLIGATORY that all load hoisting and handling be carried out only by specialized and authorized personnel IT IS OBLIGATORY to use personal protective equipment PPE such as safety footwear work wear gloves for protection against crushing safety helmet and harness for height work IT IS OBLIGATORY that only personnel authorized for load handling w...

Page 105: ...rface and avoid damage to machine parts where possible rest the machine on its side The machine and or the equipment and components must be lowered to the ground slowly and carefully to avoid damage Inspect the load hoisting equipment hooks harness chains eyebolts anchor bolts thoroughly before use If defects are found replace the accessories with new ones making sure that the replaced hoisting eq...

Page 106: ...al parts that may become corroded Based on the type of shipment the inside of the electrical cabinet may also be packed with a barrier bag to keep out humidity For load hoisting and handling it is OBLIGATORY to always consult the respective specifications contained in this manual Upon delivery of the machine check that the packaging has not been damaged during shipment and that the supply is confo...

Page 107: ...ches of painted parts The film also partly protects the machine from gentle atmospheric phenomena and prevents foreign material dirt from depositing on the machine Structure Control panels Grease The application of grease on surfaces or machine components aims to protect the components from atmospheric agents and prevent accumulation of foreign material on the machine Joints Couplings Guides Beari...

Page 108: ...en crates Wooden crates are normally used to ship the machine or other disassembled machine parts equipment or spare parts of the machine equipment or material for assembly purposes Miscellaneous Barrier bag Should the machine be shipped inside a container all the material in the container is contained inside the barrier bag and is hermetically sealed The barrier bag aims to protect components fro...

Page 109: ...all operators are in a safe position and aware of the work being carried out 2 Warnings Precautions Danger of bumping into the structure and machine parts Move cautiously during inspection work Danger of slipping tripping and falling inside the machine Move cautiously during work 2 Disconnecting machine wires Some electrical connections between the electrical cabinet and the various machine parts ...

Page 110: ...of the work being carried out Check that all operators are in a safe position and aware of the work being carried out 2 Warnings Precautions Danger of bumping into the structure and machine parts Move cautiously during inspection work Danger of slipping tripping and falling inside the machine Move cautiously during work 3 Mechanical block of axes To keep machine parts from moving during transporta...

Page 111: ...ethods The photographs are indicative of the method to be used to prepare and hook up the hoisting equipment Machine hoisting drawings and diagrams may be found in ANNEX B TECHNICAL DIAGRAMS AND GENERAL INFORMATION TYPE OF HOISTING HANDLING Handling using a crane hoisting pipes and straps Certain structures or the machine body may be hoisted by using a crane 1 hooked up to the polyester straps 2 a...

Page 112: ...rt of the structures to be hoisted 2 making sure they will not be crushed or come into contact with edges or corners that may damage them Rest the structures on wood supports 3 that make it possible to slip off the polyester straps Handling using a lift truck and pipes Some machine structures may be hoisted using a lift truck The forks of the lift truck 1 must be positioned under the pipes 2 inser...

Page 113: ...ion of the cabinet to allow for hoisting using a specific hoisting device such as for example a crane 1 and four ropes 2 If the cabinet has been packed in a barrier bag 3 for shipping it may be handled using a lift truck 5 Once the protective wood crate has been removed 4 the electrical cabinet may be handled using a crane 1 and four ropes 2 connected to the four eyebolts 7 ...

Page 114: ...in order to stay within the 4 meter height limit Take special care of over sized machines shipped in OPEN TOP type containers In these cases Paolino Bacci S r l will transport the load up to the ship Unless otherwise agreed upon the customer must organize and provide for road haulage from the port of destination to the installation site choosing means of transport suited to the load to be transpor...

Page 115: ...must be flat maximum admissible inclination of 2 1000 If the concrete is reinforced with a steel grid the grid must be deep enough under the surface of the floor seeing as the machine is installed using anchoring bolts that reach a depth of 15 cm Ditches for the removal of dust and chips must be at a distance of at least 10 cm from the machine s resting feet TYPE DESCRIPTION Type of floor Industri...

Page 116: ...etc and must be familiar with machine access procedures and residual risks associated to the tasks being carried out Personnel must be informed of the safety procedures and risks present in the customer s plant 4 7 1 Anchoring the machine To position the machine proceed as described below STEP ACTION DESCRIPTION 1 Safety checks Before working on any machine circuit or component it is OBLIGATORY to...

Page 117: ... resting plate 7 Adjustment Turn the four adjustment screws 2 at the corners of the machine body Turn the screws 1 4 turn at a time 8 Fastening the plates Act on the adjustment screws 2 to rest all the other plates on the ground uniformly Always turn the pair of screws at the opposite ends by 1 4 of a turn at a time 9 Leveling Check levelness along the X axis and the Y axis 10 Tightening the screw...

Page 118: ...ved for ease of transportation Connect the machine cables and wires to the electrical cabinet following the wiring diagram The position of the electrical power supply connection points is shown in ANNEX B TECHNICAL DIAGRAMS AND GENERAL INFORMATION For electrical and pneumatic connection information please consult the technical data DANGER The customer shall be liable for any damage deriving from t...

Page 119: ...CHAPTER 5 Controls and use Chap 5 1 48 CHAPTER 5 Controls and use ...

Page 120: ...25 5 5 3 Stop and re start procedure after working stop RESET 26 5 5 4 Machine stop during machining 27 5 6 Working procedures 27 5 6 1 Operating modes 27 5 6 2 HOLD TO RUN movements portable control 28 5 6 3 SINGLE PITCH loading unloading work cycle 29 5 6 4 TANDEM processing cycle 31 5 7 Equipping the machine 32 5 7 1 Tools 32 5 7 2 Machine tool diameter and weight 33 5 7 3 Sharpening machine to...

Page 121: ... and operated by qualified and authorized personnel who have read and fully understood the instructions provided in this manual and who are familiar with the machine s safety devices In the event of serious machine malfunctions or unidentifiable malfunctions stop the machine and wait for qualified technicians to intervene CONTROL LOCATION Main switch Located on the door of the electrical cabinet M...

Page 122: ...table pushbutton panel Located inside the machine s all around safety enclosure It is connected to the electrical board by a cable that renders the panel portable Table pushbutton panel Located near the loading unloading area Bench pedal Located near the loading unloading area ...

Page 123: ...itch MAIN SWITCH POS CONTROL DESCRIPTION 1 Main switch Two position main switch 0 1 Turn the switch to turn the machine on and off In the 0 position the machine is off In the 1 the machine is on The electrical cabinet is powered by the electrical grid 1 ...

Page 124: ...ps 3 Backlit control pushbutton RH bench vacuum pump on off WHERE PRESENT When the pushbutton is lit the vacuum pump is on Press the pushbutton to turn off the pump and enable blocking the pieces using the clamps 4 Backlit control pushbutton Stop vacuum pumps WHERE PRESENT When the pushbutton is lit the vacuum pumps are on Press the pushbutton to turn off the pumps and enable blocking the pieces u...

Page 125: ...OLD TO RUN mode only for tasks that must be carried out on board the machine such as for example equipping the machine machining trial runs and maintenance etc Select Automatic mode to carry out normal piece machining 6 Return from over stroke pushbutton When an axis has gone into over stroke this pushbutton returns the axis to the work range Only the machine operator may use this pushbutton 7 Sto...

Page 126: ...cle control pushbutton Press this pushbutton to start the machining program 11 Pushbutton not present 12 Emergency stop pushbutton Stops the machine in emergency mode and turns off the machine Disconnects power to the axes and spindles 1 The pushbutton has a mechanical block that keeps it in position turn it to the left to release Use the emergency pushbutton in case of imminent danger for the ope...

Page 127: ...xes and the spindles between 0 and 100 The potentiometer is enabled in both Manual and Automatic modes 3 Life Man Switch Press this pushbutton to confirm the operations controller using the portable pushbutton panel When the pushbutton is released the operation is terminated Collision hazard For all manual movements Keep an eye on the orientation of the axes The speed of all the movements is reduc...

Page 128: ...ontrol itself either forwards or backwards Only one axis may be moved at a time with a hold to run type action 6 Tool change control pushbutton optional Press this control to rotate the magazine position forwards 7 Axis position digitalization control pushbutton Use this control in Programming for self learning mode To be used to zero the axes in JOG mode or to BLOCK UNLOCK execution of programs i...

Page 129: ...s power from axes and spindles 1 The pushbutton has a mechanical block that keeps it in position turn it to the left to release Use the emergency pushbutton only in the event of imminent danger for the operator 2 Not present Free for future installations 3 Door command button This command select the opening mode of the sliding doors Manual mode open and close the loading sliding doors Automatic mo...

Page 130: ... For machines with TGV tables vacuum surface or suction cup system The piece is vacuum blocked Pressing the pedal again releases the piece Note The loading door is open Automatic mode The piece is blocked For machines with TGV tables with clamps The piece is blocked at low pressure For machines with TGV tables vacuum surface or suction cup system The piece is vacuum blocked Pressing the pedal agai...

Page 131: ... duly trained and qualified to carry out the first start up procedure The first start up procedure may be carried out first as an empty run without loading pieces into the machine to check the correct functioning of the machine units and subsequently loading pieces to be machined to check that the machine and the piece gripping devices are functioning properly Machine production depends on custome...

Page 132: ...machine and fully functional It is OBLIGATORY to check that all persons exposed to risks due to the start up of mechanical parts are outside the machine safety guards in a safe position and have been warned of imminent machine start up 2 Warnings Precautions Danger of colliding with the machine structure or components Move cautiously during machine start up Danger of slipping tripping and falling ...

Page 133: ...the balancing cylinders 1 to increase or decrease the pressure as required Check that the pressure gauge for the doors piece clamps 5 shows a working pressure of 6 bar If the pressure shown is not the working pressure use the pressure regulator for the doors piece clamps 1 to increase or decrease the pressure as required Check that the spindle cooling pressure gauge shows a working pressure of 6 b...

Page 134: ...s OBLIGATORY to check that all persons exposed to risks due to the start up of mechanical parts are outside the machine safety guards in a safe position and have been warned of imminent machine start up 2 Warnings Precautions Danger of colliding with the machine structure or components Move cautiously during machine start up Danger of slipping tripping and falling near the machine control stations...

Page 135: ...hbuttons Release any Emergency pushbuttons that have been pressed by pressing and turning the button to the left 7 RESET Press the Reset button 8 Turn on auxiliaries Press the Turn on Auxiliaries pushbutton 8 The Grid connected pilot light 1 turns on indicating that the machine is powered ...

Page 136: ...BLIGATORY to check that all persons exposed to risks due to the start up of mechanical parts are outside the machine safety guards in a safe position and have been warned of imminent machine start up 2 Warnings Precautions Danger of colliding with the machine structure or components Move cautiously during machine start up Danger of slipping tripping and falling near the machine control stations Mo...

Page 137: ...DESCRIPTION 5 Zero potentiometer Turn the Overdrive potentiometer 2 gradually to 0 6 Zero axes Zero all the axes using the control panel From the Main Menu press the ZEROING Softkey F 7 Set potentiometer Turn the Overdrive potentiometer gradually to 100 ...

Page 138: ...pindles must first run through a short heating cycle to allow the bearings to gradually reach a uniform working temperature For this purpose a program must be created in which all the spindles are used as follows SPINDLE PRE HEATING PROCEDURE 1 of 1 STEP ROTATION SPEED CYCLE TIME 1 50 max speed 12 000 1 min 5 min 2 75 max speed 18 000 1 min 3 min 3 100 max speed 24 000 1 min 3 min ...

Page 139: ...on Press one of the Emergency pushbuttons located on the pushbutton panels 3 Exit submenus Exit the submenus of the interface panel and return to the main page 4 Turn off windows Turn off the Windows operating system Click on START Click on CLOSE SESSION Click on STOP SYSTEM Click on OK The following message will appear You may now turn off the machine 4 Cut off power to the machine Turn the main ...

Page 140: ... Cut off compressed air supply Turn off the main cut off valve turn the knob counter clockwise and lock it The pneumatic system is disconnected from the pneumatic supply network The filters discharge any impurities 2 Safety warning DANGER The balancing cylinders remain pressurized even after the main switch has been tagged out Do not tamper with the relative pneumatic pipes to avoid sudden machine...

Page 141: ...wn at the maximum deceleration possible Electric power is cut off and the auxiliaries turn off The working Stop is used to stop the program being run without fully stopping all machine functions This kind of stop is executed by pressing the STOP button on the main panel the program being run stops immediately and all movements are slowed down at the deceleration set in the software parameters Elec...

Page 142: ... must be familiar with the location and use of all the emergency pushbuttons on the machine shown in the pictures INFORMATION Pressing an emergency pushbutton 12 stops the machine in emergency mode and transmits the stop signal Pressing an emergency pushbutton also cuts off power to the axes and spindles 2 Restart procedure To re start the machine Remove the cause for the machine stop Release the ...

Page 143: ...2 Stop and re start procedure after working stop STOP In the event of a sudden machine stop be it intentional or accidental correct function re start depends on how the machine has been stopped Proceed as described following STEP ACTION DESCRIPTION 1 Press the STOP pushbutton Before using the machine all persons involved must be familiar with the location and use of all the STOP pushbuttons on the...

Page 144: ...has been stopped Proceed as described following STEP ACTION DESCRIPTION 1 Press the RESET pushbutton Before using the machine all persons involved must be familiar with the location and use of all the RESET pushbuttons on the machine shown in the pictures 2 Re start procedure To re start the machine after a machine STOP Remove the cause for the machine stop Press the Reset key 9 3 Start cycle Pres...

Page 145: ...ration is confirmed and the machine brings the piece in working position inside the machine in the machining heads area The closing of the clamps during the stage when the operator interacts with the support device is performed at reduced pressure The pressure is then increased after confirmation of the end of loading by pressing the specific button At the end of processing the piece is automatica...

Page 146: ... of 2 m min To enable any movement the operator must press the specific command pushbutton on the portable control and the Life man pushbutton keeping it pressed until the position required is reached When the pushbutton is released the movement stops Manual spindle rotation is not enabled in this mode NOTE Safety warning DANGER Crushing hazard The machining head moves in every direction Hold the ...

Page 147: ...ine in manual mode Machine equipping Machine cleaning Machine maintenance INFORMATION Any other operation is forbidden in manual mode 5 6 3 SINGLE PITCH loading unloading work cycle The machine must be used by the operator or maintenance technician for normal machining of materials STEP DESCRIPTION 1 Load the piece program 2 Press the Start cycle pushbutton ...

Page 148: ...lly closes the door Once the door is closed the clamps lock the piece at high pressure Programmed operation sequence Processing stop and retraction of piece supports Door opening to allow manual unloading of the processed piece Depending on the configuration selected in the control software the pressers may open automatically when the support devices are positioned or the opening must be carried o...

Page 149: ...chine setup by following the operations described in section TANDEM processing cycle setup 2 For performing the processing cycle CNC program follow the instructions described in previous section 5 6 3 SINGLE STEP loading unloading processing cycle 3 At the end of TANDEM processing the machine setup must be performed reassembling the central protection of Y1 Y2 axes and selecting the processing par...

Page 150: ... tool choice maintenance and presetting The section part deals with how to block the piece 5 7 1 Tools MAINTENANCE NOTE Machine maintenance information INFORMATION The tools to be installed on the machine must comply with the EN 847 1 1997 Directive STEP DESCRIPTION 1 Check the following parameters data on the tool Tool marking Manufacturer name Max number of revolutions Measurements diameter leng...

Page 151: ...elow Coupling size Max diameter tool shaft mm Rotation speed rpm Max tool diameter mm Max tool weight kg ER40 25 6000 9000 150 10 9000 12000 130 7 12000 15000 110 5 15000 18000 80 5 ER32 20 6000 9000 140 4 9000 12000 130 4 12000 15000 110 2 5 15000 18000 80 2 5 5 7 3 Sharpening machine tools MAINTENANCE NOTE Machine maintenance information INFORMATION Tools must always be sharp to reduce cutting s...

Page 152: ...Use and maintenance instruction manual Chap 5 34 48 5 7 4 Machine tool assembly information MAINTENANCE NOTE Machine maintenance information INFORMATION Use only spacers that correspond to the diagram below ...

Page 153: ...e the tool is sharpened Improper tool balancing may lead to The tool breaking The tool coming off the spindle Balance the tools and tool holder in G1 Rebalance the tools each time they are sharpened in G1 NOTE Safety warning DANGER Danger of flying tool parts Use the following personal protective equipment PPE metal mesh gloves when replacing and handling tools Use the following personal protectiv...

Page 154: ...ers Shafts Tool gripping clamps DANGER Danger of the tool holder group breaking The presence of dust deposits on the tool stem may lead to Tool misalignment The tool being blocked poorly If the operator tightens the clamp ring nut too apply excessive torque the shaft or tool holder thread may be damaged Clean tools accurately Do not tighten the ring nut with a torque greater than that recommended ...

Page 155: ...al controls Manual pushbutton control A 15 movement pushbutton A 16 movement pushbutton The spindle to be equipped is positioned upwards 2 Unscrew ring nut Unscrew the blocking ring nut 1 3 Select clamp Select the clamp with the diameter best suited to the tool Insert the clamp in the taper 4 Insert tool Insert the tool in the clamp and after having positioned the tool in its seat tighten the ring...

Page 156: ...ntrol A 15 movement pushbutton A 16 movement pushbutton The spindle to be equipped is positioned towards the work side 6 Measure the tool Using an appropriate tool measure the length of the tool 7 Update parameters Enter the tool length in the software 8 Continue with the other spindles on the machining head starting from point 1 above until all the spindles are equipped ...

Page 157: ...st care possible The importance and need to adjust the presses is a well known fact it is standard practice in machine equipping and must be carried out only by the machine maintenance technician The risk of being crushed by the pressers is reduced by the measures adopted to attempt to contrast possible lack of diligence with redundancy Presser adjustment by the maintenance technician during machi...

Page 158: ... the work cycle After having fitted and adjusted the blocking devices including any counter profile check that the piece has been blocked properly Check that the piece is blocked in every direction in which machining pressure may be applied 5 8 4 Machining check NOTE Safety warning DANGER Danger of the piece or tool parts flying off the machine An erroneous piece program or a piece program applied...

Page 159: ...this software allows Fast and easy acquisition of CN programs with maximum optimizing in terms of machine yield reducing programming time Optimizing of programs generated by normal CAD CAM systems in terms of productivity and best possible use of machine performance potential Using the technical features of Paolino Bacci S r l work centers taking advantage of speed accelerations and axis power thr...

Page 160: ...tion process makes it possible to visually measure collisions and obtains a precise and reliable result Collision control is fully automatic and the programmer need only follow the instructions provided by PITAGORA for error proof results POS DESCRIPTION 1 Dialogue box to enter machining selection 2 Dialogue box to enter machining 3 Geometric and technological machining data 4 3D animation 5 Autom...

Page 161: ...box to enter rapid coupling 2 Dialogue box to enter the path and rapid feedrate 3 3D animation 4 Automatic collision check 5 Execution time for rapid coupling 6 Dialogue box to enter ISO program 7 File importing 8 CN code entered 9 Machining time 1 2 3 4 5 3 4 6 7 8 9 ...

Page 162: ...TWIN Use and maintenance instruction manual Chap 5 44 48 POS DESCRIPTION 1 Windows interface 2 OpenGL graphic interface 1 2 ...

Page 163: ...ort his her name to the manufacturer s technical service Machine access during troubleshooting must be permitted only to people identified by the person in charge for customer s safety Delimit the intervention area and inform the people nearby The qualification of people assigned to operate the machine during the troubleshooting must be assessed by the person in charge for customer s safety depend...

Page 164: ...EP C the person in charge for customer s safety and also the authorized technical personnel must take into account the risk of machine movements remotely controlled by the technical personnel of the manufacturer Paolino Bacci S r l TELESERVICE CONNECTION During the normal operation of the machine the teleservice must be disconnected and deactivated The teleservice connection is always initiated fo...

Page 165: ...TI INTERNET Linea telefonica ISDN ADSL HDSL Service BACCI INTRANET BACCI INTRANET CLIENTE A PC 1 Cliente A CNC Macchina A PC CLIENTE B CNC Macchina B CNC PC es WINMEDIA Macchina C Connessione Ethernet Linea telefonica ISDN ADSL HDSL Modem Connessione Ethernet Modem Modem PC 2 Cliente A ...

Page 166: ...TWIN Use and maintenance instruction manual Chap 5 48 48 Page intentionally left blank ...

Page 167: ...CHAPTER 6 Maintenance Chap 6 1 32 CHAPTER 6 Maintenance ...

Page 168: ...lized greasing system 13 6 4 1 3 Greases for mechanical elements parts manual lubrication 14 6 4 2 Maintenance of the centralized lubrication system 15 6 4 2 1 Automatic system check and topping up 16 6 4 3 Maintenance of the centralized greasing system 18 6 4 3 1 Automatic system check and topping up 19 6 5 Daily maintenance 22 6 5 1 Cleaning the machine at the end of each work shift 22 6 5 2 Cle...

Page 169: ...f operations that must be performed for a product to remain effective and functional and meet the aims for which it has been designed product stands for a building a machine a system or a road The maintenance activity comprises a series of operations such as tests repairs replacements of pieces or parts of a product etc INFORMATION Lubrication maintenance operations can either be performed indepen...

Page 170: ...R Electrocution hazard The machine must be turned off before any maintenance is carried out Live parts or pressurized parts may cause very serious injury Turn off the machine and cut off the air supply Block the main switch and the cut off switch with locks NOTE Safety warning DANGER Crushing hazard The balancing cylinders remain pressurized even after the main valve has been cut off Do not tamper...

Page 171: ... use original spare parts Spare parts that are not original may not be compatible and damage the machine All interventions must be compatible with and rigorously respect the safety rules on the operator s integrity 6 2 1 Other interventions If the need for maintenance and repair interventions that are not contained in this manual arises while you use the machine you are recommended to address the ...

Page 172: ...ARY MAINTENANCE TIMETABLE MECHANICAL MAINTENANCE TECHNICIAN Machine part component Personnel qualification Mechanical maintenance technician Interval Frequency in hours Product 1st degree machine cleaning Resting surface Micro switches and cams Blowers 8 h FRL unit Check clean and top up as required 8 h See table of oils Centralized lubrication system Level control Visual inspection Pressure check...

Page 173: ...CTRONIC MAINTENANCE TECHNICIAN Machine part component Personnel qualification Electrical maintenance technician Interval Frequency in hours Product Electrical system Visual inspection cables and connections Check safety devices 1000 h ORDINARY MAINTENANCE TIMETABLE MECHANICAL SUPPORT TECHNICIAN Machine part component Personnel qualification Mechanical support technician Interval Frequency in hours...

Page 174: ...ng the maintenance intervals refer to use of the machine for one work shift each day If the machine operates for more than one daily shift the maintenance frequency must be increased accordingly Every 8h of work that is at the end of each shift every day for a single shift Every 40 of work that is every 5 shifts every week for a single shift Every 160 of work that is every 20 shifts every month fo...

Page 175: ...hereby compromising machine safety Abide by the following safety recommendations when using lubricants Wear gloves and protective clothing Wear safety glasses Keep lubricants away from food and drink Immediately remove contaminated clothing Wash hands before work breaks and at the end of the work Avoid prolonged contact with eyes and skin Do not allow the product to enter the sewage system and bod...

Page 176: ...SO Nuto H 5 MOBIL Velocite Oil No 4 Q8 Puccini 4P TEXACO 300 Oil 5 TOTAL Azolla ZS 15 MAINTENANCE NOTE Machine maintenance information INFORMATION Risk of damage to the machine Use only the oils specified above Other products may be incompatible with the product used by the manufacturer for first lubricant top up The use of incompatible oils mixed together or one after the other may create substan...

Page 177: ... Maintenance Chap 6 11 32 6 4 1 1 Oil for the tool holders To lubricate the tapered part of the tool holders 1 use only the product specified in the table below BRAND TYPE OF LUBRICANT METAFLUX Spray paste 70 81 ...

Page 178: ...system For the centralized lubrication system 1 use oil that has the characteristics specified in the table below Use one of the products indicated in the table below or an ISO UNI F class or ISO UNI H class hydraulic oil BRAND TYPE OF OIL MOBIL DTE OIL HEAVY MOBIL DTE OIL MEDIUM MOBIL VACTRA OIL N 2 1 ...

Page 179: ...isk of damage to the machine Use only grease that is resistant to high pressure otherwise if the oil soaps separate inside the lubricant grease they may then solidify and jam up the pneumatic system Use only one of the greases specified above Other products may be incompatible with the product used by the manufacturer for initial greasing Incompatible greases mixed together or used one after they ...

Page 180: ...isk of damage to the machine Use only grease that is resistant to high pressure otherwise if the oil soaps separate inside the lubricant grease they may then solidify and jam up the pneumatic system Use only one of the greases specified above Other products may be incompatible with the product used by the manufacturer for initial greasing Incompatible greases mixed together or used one after they ...

Page 181: ... 15 32 6 4 2 Maintenance of the centralized lubrication system For detailed information regarding the maintenance of the centralized lubrication system please consult the specific information contained in ANNEX E OEM DOCUMENTATION ...

Page 182: ...ed PPE based on the maintenance being carried out also use one of the following PVC coveralls 2 Check Check the lubricant oil level in the tank Keep the tank full electrical minimum level signal If the oil pump works with the tank empty air may get pumped into the lubrication system this may make it difficult to keep the pumping pressure up and may keep the pump from priming 3 Visual inspection In...

Page 183: ...atible with the product used by the manufacturer for initial greasing Incompatible greases mixed together or used one after they other may create substances that are damaging for machine operation thereby compromising machine safety MAINTENANCE NOTE Machine maintenance information INFORMATION Risk of damage to the machine Check system pressure Follow the procedure described in the attached manual ...

Page 184: ...arding the maintenance of the centralized greasing system please consult the specific information contained in ANNEX E OEM DOCUMENTATION NOTE Safety warning DANGER Risk of the spring flying off There is a highly loaded spring 1 inside the tank see plate 2 Do not open the lubricant tank Top up the tank using the coupling see procedure 1 2 ...

Page 185: ...sed PPE based on the maintenance being carried out also use one of the following PVC coveralls 2 Check Check the lubricant grease level in the tank Keep the tank full electrical minimum level signal If the pump works with the tank empty air may get pumped into the lubrication system this may make it difficult to keep the pumping pressure up and may keep the pump from priming 3 Visual inspection In...

Page 186: ...STEP ACTION DESCRIPTION 4 Topping up the tank Use clean lubricant as foreign bodies may clog the pump filter 5 Connect the system Connect the pneumatic filling to the centralized system coupling point 6 Top up the tank Fill the tank to the maximum level mark ...

Page 187: ...matic system Use only one of the greases specified above Other products may be incompatible with the product used by the manufacturer for initial greasing Incompatible greases mixed together or used one after they other may create substances that are damaging for machine operation thereby compromising machine safety MAINTENANCE NOTE Machine maintenance information INFORMATION Risk of damage to the...

Page 188: ...ng compressed air as the machining chips may penetrate between the movement gears compromising machine operation When cleaning the machine wear the following PPE 3 Clean the machine components Clean the machine components thoroughly removing all grease and dirt deposits MAINTENANCE NOTE Machine maintenance information INFORMATION Risk of damage to the machine Do not use compressed air to clean the...

Page 189: ...1 Check the lubricator and the oil level Check the oil level in the lubricator group 1 If necessary top it up following the instructions provided by the FRL group manufacturer 2 Check condensation Discharge condensation from the lubricator filter 1 following the instructions provided by the FRL group manufacturer 1 1 ...

Page 190: ... that have been balanced in G1 Rebalance the tool every time it is sharpened NOTA Safety warning DANGER Risk of flying tool parts Negligence during tool maintenance represents a major cause of accidents Clean and sharpen the tools Keep tools clean and sharp Balance tools in G1 every time they are sharpened MAINTENANCE NOTE Machine maintenance information Use only one of the greases specified above...

Page 191: ...aking sure to always work in safe conditions Risk of bumping into the machine structure and parts Move cautiously while carrying out maintenance Risk of slipping tripping and falling on machining scraps Move cautiously while carrying out maintenance Risk of dust and materials being flung or sucked in In addition to commonly used PPE based on the maintenance being carried out also use one of the fo...

Page 192: ...of the electrical components in the electrical cabinet Clean the machine and the inside of the electrical cabinet using an industrial vacuum NOTE Safety warning DANGER Electrocution hazard Never use compressed air to clean the machine The jet of air may push chips and dust present in the air inside the milling unit or between the contacts of the electrical components in the electrical cabinet Clea...

Page 193: ...safe conditions Risk of bumping into the machine structure and parts Move cautiously while carrying out maintenance Risk of slipping tripping and falling on machining scraps Move cautiously while carrying out maintenance Risk of dust and materials being flung or sucked in In addition to commonly used PPE based on the maintenance being carried out also use one of the following PVC coveralls 2 Clean...

Page 194: ... materials being flung or sucked in In addition to commonly used PPE based on the maintenance being carried out also use one of the following PVC coveralls 2 Check Visually inspect that the electrical cables and cable holding chains are not damaged and replace damaged components as required Check that the electrical connectors as fastened tightly Check electrical electronic and electro mechanical ...

Page 195: ... inspect the pneumatic tubes for damage Check that pneumatic couplings are well fastened 5 Check the mechanical components Visually check the mechanical components in continuous movement and subject to wear for damage Guides skids and recirculation screws Components subject to wear blowers guards ...

Page 196: ... wiring Electrical electronic and electro mechanical components Check on the electrical manifold of the machining head and brush replacement Electrical cabinet conditioner fan Overhaul of the electrical cabinet conditioner Mechanical Check that transmission belts are taut Check that mechanical organs are tight ring nuts flanges etc 6 10 Decommissioning Before long idle periods the machine must und...

Page 197: ...AOLINO BACCI S r l declines any responsibility arising from damage incurred by persons or objects due to the re use of individual machine parts for functions or assembly different from the original functions or assembly PAOLINO BACCI S r l shall not implicitly or explicitly acknowledge the suitability of machine parts that were reused after the final de activation of the machine for dismantling pu...

Page 198: ...TWIN Use and maintenance instruction manual Chap 6 32 32 Page intentionally left blank ...

Page 199: ...CHAPTER 7 Attached documentation and diagrams Chap 7 1 4 7 Attached documents and diagrams CHAPTER ...

Page 200: ...TWIN Use and Maintenance Instruction Manual Chap 7 2 4 INDEX 7 Attached documents and diagrams 1 7 1 List of attached documents 3 ...

Page 201: ...ete the information provided in this manual PAOLINO BACCI S r l provides a series of ANNEXED documents This is a list of the ANNEXES to the manual ANNEX A SYSTEM DIAGRAMS ANNEX B TECHNICAL DIAGRAMS AND GENERAL INFORMATION ANNEX C SPARE PARTS ANNEX D OPERATOR INTERFACE SOFTWARE MANUAL ANNEX E OEM DOCUMENTATION ...

Page 202: ...TWIN Use and Maintenance Instruction Manual Chap 7 4 4 Page intentionally left blank ...

Reviews: