background image

LOWER THREADING

Ge
tting

 Re
ad

y

41

1

f

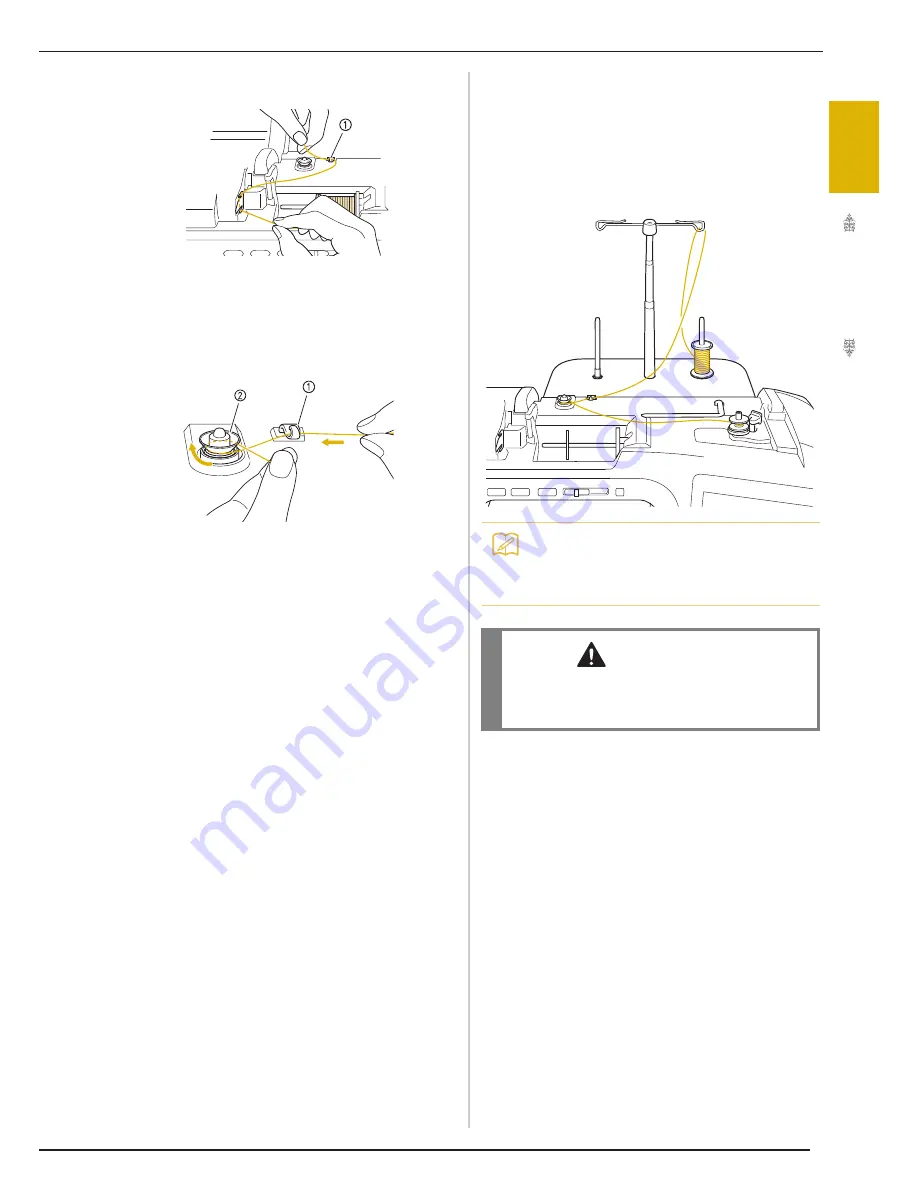
Pass the thread through the thread guide.

a

Thread guide

g

Pass the thread around the pre-tension disk 
making sure that the thread is under the 
pre-tension disk.

a

Thread guide

b

Pre-tension disk

h

Follow steps 

g

 through 

k

 on page 39 

through 40.

Using the Spool Stand

To wind thread on the bobbin while the spool stand 
is installed, pass the thread from the spool through 
the thread guide on the telescopic thread guide, and 
then wind the bobbin according to steps 

e

 through 

k

 of “Using the Supplemental Spool Pin”on 

page 38 to page 40.

Memo

• See page 9 to assemble the spool stand.

• See page 52 to thread the machine using 

the spool stand.

 CAUTION

• When winding thread on the bobbin, do not 

cross the bobbin winding thread with the 
upper thread in the thread guides.

Summary of Contents for Ellisimo BLSO

Page 1: ......

Page 2: ...retain the above copyright notice this list of conditions and the following disclaimer Redistribution s in binary form must reproduce the above copyright notice this list of conditions and the followi...

Page 3: ...ord or plug if it is not working properly if it has been dropped or damaged or water is spilled on the unit Return the machine to the nearest authorized retailer for examination repair electrical or m...

Page 4: ...o not use or store the machine near a space heater iron halogen lamp or other hot objects Use only neutral soaps or detergents to clean the case Benzene thinner and scouring powders can damage the cas...

Page 5: ...However there is no guarantee that interference will not occur in a particular installation If this equipment does cause harmful interference to radio or television reception which can be determined...

Page 6: ...de cutter Be sure to observe the precaution Label location CAUTION When using the side cutter sew between low and mid speed and do not touch the knives or operation lever of the side cutter while sewi...

Page 7: ...IMPORTANT SAFETY INSTRUCTIONS v...

Page 8: ...dle has not actually been lowered Also you can view the location of the needle within the sewing area in the screen See Checking the Needle Location in the Screen on page 75 Edge Sewing Using the buil...

Page 9: ...g a Pattern on page 288 Print and Stitch Combining the Embroidery and Printing Completed embroidery patterns can be combined with printed backgrounds that are built into this machine Beautiful three d...

Page 10: ...s Pre programmed with more than 100 frequently used stitches Character Decorative Stitches The variety of stitches widen your creativity Chapter 3 Page 77 Chapter 4 Page 145 Embroidery Maximum 30 cm 2...

Page 11: ...to Chapter 6 Embroidery Edit for an explanation about the embroidery edit functions In the screens appearing in the step by step instructions the parts referred to in the operations are marked with C...

Page 12: ...ocking the Screen 74 Checking the Needle Location in the Screen 75 Chapter 3 Utility Stitches 77 SELECTING UTILITY STITCHES 78 Selecting a Stitch 79 Saving Your Stitch Settings 81 SEWING THE STITCHES...

Page 13: ...38 Embroidering Linked Characters 239 Uninterrupted Embroidering Using a Single Color 241 USING THE MEMORY FUNCTION 242 Embroidery Data Precautions 242 Saving Embroidery Patterns in the Machine s Memo...

Page 14: ...CONTENTS xii...

Page 15: ...e accessory compartment of the flat bed attachment When sewing cylindrical pieces remove the flat bed attachment page 4 m Thread cutter Pass the threads through the thread cutter to cut them page 48 n...

Page 16: ...plate cover to clean the race page 86 211 h Needle plate The needle plate is marked with guides to help sew straight seams page 85 i Needle bar thread guide Pass the upper thread through the needle ba...

Page 17: ...tically For straight and zigzag stitch patterns that take reverse stitches the machine will sew reverse stitches at low speed only while holding down the Reverse Reinforcement Stitch button the stitch...

Page 18: ...lift off the lid to open the case The case can only be opened or locked correctly if both bars are slid in the same direction a Bars Closing the Accessory Case a Fully slide the bar on each side of t...

Page 19: ...n the accessory compartment of the flat bed attachment a Storage space of the flat bed attachment b Presser foot storage space of the flat bed attachment c Presser foot storage trays Using the Embroid...

Page 20: ...9 30 31 32 33 34 35 36 37 38 39 40 41 42 43 44 45 46 47 48 49 50 51 52 53 See Additional Accessories Guide for presser foot instruction Included Accessories 46 49 are contained in the embroidery unit...

Page 21: ...XA5523 050 36 Embroidery needle plate cover XA9939 051 37 Touch pen stylus XA9940 051 38 Knee lifter X4713 001 39 USB cable XD0745 051 40 Alternate bobbin case no color XC8167 451 41 Straight stitch...

Page 22: ...arge H 18 cm W 13 cm H 7 inches W 5 inches EF75 Frame EF79 Embroidery sheet 4 Embroidery card Reader BLECR 5 Extension Table and free motion grip BLSO ET 6 Embroidery bobbin thread white BBT W Embroid...

Page 23: ...opic thread guide XE0766 001 2 Spool support XE4958 001 3 Spool pin 2 XA6313 051 4 Screw and washer XC7568 051 5 Spool cap XL 2 XE0779 001 6 Spool holders 2 XA0679 050 7 Spool cap base 2 XE0780 001 8...

Page 24: ...d then pull the upper cover up to remove it from the machine e Insert the spool stand onto the notches of the machine How to remove a From the back of the machine press in the spool stand latches one...

Page 25: ...tterns 30 Using the Sewing Machine Help Key 32 Using the Operation Guide Function 33 Using the Sewing Guide Function 34 Using the Pattern Explanation Function 35 LOWER THREADING 37 Winding the Bobbin...

Page 26: ...turn the main power to OFF first Always grasp the plug to remove it from the outlet Pulling on the cord may damage the cord or lead to fire or electric shock Do not allow the power cord to be cut dama...

Page 27: ...rt the plug into a wall outlet a Main power switch b Power supply cord b Turn the main power switch to I to turn on the machine a OFF b ON c Turn the main power switch to O to turn off the machine Mem...

Page 28: ...r the included touch pen Do not use a sharp pencil screw driver or other hard or sharp object It is not necessary to press hard on the screen Pressing too hard or using a sharp object may damage the s...

Page 29: ...ows the presser foot code Attach the presser foot indicated in this display before sewing d Shows a preview of the selected stitch When shown at 100 the stitch appears in the screen at nearly its actu...

Page 30: ...ches Embroidery or Embroidery edit 14 f Stitch selection display Press the key for the pattern you want to sew Use to change to different stitch groups 79 g Edge sewing key Using the built in camera p...

Page 31: ...e automatic thread cutting function before sewing to have the machine automatically sew reinforcement stitches at the beginning and end of sewing depending on the pattern the machine may sew reverse s...

Page 32: ...ry card Reader USB card writer module Note The processing speed may vary by port selection and quantity of data Do not insert anything other than USB media into the USB media port Otherwise the USB me...

Page 33: ...able can only be inserted into a port in one direction If it is difficult to insert the connector do not insert it with force Check the orientation of the connector For details on the position of the...

Page 34: ...k the left mouse button a Pointer Changing Pages Rotate the mouse wheel to switch through the tabs of the pattern selection screens Memo Double clicking has no effect a Memo If page numbers and a vert...

Page 35: ...LCD SCREEN Getting Ready 21 1...

Page 36: ...ssure The higher the number the greater the pressure will be Set the pressure at 3 for normal sewing e Select whether 1 01 Straight stitch Left or 1 03 Straight stitch Middle is the utility stitch tha...

Page 37: ...1 minute increments h Change the image of the screen saver see page 25 i Select the initial screen that is displayed when the machine is turned on see page 28 j Use when running an application k Chang...

Page 38: ...ad tension for embroidering see page 225 f Select the height of the embroidery foot W during embroidering see page 197 g Change the display units mm inch h Change the initial mode of the display embro...

Page 39: ...t image you can select your own personal images for the screen saver of your machine Before changing the screen saver image prepare the image on your computer or USB media Compatible image files Memo...

Page 40: ...The General settings screen appears c Display 4 7 page 4 of 7 of the General settings screen d Press e Press f Connect the USB media or the computer using a USB cable that contains your personal imag...

Page 41: ...t Press when connecting a computer using a USB cable and then copy your personal images into Removable Disk which appears on the desktop of the computer o A list of your personal images appear on the...

Page 42: ...setting for the initial screen display Opening Screen When the machine is turned on the home page screen appears after the opening movie screen is touched Home Page When the machine is turned on the...

Page 43: ...7 page 4 of 7 of the General settings screen d Use and to choose the display language Choose from the following languages English Deutsch German Fran ais French Italiano Italian Nederlands Dutch Espa...

Page 44: ...be selected for the embroidery pattern and pattern thumbnails a Press o The Sewing settings screen appears b Press o The Embroidery settings screen appears c Display 7 7 page 7 of 7 of the Embroidery...

Page 45: ...LCD SCREEN Getting Ready 31 1 a Pattern thumbnails background b Selected color f Press to return to the original screen Memo The setting remains selected even if the machine is turned off b a...

Page 46: ...key to see explanation for upper threading winding the bobbin changing the presser foot preparing to embroider a pattern and how to use the machine see page 35 b Press this key to select utility stit...

Page 47: ...ays information about threading the machine changing presser feet etc Some of the functions are described in the movies Watch these movies for a better understanding of the functions displays informat...

Page 48: ...to view the next page Press to view the previous page f Press to return to the original screen Using the Sewing Guide Function The sewing guide function can be used to select patterns from the Utilit...

Page 49: ...n If you want to know more about the uses of a stitch pattern select the pattern and press and then to see an explanation of the stitch selection Example Displaying information about a Press b Press N...

Page 50: ...LCD SCREEN 36 c Press o The screen shows information d Press to return to the original screen Memo The settings remain displayed to allow you to fine tune the stitch...

Page 51: ...wind the bobbin using the supplemental spool pin a Supplemental spool pin a Turn the main power to ON and open the top cover b Align the groove in the bobbin with the spring on the bobbin winder shaf...

Page 52: ...r the pre tension disk a Pre tension disk o Make sure that the thread passes under the pre tension disk b Pre tension disk c Pull it in as far as possible o Check to make sure thread is securely set b...

Page 53: ...may tangle around the bobbin and cause the needle to break Memo Sliding the bobbin winding switch to the left switches the machine into bobbin winding mode Note changes to while the bobbin is winding...

Page 54: ...Set the thread spool on the spool pin so that the thread unwinds from the front of the spool a Spool pin b Spool cap c Thread spool d Spool felt d Push the spool cap onto the spool pin as far as possi...

Page 55: ...Stand To wind thread on the bobbin while the spool stand is installed pass the thread from the spool through the thread guide on the telescopic thread guide and then wind the bobbin according to step...

Page 56: ...nding b Cut the thread with scissors near the pre tension disk a Pre tension disk c Push the bobbin winder switch to the right and then raise the bobbin at least 10 cm 4 inches from the shaft d Cut th...

Page 57: ...Hold the bobbin lightly with your right hand and then guide the thread with your left hand CAUTION Use a bobbin thread that has been correctly wound Otherwise the needle may break or the thread tensi...

Page 58: ...ver 1 and then lightly press down on the right side to close the cover 2 Note If the thread is not correctly inserted through the tension spring of the bobbin case it may cause incorrect thread tensio...

Page 59: ...holding the upper thread press the Needle Position button to lower the needle a Needle Position button c Press the Needle Position button to raise the needle d Gently pull the upper thread A loop of...

Page 60: ...ding to injury When using the walking foot the side cutter or accessories not included with this machine attach the accessory to the machine after threading the machine Memo The automatic threading fu...

Page 61: ...ead down up then down through the groove as shown in the illustration CAUTION If the thread spool and or spool cap are set incorrectly the thread may tangle on the spool pin and cause the needle to br...

Page 62: ...Thread cutter m Press the Automatic Threading button to have the machine automatically thread the needle o The thread passes through the eye of the needle Note When using thread that quickly winds of...

Page 63: ...step c Then pass the thread through the eye of the needle after step i Note Some needles cannot be threaded with the needle threader In this case instead of using the needle threader after passing the...

Page 64: ...inds from the front Push the spool cap onto the spool pin as far as possible to secure the thread spool a Spool cap b Spool pin c Thread spool f Hold the thread from the spool with both hands and plac...

Page 65: ...ed k Press to select the twin needle mode a Single needle twin needle setting o appears l Start sewing Sample of Twin Needle Sewing Note If the key is light gray after selecting the stitch the selecte...

Page 66: ...pin so that the center of the spool is aligned with the hole at the center of the spool felt and then insert the spool cap onto the spool pin a Spool felt When using thread on a cone spool use the spo...

Page 67: ...the spool Note When using 2 spools of thread make sure that both spools are feeding in the same direction Make sure that the spools do not touch each other otherwise the thread will not feed off smoo...

Page 68: ...ser Foot a Place the new presser foot under the holder aligning the foot pin with the notch in the holder Lower the presser foot lever so that the presser foot pin snaps into the notch in the holder a...

Page 69: ...ation lever b Needle clamp screw c Fork d Walking foot shank e Presser foot bar d Lower the presser foot lever Insert the screw and tighten the screw securely with the screwdriver Note Thread the need...

Page 70: ...changing the needle If is not pressed and the Start Stop button or another operation button is pressed accidentally the machine will start and injury may result Use only sewing machine needles made f...

Page 71: ...to securely tighten the needle clamp screw a Needle stopper b Hole for setting the needle c Flat side of needle e Press to unlock all keys and buttons CAUTION Be sure to push in the needle until it t...

Page 72: ...e needle 75 11 is inserted in the sewing machine Fabric Thread Needle Combinations The following table provides information concerning the appropriate thread and needle for various fabrics Please refe...

Page 73: ...ener 64 Sewing Lightweight Fabrics 64 Sewing Stretch Fabrics 65 STITCH SETTINGS 66 Setting the Stitch Width 66 Setting the Stitch Length 67 Setting the Thread Tension 67 Proper Thread Tension 67 Upper...

Page 74: ...tion Keep your hands away from moving parts while the machine is in operation Do not stretch or pull the fabric during sewing Doing so may lead to injury Do not use bent or broken needles Doing so may...

Page 75: ...the machine Do not press the Thread Cutter button when there is no fabric set in the machine or during machine operation The thread may tangle possibly resulting in damage Note When cutting thread thi...

Page 76: ...t the beginning of sewing when the Start Stop button is pressed Press the Reverse Reinforcement Stitch button to sew reverse stitches or reinforcement stitches automatically at the end of sewing see p...

Page 77: ...g thread toward the back while sewing a 5 mm approx 3 16 inch Sewing Heavyweight Fabrics The sewing machine can sew fabrics up to 6 mm approx 1 4 inch thick If the thickness of a seam causes sewing to...

Page 78: ...the needle for thick fabrics page 58 a Edge of the hook and loop fastener Sewing Lightweight Fabrics Place thin paper or tear away embroidery stabilizer under thin fabrics to make sewing easier Gentl...

Page 79: ...and then sew without stretching the fabric In addition a better result can be achieved by using thread for knits or a stretch stitch a Basting stitching Memo For best results when sewing stretch fabri...

Page 80: ...isplay gets bigger Note Settings for some stitches cannot be changed refer to the STITCH SETTING CHART at the end of this manual If you turn off the machine or select another stitch without saving sti...

Page 81: ...any necessary changes Proper Thread Tension The upper thread and the bobbin thread should cross near the center of the fabric Only the upper thread should be visible from the right side of the fabric...

Page 82: ...ead Note If the bobbin thread was incorrectly threaded the upper thread may be too tight In this case refer to Setting the Bobbin page 43 and rethread the bobbin thread Memo When you finish sewing rem...

Page 83: ...he machine will automatically sew reverse stitches or reinforcement stitches and then continue sewing d Press the Reverse Reinforcement Stitch button a Reverse stitches or reinforcement stitches o The...

Page 84: ...et the fabric in the start position and start sewing a Reverse stitches or reinforcement stitches o The machine will automatically sew reverse stitches or reinforcement stitches and then continue sewi...

Page 85: ...slot on the front of the machine Insert the knee lifter bar as far as possible c Use your knee to move the knee lifter bar to the right in order to raise the presser foot Release the knee lifter to l...

Page 86: ...e presser foot when sewing is stopped can be changed according to the type of fabric being sewn Press to display Pivoting Height on 2 7 of the set tings screen Press or to select one of the three heig...

Page 87: ...d sewing continues Automatic Fabric Sensor System Automatic Presser Foot Pressure The thickness of the fabric is automatically detected and the presser foot pressure is automatically adjusted with an...

Page 88: ...on button the feed dogs are lowered At this time the fabric can be shifted to finely adjust the needle drop position a Press b Set Needle Position Stitch Placement to ON or OFF c Press to return to th...

Page 89: ...close the screen VIEW ANGLE Each press of switches the built in camera between a front view and an angled top view NEEDLE DROP POSITION Press to show the needle drop position in the screen as a Needl...

Page 90: ...USEFUL FUNCTIONS 76...

Page 91: ...casting Using Presser Foot J 95 Overcasting Using the Side Cutter 96 When Sewing Straight Stitches While Using the Side Cutter 98 Quilting 99 Piecing 102 Quilting 102 Appliqu 103 Quilting with Satin S...

Page 92: ...Screens There are 6 categories of Utility Stitches If a page number such as appears there is more than one stitch selection screen for that category Straight Overcasting Decorative Stitches Heirloom...

Page 93: ...h you want to sew Using the Mirror Image Key Depending on the type of utility stitch you select you may be able to sew a horizontal mirror image of the stitch If is lit when you select a stitch it wil...

Page 94: ...stitch is displayed b Press to change the thread color of the stitch on the screen Press to display an enlarged image of the stitch a Stitch screen c Press to go back to the original screen Memo The...

Page 95: ...ater for a stitch you can change the settings so that they can be saved for that stitch Five sets of settings can be saved for a single stitch Saving Settings a Select a stitch Example b Specify your...

Page 96: ...tomatically appears Memo When a stitch is selected the last settings retrieved are displayed The last settings retrieved are retained even if the machine was turned off or a different stitch was selec...

Page 97: ...gather pintuck etc Reinforcement stitch is sewn while pressing Reverse Reinforcement Stitch button 3 5 1 8 0 0 7 0 0 1 4 2 5 3 32 0 2 5 0 1 64 3 16 OK J Triple stretch stitch General sewing for reinf...

Page 98: ...leted hold the Reverse Reinforcement Stitch button to sew 3 4 reverse stitches or reinforcement stitches at the end of the seam g After sewing press the Thread Cutter button to trim the threads CAUTIO...

Page 99: ...needle position stitches Aligning the Fabric with a Mark on the Needle Plate or Bobbin Cover with Mark While sewing align the edge of the fabric with the 16 mm approx 5 8 inch mark on the needle plat...

Page 100: ...ng on lightweight fabrics The small opening on the foot provides support for the fabric as the needle travels through the fabric a Press the Needle Position button to raise the needle and turn the mai...

Page 101: ...u cannot change the needle position using the width display Always secure the needle plate before inserting the bobbin case into its original position CAUTION Selecting other stitches will cause an er...

Page 102: ...5 16 inches and then tie both ends together Do not sew a reverse stitch at the end d Insert the ends of the thread into the dart with a hand sewing needle e Iron the dart to one side so that it is fla...

Page 103: ...ine and remove the basting stitch Flat Fell Seam Use for reinforcing seams and finishing edges neatly a Select and attach presser foot J b Sew the finish line then cut half of the seam allowance from...

Page 104: ...parts only a Surface c Select and attach presser foot I d Sew a straight stitch along the fold When the automatic thread cutting and automatic reinforcement stitching are preset reinforcement stitche...

Page 105: ...position Appliqu Using a Zigzag Stitch Attach the appliqu material using a temporary spray adhesive or basting and then sew it Sew a zigzag stitch while positioning the right hand side needle drop poi...

Page 106: ...page 43 b Thread the gimp thread through the hole in the cord guide bobbin cover from top to bottom Position the thread in the notch at the back of the cord guide bobbin cover a Notch b Gimp thread c...

Page 107: ...sitioning the right hand side needle drop point just outside the edge of the fabric Stitch Stitch name Presser foot Applications Stitch width mm inch Stitch length mm inch Twin needle Auto Manual Auto...

Page 108: ...l Auto Manual Overcasting stitch Reinforcing of light and medium weight fabrics 3 5 1 8 2 5 5 0 3 32 3 16 2 0 1 16 1 0 4 0 1 16 3 16 NO Overcasting stitch Reinforcing of heavyweight fabric 5 0 3 16 2...

Page 109: ...1 32 3 16 OK J Overcasting stitch Reinforcing of medium stretch fabric and heavyweight fabric decorative stitching 5 0 3 16 0 0 7 0 0 9 32 2 5 3 32 0 5 4 0 1 32 3 16 OK J Overcasting stitch Reinforce...

Page 110: ...only attach the side cutter after threading the needle using the Automatic Threading button Stitch Stitch name Presser foot Applications Stitch width mm inch Stitch length mm inch Twin needle Auto Man...

Page 111: ...ction of the upper thread Pass it below the presser foot and pull it out in the fabric feed direction a Presser foot b Upper thread g Make a cut of approximately 20 mm approx 3 4 inch in the fabric a...

Page 112: ...knife b Upper knife c Operation lever Note If the width has been adjusted rotate the handwheel toward you counterclockwise Check that the needle does not touch the side cutter If the needle touches th...

Page 113: ...quilting stitch 3 50 0 00 7 00 0 1 4 2 5 3 32 1 0 4 0 1 16 3 16 NO Basting stitch Middle Basting 3 50 0 00 7 00 0 1 4 20 3 4 5 30 3 16 1 3 16 NO Stem stitch Reinforced stitching sewing and decorative...

Page 114: ...5 00 3 16 0 00 7 00 0 1 4 1 6 1 16 1 0 4 0 1 16 3 16 NO Rick rack stitch Decorative top stitching 4 00 3 16 0 00 7 00 0 1 4 2 5 3 32 1 0 4 0 1 16 3 16 NO Decorative stitch Decorative stitching and app...

Page 115: ...or invisible appliqu or attaching binding 1 5 1 16 0 5 5 0 1 64 3 16 1 8 1 16 1 0 4 0 1 16 3 16 NO Quilting stippling Background quilting 7 0 1 4 1 0 7 0 1 16 1 4 1 6 1 16 1 0 4 0 1 16 3 16 NO Stitch...

Page 116: ...to keep the quilt top batting and backing from sliding The walking foot has a set of feed dogs that move together with the feed dogs in the needle plate during sewing For straight line quilting use th...

Page 117: ...bric and then fold over the seam margin using an iron Clip curves when necessary c Turn the appliqu over and attach the stabilizer with basting pins or a basting stitch d Select and attach presser foo...

Page 118: ...the width control to ON f Press o The display will return to the original screen g Start sewing You can adjust the stitch width during sewing by moving the sewing speed controller Slide the lever to...

Page 119: ...r CAUTION With free motion quilting control the feeding speed of the fabric to match the sewing speed If the fabric is moved faster than the sewing speed the needle may break or other damage may resul...

Page 120: ...older screw aligned with the notch in the quilting foot a Presser foot holder screw b Notch f Hold the quilting foot in place with your right hand and tighten the presser foot holder screw using the s...

Page 121: ...d of this manual Free motion open toe quilting foot O a Press to set the machine to free motion sewing mode The key appears as the quilting foot is raised to the necessary height and then the feed dog...

Page 122: ...g quilting lines at equal distances around a motif is called echo quilting The quilting lines which appear as ripples echoing away from the motif are the distinguishing characteristic of this quilting...

Page 123: ...sewing speed If the fabric is moved faster than the sewing speed the needle may break or other damage may result Memo When starting to sew the internal sensor detects the thickness of the fabric and...

Page 124: ...the measurement on the quilting foot as a guide sew around the motif a 6 4 mm approx 1 4 inch Finished project h Press to cancel the free motion sewing mode o Rotate the handwheel toward you counterc...

Page 125: ...t Seen from the side a Wrong side of fabric b Right side of fabric c Edge of fabric d Basting stitching e 5 mm 3 16 inch d Fold back the fabric inside along the basting line Seen from the side a Wrong...

Page 126: ...guide of the presser foot and then lower the presser foot lever a Wrong side of fabric b Fold of hem c Guide k Adjust the stitch width until the needle slightly catches the fold of the hem a Needle d...

Page 127: ...d of the hem against the presser foot guide m Remove the basting stitching and reverse the fabric a Wrong side of fabric b Right side of fabric Appliqu a Use a temporary spray adhesive fabric glue or...

Page 128: ...elltuck stitches give an attractive appearance of shells along the curve of a collar This stitch pattern can be used for edging the neckline or sleeves of dresses and blouses a Select b Increase the u...

Page 129: ...sser foot N Sew scallop stitches along the edge of the fabric Do not sew directly on the edge of the fabric c Trim along the seam making sure not to cut the stitches Memo To make shell tucks at the ed...

Page 130: ...hes Use smocking stitches for decorative sewing on clothes etc a Select a straight stitch and attach presser foot J b Set the stitch length to 4 0 mm approx 3 16 inch and loosen the upper thread tensi...

Page 131: ...4 0 mm approx 3 16 inch b Paper c Basting stitches b Select or c Attach presser foot J Align the center of the presser foot with the middle of the space between the fabrics and begin sewing a Basting...

Page 132: ...hreads Memo Before sewing the straight stitch rotate the handwheel toward you counterclockwise and pull up the bobbin thread Holding the top and bobbin thread pull a length of thread out from the rear...

Page 133: ...he right side of the fabric facing up sew one edge of the open area Memo Use a light to medium weight homespun fab ric with a little stiffness CAUTION The Automatic Threading button cannot be used Thr...

Page 134: ...ea which are not yet open Pull out four threads leave five threads and then pull out four threads The width of five threads is approximately 4 mm approx 3 16 inch or less a Approx 4 mm approx 3 16 inc...

Page 135: ...4 0 2 1 0 1 64 1 16 NO Narrow squared buttonhole Buttonholes for light to medium weight fabrics 5 0 3 16 3 0 5 0 1 8 3 16 0 4 1 64 0 2 1 0 1 64 1 16 NO Wide squared buttonhole Buttonholes with extra s...

Page 136: ...te on the presser foot and insert the button that will be put through the buttonhole Then tighten the button holder plate around the button a Button holder plate d Align the presser foot with the mark...

Page 137: ...ion making sure that there is no gap behind the part of the foot marked A If the buttonhole foot is not slid back as far as possible the buttonhole will not be sewn at the correct size Memo If automat...

Page 138: ...to set the size of the buttonhole One mark on the presser foot scale equals 5 mm approx 3 16 inch Add the button diameter and thickness together and then set the plate at the calculated value a Presse...

Page 139: ...changing the stitch settings make sure that all stitch settings are changed to match Stitch Stitch name Presser foot Applications Stitch width mm inch Stitch length mm inch Twin needle Auto Manual Aut...

Page 140: ...stop after sewing the bar tack f Select stitch to sew the right side of the buttonhole and press the Start Stop button to begin sewing g Sew the right side of the buttonhole and press the Start Stop...

Page 141: ...d length of the darning a Presser foot scale b Completed length measurement c Width 7 mm approx 1 4 inch d 5 mm approx 3 16 inch Stitch Stitch name Presser foot Applications Stitch width mm inch Stitc...

Page 142: ...tart the machine o Once sewing is completed the machine automatically sews reinforcement stitches and then stops Note Pass the thread underneath the presser foot Set the presser foot so that there is...

Page 143: ...r foot Applications Stitch width mm inch Stitch length mm inch Twin needle Auto Manual Auto Manual Bar tack Reinforcement at opening of pocket etc 2 0 1 16 1 0 3 0 1 16 1 8 0 4 1 64 0 3 1 0 1 64 1 16...

Page 144: ...nd stop automatically Bar Tacks on Thick Fabrics Place a piece of folded fabric or cardboard beside the fabric being sewn to level the buttonhole foot and allow for easier and even feeding a Presser f...

Page 145: ...per thread and start sewing o The machine stops automatically when sewing is finished f From the wrong side of the fabric pull the end of the bobbin thread to pull the upper thread through to the wron...

Page 146: ...er toward you before sewing a Shank lever b Pull the two ends of the upper thread between the button and the fabric wind them around the shank and then tie them firmly together c Tie the ends of the b...

Page 147: ...Needle drop position d Lower the presser foot and start sewing o When sewing is finished the machine sews reinforcement stitches and stops automatically e Use the eyelet punch to make a hole in the c...

Page 148: ...he flat bed attachment to use the free arm b Select and attach monogramming foot N c Set the needle in the fabric at the sewing start point and sew seam 1 as shown a Start Point Memo Insert the tubula...

Page 149: ...onnected to the starting point of seam 1 Zipper Insertion Centered Zipper Use for bags and other such applications a Select b Attach presser foot J and sew straight stitches up to the zipper opening C...

Page 150: ...ric then remove the basting Inserting a Side Zipper Use for side zippers in skirts or dresses a Select CAUTION When using zipper foot I make sure the straight stitch middle needle position is selected...

Page 151: ...foot a Right b Left c Needle drop position f Set the presser foot in the 3 mm approx 1 8 inch margin g Starting from the end of the zipper opening sew to a point about 50 mm approx 2 inches from the e...

Page 152: ...foot a Right b Left c Needle drop position k Set the fabric so that the left edge of the presser foot touches the edge of the zipper teeth l Sew reverse stitches at the top of the zipper then continue...

Page 153: ...If the fabric has a complicated pattern is sheer or is glossy such as a vinyl material the built in camera may not be able to detect it correctly For best results iron the fold when folding the edge o...

Page 154: ...chine settings screen the brightness of the light changes to 5 f When the message shown below appears check that the vertical stitch alignment foot V is attached and that the edge sewing sheet is posi...

Page 155: ...ue with a black starting point or black with a red starting point a Key for changing the color of the fabric edge indicator line b Fabric edge indicator line Note Before pressing install the vertical...

Page 156: ...again starting with step a When the Fabric Edge Indicator Line Is Not Aligned With the Edge of the Fabric The fabric edge indicator line that appears is not aligned with the edge of the fabric The fab...

Page 157: ...ge of the fabric to the seam is set a Note Distances between 1 5 mm about 1 16 inch and 38 5 mm about 1 1 2 inches can be measured The distance is displayed in the screen in 0 5 mm about 1 64 inch inc...

Page 158: ...age appears edge sewing with the seam wizard function is canceled Note While sewing do not place anything including your hands within 2 mm about 1 16 inch from the edge of the fabric otherwise the edg...

Page 159: ...Beginning of the Pattern 159 Checking the Image 160 COMBINING STITCH PATTERNS 162 Before Combining 162 Combining Various Stitch Patterns 162 Combining Large and Small Stitch Patterns 164 Combining Ho...

Page 160: ...itch length and width e Cross stitch f Utility decorative stitch patterns g Alphabet characters gothic font h Alphabet characters handwriting font i Alphabet characters outline j Patterns saved in the...

Page 161: ...If a page number such as appears there is more than one stitch selection screen for that category Decorative Stitch Patterns 7mm Decorative Stitch Patterns Satin Stitch Patterns 7mm Satin Stitch Patt...

Page 162: ...ttern you want to sew Press to view the next page Press to view the previous page Touch the bar that appears between and to leap multiple pages at one time To select a different stitch pattern press W...

Page 163: ...ITCH PATTERNS Character Decorative Stitches 149 4 c Press and then enter B d Press and then enter lue e Press to enter a space f Press again and enter S a Jumping stitch Remove the jumping stitches af...

Page 164: ...and then repeat from step a Deleting Characters a Press to delete the last character b Select the correct character Adjusting the Character Spacing The space between the characters can be adjusted a P...

Page 165: ...e Each setting equals a specific distance between characters Value mm 0 0 1 0 18 2 0 36 3 0 54 4 0 72 5 0 9 6 1 08 7 1 26 8 1 44 9 1 62 10 1 8 Memo The default setting is 0 No number less than 0 can b...

Page 166: ...or bunching of stitches so be sure to attach a stabilizer material Guide the fabric with your hand to keep the fabric feeding straight and even during sewing Fabric When sewing on stretch fabrics ligh...

Page 167: ...on 16 18 Memo If the fabric is pulled or pushed during sew ing the pattern may not turn out correctly Also depending on the pattern there may be movement to the left and right as well as front and ba...

Page 168: ...value decreases each time the button is pressed and the pattern will shorten If the pattern is skewed to the left Press in the Fine Adjust Horiz display o The displayed value increases each time the...

Page 169: ...he editing functions Make patterns larger or smaller make mirror images etc Note Some editing functions cannot be used with certain stitch patterns Only the functions for the displayed keys are availa...

Page 170: ...highlighted 66 67 h Thread tension key Shows the thread tension setting for the selected stitch pattern The machine default settings are highlighted 67 i Memory key Use this key to save stitch pattern...

Page 171: ...e Length for 7mm Satin Stitch Patterns Only When 7mm satin stitch patterns are selected press to choose from 5 automatic length settings without changing the stitch zigzag width or stitch length setti...

Page 172: ...emo To finish a complete motif while sewing the pattern continuously you can press the key while sewing The machine will automatically stop when the motif is finished CAUTION If the stitches bunch whe...

Page 173: ...sewing or when the stitching is sewn incorrectly a Press the Start Stop button to stop the machine and then press o Sewing returns to the beginning of the selected pattern W from the point where sewi...

Page 174: ...image on the screen a Press o An image of the selected pattern is displayed b Press to change the thread color in the image to red blue or black o The color changes every time you press the button c...

Page 175: ...ERNS Character Decorative Stitches 161 4 e Press to return to the original screen Memo You can also sew from this screen when the presser foot symbol is displayed Image of some patterns will display i...

Page 176: ...Single stitch sewing is automatically selected for sewing combined patterns If you want to sew the pattern continuously press after finishing the stitch pattern combination When changing sizes creatin...

Page 177: ...COMBINING STITCH PATTERNS Character Decorative Stitches 163 4 c Press o The display returns to the stitch selection screen d Press e Select f Press to sew the pattern continuously...

Page 178: ...ess o The large size stitch will be selected b Press again then press to select the small size o The pattern is displayed in a smaller size c Press to sew continuously o The entered pattern is repeate...

Page 179: ...ntal Mirror Image Stitch Patterns Example a Press b Press again then press o The pattern is flipped along a vertical axis c Press o The entered pattern is repeated Combining Stitch Patterns of Differe...

Page 180: ...tch Patterns Only You can use the keys with 7mm satin stitch patterns to create a step effect Stitch patterns sewn so that they create a step effect are called step stitch patterns Press to move the s...

Page 181: ...TTERNS Character Decorative Stitches 167 4 a Press b Press o The next stitch pattern will move to the right c Press again d Press o The next stitch pattern will move to the left e Press o The entered...

Page 182: ...COMBINING STITCH PATTERNS 168 More Examples Press o o o o Press o o o o o o o o Press o o o Press o o o o o o o o...

Page 183: ...mory Stick Smart Media Multi Media Card MMC XD Picture Card To create file folders use a computer Computers and Operating Systems with the Following Specifications can be Used Compatible models IBM PC...

Page 184: ...al Business Machines Corporation Microsoft and Windows are registered trademarks or trademarks of Microsoft Corporation Each company whose software title is mentioned in this manual has a Software Lic...

Page 185: ...e s memory a Press b Press Press to return to the original screen without saving o The Saving screen is displayed When the pattern is saved the display returns to the original screen automatically Not...

Page 186: ...the currently selected stitch pattern To save the stitch pattern in the machine s memory you have to delete a previously saved stitch pattern a Press Press to return to the original screen without sa...

Page 187: ...ch patterns from the machine to USB media plug the USB media into the machine s top USB port a Press Memo USB media is commercially available but some USB media may not be usable with this machine Ple...

Page 188: ...matically Note The processing speed may vary by port selection and quantity of data You can also plug a USB media into the center port but the primary top USB port will process the data faster It is r...

Page 189: ...nto the USB ports on the computer and machine whether or not they are turned on a USB port for computer b USB cable connector o The Removable Disk icon will appear in Computer My computer on the compu...

Page 190: ...Choose a stitch pattern to retrieve If the entire saved stitch pattern is not displayed press the thumbnail Press to return to the original screen without saving a Saved stitch patterns c Press Press...

Page 191: ...s o Stitch patterns and a folder in a top folder are displayed c Press when there is a subfolder to sort two or more stitch patterns to USB media the stitch pattern in the subfolder is displayed Press...

Page 192: ...lug the USB cable connector into the corresponding USB ports for the computer and for the machine see page 175 b On the computer open Computer My computer then go to Removable Disk c Move copy the pat...

Page 193: ...ss Press to delete the stitch pattern The pattern will be deleted from the Removable Disk folder in your computer o The selected stitch pattern is recalled and the sewing screen will be displayed Note...

Page 194: ...USING THE MEMORY FUNCTION 180...

Page 195: ...ing Image 217 Using USB Media 217 Using a USB Cable 218 Printing the Background and Embroidery Position Sheet 219 Sewing Embroidery Patterns 220 ADJUSTMENTS DURING THE EMBROIDERY PROCESS 221 If the Bo...

Page 196: ...ace 37 5 Fabric preparation Attach a stabilizer material to the fabric and hoop it in the embroidery frame 197 6 Pattern selection Turn the main power to ON and select an embroidery pattern 186 7 Embr...

Page 197: ...holder e Use the included screwdriver to loosen the screw of the presser foot holder then remove the presser foot holder a Screwdriver b Presser foot holder c Presser foot holder screw o Remove the pr...

Page 198: ...ove the machine with the embroidery unit attached The embroidery unit could fall off and cause injury Keep your hands and foreign objects away from the embroidery carriage and frame when the machine i...

Page 199: ...d down the release button and pull the embroidery unit away from the machine a Release button CAUTION Always remove the embroidery frame before pressing Otherwise the frame may strike the embroidery f...

Page 200: ...as finished the initialization and the carriage has moved to the start position the pattern type selection screen will display If another screen is displayed press then to display the screen below a B...

Page 201: ...7 categories of patterns in this machine If a page number such as appears there is more than one pattern selection screen for that category Embroidery patterns Alphabet characters Floral alphabet patt...

Page 202: ...ELECTING PATTERNS 188 Baby Lock Exclusives Flower designs Lace designs Borders designs Quilting designs Occasions designs Children designs Animals designs Appliqu designs Novelty designs Nancy designs...

Page 203: ...rn you want to embroider b Press the key of the pattern you want to embroider Press to view the next page Press to view the previous page o The selected pattern is displayed c Press to create a mirror...

Page 204: ...ecting Alphabet Character Patterns Example Entering Blue Sky a Press b Press the key of the font you want to embroider c Press to change the selection screens Memo If you continue adding characters af...

Page 205: ...character and then press to change the size The size changes each time you press the key from large to medium to small If you make a mistake press to erase the mistake If the pattern is too small to...

Page 206: ...RNS 192 h Press and then enter ky i Press o The sewing screen is displayed j Proceed to VIEWING THE SEWING SCREEN on page 195 to embroider the pattern To return to the previous screen to select anothe...

Page 207: ...d at the bottom part of the screen c Press the key of the frame pattern you want to embroider If you make a mistake selecting the pattern press the key of the pattern you want to embroider o The selec...

Page 208: ...a Primary top USB port b Embroidery card Reader USB card writer module b Insert the card completely into the card Reader USB card writer module Insert the embroidery card so that the end with a printe...

Page 209: ...wing the pattern not including time for changing and automatically trimming the thread h Shows the number of colors in the selected pattern and the number of the color currently being sewn i Shows the...

Page 210: ...B media or a computer 244 248 u Return key Press this key to return to the pattern type selection screen v Cut Tension key Press this key to specify automatic thread cutting thread trimming or the thr...

Page 211: ...a thickness of less than 3 mm approx 1 8 inch Using fabrics thicker than 3 mm approx 1 8 inch may cause the needle to break When using layers with thicker batting etc you can sew more attractive embr...

Page 212: ...bilizer b Fabric wrong side Memo When embroidering on thin fabrics such as organdy or lawn or on napped fabrics such as towel or corduroy use water soluble sta bilizer sold separately for best results...

Page 213: ...Quilt Medium Small Embroidery field 30 cm 20 cm approx 12 inches 8 inches Embroidery field 20 cm 20 cm approx 8 inches 8 inches Embroidery field 10 cm 10 cm approx 4 inches 4 inches Embroidery field...

Page 214: ...crew and then remove the slack in the fabric by pulling on the edges and corners Do not loosen the screw d Gently stretch the fabric taut and tighten the frame adjustment screw to keep the fabric from...

Page 215: ...c you want to embroider a Embroidery pattern b Mark b Place the embroidery sheet on the inner frame Align the guide lines on the embroidery sheet with the mark you made on the fabric a Inner frame b G...

Page 216: ...the small piece of fabric to the larger piece in the frame If you do not wish to use a temporary spray adhesive attach the stabilizer with a basting stitch a Fabric b Stabilizer Embroidering Edges or...

Page 217: ...the embroidery frame holder a Embroidery frame holder b Embroidery frame guide c Slide the embroidery frame into the holder making sure to align the embroidery frame s with the holder s a Arrow mark...

Page 218: ...ATTACHING THE EMBROIDERY FRAME 204 Removing the Embroidery Frame a Raise the frame securing lever b Pull the embroidery frame toward you...

Page 219: ...center of the larger circle is at the center of the embroidery pattern a Embroidery positioning sticker b Center of the embroidery pattern c Embroidery field Note When embroidery frame small is insta...

Page 220: ...dery positioning sticker can be selected c From the areas shown in the window select the area containing the embroidery positioning sticker Note If the embroidery positioning sticker is placed in the...

Page 221: ...icker from the fabric and press To remove the embroidery positioning sticker more easily press so that the embroidery frame moves slightly forward and away from under the needle After the embroidery p...

Page 222: ...following screen is displayed b From press the key for the position that you want to check a Selected position The needle will move to the selected position on the pattern c Press Memo To see the ent...

Page 223: ...idered appears b Press to select the frame used in the preview Frames displayed in light gray cannot be selected Press to enlarge the image of the pattern The pattern can be sewn as it appears in the...

Page 224: ...bbin case no color on the screw is set with tighter tension for embroidery with different weights of bobbin threads and a variety of embroidery techniques This bobbin case is identified with a dark co...

Page 225: ...cer Using Prewound Bobbins with Alternate Bobbin Case No Color on the Screw Use the alternate bobbin case no color on the screw when a tighter bobbin tension is needed See page 312 for how to remove t...

Page 226: ...op the machine c Trim the excess thread at the end of the seam If the end of the seam is under the presser foot raise the presser foot then trim the excess thread d Press the Start Stop button to star...

Page 227: ...abilizer b Place the appliqu material into the embroidery frame and then press the Start Stop button to sew the outline of the appliqu a Outline of appliqu b Appliqu material The machine will sew arou...

Page 228: ...f Apply a thin layer of adhesive or spray adhesive to the back of the appliqu piece and attach it to the appliqu position so that it follows the seam of the outline g Press the Start Stop button The...

Page 229: ...217 Step3 When using iron on paper With a printer print the background onto iron on paper and print the embroidery position sheet on plain paper Then iron the background image onto fabric When using...

Page 230: ...the key of the pattern you want to embroider o An image of the pattern combined with the background appears Checking Only the Embroidery Pattern Press o Only the embroidery pattern not the background...

Page 231: ...the primary top USB port on the machine b Select the pattern and then press o The select USB output screen appears Note Print the background and embroidery position sheet in their original dimensions...

Page 232: ...here the image data is saved from the machine and then copy the image data from the USB media to the computer Using a USB Cable a Plug the USB cable connectors into the corresponding USB ports on the...

Page 233: ...nt the embroidery position sheet file named E_1p pdf onto plain paper a Embroidery position sheet Memo Do not disconnect the USB cable from the machine until data output is finished Note Print the bac...

Page 234: ...phane tape to prevent the paper from moving a Cellophane tape d After checking that a pattern is selected press o The sewing screen appears e Align the embroidering position according to steps b throu...

Page 235: ...e frame securing lever and remove the embroidery frame Be careful not to apply strong force to the fabric at this time Otherwise the fabric may loosen in the frame c Insert a wound bobbin into the mac...

Page 236: ...on to reset the bobbin c Press d Press or to move the needle back the correct number of stitches before the spot where the thread broke If you cannot move back to the spot where the thread broke press...

Page 237: ...d when embroidery is stopped The next time the machine is turned on you have the option to continue or delete the pattern a Current stitch number when embroidery was stopped a Turn the main power to O...

Page 238: ...ry frame and press o The previous sewing screen displayed before the machine was turned off appears d Continue embroidering a Stitch number when embroidery is resumed Memo If you want to start a new e...

Page 239: ...ead is too tight resulting in the bobbin thread being visible from the right side of the fabric a Right side b Wrong side a Press b Press to weaken the upper thread tension The tension number will dec...

Page 240: ...are required to accommodate different bobbin threads See Sewing Attractive Finishes on page 210 To adjust the bobbin tension for embroidery function using the alternate bobbin case with no color on t...

Page 241: ...tion will cut the thread at the end of sewing each color This function is initially turned on To turn this function off press key and then This function can be turned on or off during embroidering Thi...

Page 242: ...he thread This function can be turned on or off during embroidering Select a setting from 5 mm to 50 mm in 5 mm increments Your customized setting remains after turning the machine off and on Press or...

Page 243: ...the thread colors or the embroidery thread number Memo SPM is the number of stitches sewn in one minute Decrease the sewing speed when embroi dering on thin thick or heavy fabrics The sewing speed ca...

Page 244: ...country or area cotton like polyester thread is sold e Press Changing the Embroidery Frame Display a Press b Press c In the Frame Display use to change the embroidery frame display mode There are 14...

Page 245: ...frame embroidering area 20 cm 20 cm 8 inches 8 inches d Embroidery area for optional large embroidery frame 18 cm 13 cm 7 inches 5 inches e Embroidering area for optional border embroidery frame 18 c...

Page 246: ...the pointer on the desired pattern and then select and drag the pattern The pattern can also be dragged by selecting it directly in the screen with your finger or the touch pen CAUTION When you have r...

Page 247: ...ISING THE PATTERN Embroidery 233 5 Aligning the Pattern and the Needle Example Aligning the lower left side of a pattern and the needle a Mark the embroidery start position on the fabric as shown b Pr...

Page 248: ...align the needle and the mark on the fabric and begin embroidering the pattern Changing the Size a Press b Select the direction in which to change the size Press to enlarge the pattern proportionatel...

Page 249: ...left Press to rotate the pattern 90 degrees to the right Press to rotate the pattern 10 degrees to the left Press to rotate the pattern 10 degrees to the right Press to rotate the pattern 1 degree to...

Page 250: ...to its original position a Degree of rotation c Press to return to the original screen Creating a Horizontal Mirror Image Press so it appears as to create a horizontal mirror image of the selected pat...

Page 251: ...ns can be changed A setting between 80 and 120 in 5 increments can be specified a Press b Change the density Press to make the pattern less dense Press to make the pattern more dense a Normal b Fine s...

Page 252: ...th each letter in a different color If MULTI COLOR is set the machine stops after each character is sewn so that the thread can be changed to a different color a Press so that it appears as Press the...

Page 253: ...he character patterns for ABC b Press c Press o The needle is positioned in the lower left corner of the pattern The embroidery frame moves so that the needle is positioned correctly d Press Note For...

Page 254: ...a generous length remove the embroidery frame and then attach the embroidery frame again so that the remaining characters DEF can be embroidered a End of the embroidering i As in step a select the cha...

Page 255: ...hine will hesitate but not stop between color steps and then continue till the pattern is completed Press for the multicolor steps to become shaded and the selected pattern will embroider in a single...

Page 256: ...h Memory Stick Smart Media Multi Media Card MMC XD Picture Card CAUTION When using embroidery data other than our original patterns the thread or needle may break when sewing with a stitch density tha...

Page 257: ...ta stored in a folder created in USB media can be retrieved Do not create folders in Removable Disk on a computer If embroidery data is stored in a folder in Removable Disk that embroidery data cannot...

Page 258: ...ave is in the sewing screen CAUTION Before disconnecting the USB cable click the Unplug or Eject Hardware icon in the taskbar of Windows 2000 or the Safely Remove Hardware icon in the taskbar of Windo...

Page 259: ...y If the Memory is Full If the screen below displays either the maximum number of patterns have been saved or the pattern you want to save takes a lot of memory and the machine cannot save it If you d...

Page 260: ...tically b a Note Do not turn the main power to OFF while the Saving screen is displayed You will lose the pattern you are saving Memo If there is enough memory available after deleting the pattern the...

Page 261: ...for more details Depending on the type of USB media being used either directly plug the USB device into the machine s USB port or plug the USB media Reader Writer into the machine s USB port The USB m...

Page 262: ...the machine b Turn on your computer and select Computer My computer The USB cable can be plugged into the USB ports on the computer and embroidery machine whether or not they are turned on a USB port...

Page 263: ...eturn to the original screen without saving o The pattern will be temporarily saved to Removable Disk under Computer My computer e Select the pattern s phc file in Removable Disk and copy the file to...

Page 264: ...ry pattern from either direct USB media or a folder in the USB media If the pattern is in a folder check each folder to find the embroidery pattern a Insert the USB media into the primary top USB port...

Page 265: ...n USB media c Path The path to shows the current folder at the top of the list Embroidery patterns and subfolders within a folder are displayed Press to return to the previous folder Use the computer...

Page 266: ...he pattern data to Removable Disk o Pattern data in Removable Disk is written to the machine d Press o The patterns in the computer are displayed on the selection screen e Press the key of the pattern...

Page 267: ...USING THE MEMORY FUNCTION Embroidery 253 5 f Press o The sewing screen is displayed...

Page 268: ...titch and one pattern with a satin stitch a Select a straight stitch frame pattern Embroider the pattern onto the appliqu material then cut neatly around the outside of the shape b Embroider the same...

Page 269: ...do not have to change the fabric in the embroidery frame using this method Embroider one pattern with a straight stitch and one pattern with a satin stitch a Select a straight stitch frame pattern an...

Page 270: ...f Reattach the embroidery frame to the embroidery unit and embroider the satin stitch pattern to create an appliqu Note Do not remove the fabric from the embroi dery frame to cut it Also do not pull s...

Page 271: ...s how to read the split embroidery pattern shown below from USB media and embroider it a Connect to the machine the media containing the created split embroidery pattern and then select the split embr...

Page 272: ...to embroider the pattern section f When embroidering is finished the following screen appears Press o A screen appears so that a section of the split embroidery pattern can be selected g Repeat steps...

Page 273: ...Choosing a Color from the Custom Thread Table 281 Designing Repeated Patterns 282 Sewing Repeated Patterns 282 Repeating One Element of a Repeated Pattern 284 Color Sorting Repeated Patterns 285 Assig...

Page 274: ...tely sold embroidery cards and many other patterns Move Patterns Within the 30 cm u 20 cm approx 12 inches u 8 inches wide embroidery area you can change the position of patterns and check the positio...

Page 275: ...oidery patterns h Patterns saved in the machine s memory see page 249 i Patterns saved in USB media see page 250 j Patterns saved on the computer see page 252 k Press this key to position the embroide...

Page 276: ...edit See pages 189 and 193 for more information on selecting patterns o The pattern is displayed in the top part of the screen c Press o The pattern selected for editing is outlined in red on the embr...

Page 277: ...e the layout of the pattern If the characters are too small to see press to view a display of all entered characters d Select the layout Example When selecting an arc use and to change the degree of t...

Page 278: ...SELECTING PATTERNS TO EDIT 264 f After you finish your selections press o The embroidery edit screen will appear g Proceed to EDITING PATTERNS on page 265 to edit the pattern...

Page 279: ...the pattern currently selected c Shows the distance from the center of the frame d Shows the color sequence and times of each step of the pattern currently selected e Shows the degree of rotation for...

Page 280: ...ters in a pattern 273 g Add key Press this key to add another pattern to the editing pattern 288 h Delete key Press this key to delete the selected pattern the pattern outlined by the red box 269 i Pa...

Page 281: ...o the center a Distance from the center The pattern can also be moved by dragging it If a USB mouse is connected move the mouse to position the pointer on the desired pattern and then select and drag...

Page 282: ...Press to rotate the pattern 10 degrees to the left Press to rotate the pattern 10 degrees to the right Press to rotate the pattern 1 degree to the left Press to rotate the pattern 1 degree to the rig...

Page 283: ...horizontally Press to compact the pattern horizontally Press to stretch the pattern vertically Press to compact the pattern vertically Press to return the pattern to its original appearance a Shows th...

Page 284: ...TERNS 270 b Press the key of the layout you want to embroider See page 263 for more information about layout types o The display will show the selected layout c Press Changing Alphabet Character Spaci...

Page 285: ...ess to return to the original screen Reducing Character Spacing The spacing between characters can be reduced to 50 of the narrowest character in the group Note It is not recommended to edit data and...

Page 286: ...r spacing or to separately edit the patterns after all characters have been entered a Press b Press o The key appears as c Use to select where the pattern is to be separated and then press to separate...

Page 287: ...the character spacing e Press Changing the Color of Each Alphabet Character in a Pattern a Press so you can assign a thread color to each character b Change the thread to sew each character in a diff...

Page 288: ...for ABC b In the sewing screen press c Press o The needle is positioned in the lower left corner of the pattern The embroidery frame moves so that the needle is positioned correctly d Press Note For d...

Page 289: ...the threads to a generous length remove the embroidery frame and then attach the embroidery frame again so that the remaining characters DEF can be embroidered a End of the embroidering i As in step...

Page 290: ...patterns Changing the Thread Color You can change the thread color by moving the color to be changed to the top of the sewing order and selecting a new color from the thread colors in the machine a In...

Page 291: ...reate a custom thread table containing the thread colors that you most often use You can select thread colors from the machine s extensive list of thread colors from nine different thread brands You c...

Page 292: ...ustom thread table You can choose colors from the custom thread from the custom thread table by directly touching the screen with the touch pen You can scroll through 100 colors at a time using and on...

Page 293: ...entered number and then enter the correct number a Thread brand e Press a Thread brand b Entered thread color number o The selected thread color is set in the custom thread table f Repeat the previous...

Page 294: ...epeat the previous steps a through c on page 277 b Press to display the thread list c Use to select a thread color a Thread list b Thread brand d Press e Repeat the previous steps until all desired th...

Page 295: ...e color you want to change at the top of the sewing order c Press a Custom thread change key o The custom thread table will appear d Press to choose a new color from the custom thread table Use and to...

Page 296: ...the patterns within a repeated pattern stitch a Select a pattern and then press b Press c Select the direction in which the pattern will be repeated a Vertical direction b Horizontal direction c Repe...

Page 297: ...bottom To delete the top pattern press To delete the bottom pattern press e Adjust the spacing of the repeated pattern To widen spacing press To tighten spacing press a Press to change a repeated patt...

Page 298: ...ss to cut horizontally Press to cut vertically o The pattern direction indicator will change depending on the direction selected b Use and to select the cut line o The cut line will move Memo When the...

Page 299: ...atedly changing the upper thread or changing the sewing order manually Note Once you have cut a repeated pattern into separate elements you cannot return to the original repeated pattern Each element...

Page 300: ...EDITING PATTERNS 286...

Page 301: ...the final thread When sewing a series of patterns use the point of this arrow for positioning the following designs to be sewn a Press b Press c Press to select the thread mark to be sewn d Press Mem...

Page 302: ...ess To combine the pattern with other patterns select see page 289 See page 210 for more information about sewing patterns Note If multiple patterns are displayed in the screen only the pattern select...

Page 303: ...mbroidery Edit 289 6 COMBINING PATTERNS Editing Combined Patterns Example Combining alphabet characters with an embroidery pattern and editing a Press to select an embroidery pattern b Use to view 2 7...

Page 304: ...een f Select and enter Spring After selecting press to change the character case then enter the remaining characters o The characters you enter will be displayed in the center of the display g Press h...

Page 305: ...ting combined embroidery pat terns If multiple patterns have been combined use to select the pattern to be edited If a USB mouse is connected the pattern can be selected by clicking it Move the mouse...

Page 306: ...idery order will be as follows a Embroider by following the color order on the right side of the display After the flowers are embroidered the cursor will move to the Spring part of the pattern b Embr...

Page 307: ...ine of the pattern This is useful for embroidering fabric that cannot have stabilizer material affixed with an iron or adhesive By stitching stabilizer material to the fabric shrinkage of the stitchin...

Page 308: ...will be used to create an appliqu piece Note When is pressed the pattern is moved to the center After selecting the basting setting move the pattern to the desired position Memo To cancel the setting...

Page 309: ...re selecting the appliqu setting If the pattern is edited after selecting the appliqu setting the appliqu stitching and pattern may become misaligned Since an outline is added the pattern for an appli...

Page 310: ...y and cannot be selected Memo Three steps are added to the sewing order appliqu cutting line position of pattern placement on the garment and appliqu stitching a Cutting line for appliqu b Position of...

Page 311: ...gns with the placement line Memo We recommend using thread for the cutting line that is closest to the color of the fabric Note Depending on the pattern density and fabric used there may be shrinking...

Page 312: ...the appliqu piece and then iron it if necessary Using a Frame Pattern for the Out line Using a frame pattern the desired shape can be added as the outline of the appliqu a Perform the operations descr...

Page 313: ...size of the appliqu pattern d Press and then press e Press to select the appliqu piece setting f Press g Use to select the frame pattern and then press and o The frame pattern is deleted h Press i Con...

Page 314: ...hen press o A window appears so that the area containing the embroidery positioning sticker can be selected Note When embroidery frame small is installed the built in camera cannot be used to align th...

Page 315: ...embroidery positioning sticker is placed in the center of embroidery frame select any of the four areas If the embroidery positioning sticker over laps two areas select either of the two areas Note At...

Page 316: ...oning sticker f A reminder message appears Remove the embroidery positioning sticker from the fabric and press To remove the embroidery positioning sticker more easily press so that the embroidery fra...

Page 317: ...d retrieve edited embroidery patterns to and from the machine s memory a personal computer or USB media Refer to the relevant sections in Chapter 5 on saving and retrieving embroidery patterns and fol...

Page 318: ...tep3 When using iron on paper With a printer print the background onto iron on paper and print the embroidery position sheet on plain paper Then iron the background image onto fabric When using printa...

Page 319: ...a Press the key of the pattern you want to embroider o An image of the pattern combined with the background appears Checking Only the Embroidery Pattern Press o Only the embroidery pattern not the ba...

Page 320: ...imary top USB port on the machine b Select the pattern and then press o The select USB output screen appears Note Print the background and embroidery position sheet in their original dimensions If an...

Page 321: ...e USB media where the image data is saved from the machine and then copy the image data from the USB media to the computer Using a USB Cable a Plug the USB cable connectors into the corresponding USB...

Page 322: ...aper print the file named E_1r pdf an image flipped on a vertical axis When printing onto printable fabric print the file named E_1n pdf an image that is not flipped a Background image Memo Do not dis...

Page 323: ...a pattern is selected press The sewing screen appears e Align the embroidering position according to steps b through f of Using the Built In Camera to Align the Embroidering Position on page 300 f Re...

Page 324: ...PRINT AND STITCH COMBINING EMBROIDERY PATTERNS AND PRINTED DESIGNS 310...

Page 325: ...ning the Cutter in the Bobbin Case Area 314 About the Maintenance Message 315 ADJUSTING THE SCREEN 316 Touch Panel is Malfunctioning 316 TROUBLESHOOTING 317 ERROR MESSAGES 322 Alarm Sounds 329 SPECIFI...

Page 326: ...o example of cleaning the race see page 34 Follow the steps explained below to complete the operation a Press the Needle Position button to raise the needle b Turn the main power to OFF c Remove the n...

Page 327: ...ms arise When cleaning the bobbin case use card stock or another type of paper of similar thickness and sturdiness in order to prevent pieces of paper tearing off and getting lodged in the bobbin case...

Page 328: ...Area The cutter below the needle plate should be cleaned If dust or lint accumulate on the cutter it will be difficult to cut the thread when the Thread Cutter button is pressed or the automatic thre...

Page 329: ...recommended to take your machine to an authorized retailer for a regular maintenance check Although this message will disappear and the machine will continue to function once you press the message wi...

Page 330: ...and back to ON o The touch panel adjustment screen is displayed b Using the included touch pen lightly touch the center of each in order from 1 to 5 c Turn the main power to OFF then turn it back to O...

Page 331: ...emoved reinstall needle plate and tighten screws prior to installing bobbin case 43 Using improper needle or thread for the selected fabric Check the Fabric Thread Needle Combination chart 58 Presser...

Page 332: ...he needle correctly 56 Needle clamp screw is not tightened Tighten the needle clamp screw 57 Needle is turned or bent Replace the needle 56 Using improper needle or thread for the selected fabric Chec...

Page 333: ...ol cap then reattach the spool cap 46 Wrong presser foot Use the correct presser foot STITCH SETTING CHART High pitched sound while sewing Dust or lint is caught in the feed dogs Remove the dust or li...

Page 334: ...set the bobbin The presser foot was bumped or moved while removing or attaching the embroidery frame or the embroidery unit was moved If the presser foot is bumped or the embroidery unit is moved duri...

Page 335: ...rn selected the machine may feed the fabric even if the needle is raised This is due to the needle bar release mechanism At these times the machine will make a sound different from that made during no...

Page 336: ...ons related to thread delivery This message is displayed when the embroidery unit is initializing This message is displayed when you try to sew with a stitch other than a middle needle position stitch...

Page 337: ...ge of the fabric cannot be detected by the built in camera Press raise the presser foot raise the needle if it is lowered and then perform the procedure described in Edge Sewing on page 140 starting f...

Page 338: ...embroidery frame is attached This message is displayed when the machine is ready to sew an embroidery pattern and the Start Stop button is pushed while the embroidery frame is not attached This messag...

Page 339: ...placing the embroidering bobbin thread This message is displayed when rotating a saved combined pattern in the Embroidery screen This message is displayed when the embroidery frame is attached This me...

Page 340: ...d when the Start Stop button is pushed to sew Utility stitches or Character Decorative stitches while the foot controller is connected This message does not appear when embroidering This message is di...

Page 341: ...nt Stitch button is pushed This message is displayed when the embroidery unit is attached and the power is turned on with the needle in the down position This message is displayed when the selected st...

Page 342: ...y to use incompatible USB media For a list of compatible USB media visit www babylock com This message is displayed when it seems that the upper thread has not been threaded correctly This message is...

Page 343: ...rectly the machine beeps to confirm the operation This message is displayed when you press in the screen other than the Utility Stitch or press in the screen other than the Utility Stitch or Character...

Page 344: ...ox Box 2 of 3 Dimension of box Approx 68 5 cm W 15 2 cm H 39 4 cm D approx 26 31 32 inches W 6 inches H 15 33 64 inches D Weight of box for shipping Approx 5 kg approx 11 lb Embroidery Unit Box 3 of 3...

Page 345: ...g button turn the main power to ON The following screen will appear on the LCD b Press c Insert the USB media into the primary top USB port on the machine The media device should only contain the upgr...

Page 346: ...tton turn the main power to ON o The following screen will appear on the LCD b Press c Plug the USB cable connector into the corresponding USB ports for the computer and for the machine o Removable Di...

Page 347: ...ill appear e When the message disappears press o The upgrade file is downloaded f Unplug the USB cable and turn the machine off and on again Note If an error occurs a red text error message will appea...

Page 348: ...UPGRADING YOUR MACHINE S SOFTWARE 334...

Page 349: ...forcement stitch is sewn while pressing Reverse Reinforcement Stitch button 3 5 1 8 0 0 7 0 0 1 4 2 5 3 32 0 2 5 0 1 64 3 16 OK J Triple stretch stitch General sewing for reinforcement and decorative...

Page 350: ...6 0 0 7 0 0 1 4 4 0 3 16 1 0 4 0 1 16 3 16 OK J Overcasting stitch Stretch knit seam 5 0 3 16 0 0 7 0 0 1 4 4 0 3 16 1 0 4 0 1 16 3 16 NO Single diamond overcast Reinforcement and seaming stretch fabr...

Page 351: ...0 0 7 0 0 1 4 2 5 3 32 0 2 4 0 1 64 1 16 OK J Satin scallop stitch Decorating collar of blouse edge of handkerchief 5 0 3 16 2 5 7 0 3 32 1 4 0 5 1 32 0 1 1 0 1 64 1 16 OK J Scallop stitch Decorating...

Page 352: ...ple straight at center 3 5 1 8 1 0 7 0 1 16 1 4 2 5 3 32 1 5 4 0 1 16 3 16 OK J Hemstitching zigzag Decorative hems top stitching 6 0 15 64 1 5 7 0 1 16 1 4 3 0 1 8 1 0 4 0 1 16 3 16 OK J Hemstitching...

Page 353: ...Hemstitching Decorative hems smocking 6 0 15 64 1 5 7 0 1 16 1 4 1 6 1 16 1 0 4 0 1 16 3 16 NO Hemstitching Decorative hems smocking 5 0 3 16 1 5 7 0 1 16 1 4 1 6 1 16 1 0 4 0 1 16 3 16 NO Hemstitchin...

Page 354: ...ht or thick fabrics for larger flat buttons 7 0 1 4 3 0 7 0 1 8 1 4 0 5 1 32 0 3 1 0 1 64 1 16 NO Tapered keyhole buttonhole Buttonholes in medium to heavy weight fabrics for larger flat buttons 7 0 1...

Page 355: ...ers NO Forward Straight For attaching appliqu on tubular pieces of fabric and mitering corners NO Diagonally right down Straight For attaching appliqu on tubular pieces of fabric and mitering corners...

Page 356: ...6 NO Quilting appliqu stitch Quilting stitch for invisible appliqu or attaching binding 2 00 0 50 5 00 1 64 3 16 2 0 1 0 4 0 1 16 3 16 NO Shell tuck edge Shell tuck edge finish on fabrics 4 00 3 16 0...

Page 357: ...tive stitch Decorative stitching 5 50 3 16 0 00 7 00 0 1 4 1 6 1 16 1 0 4 0 1 16 3 16 NO Hemstitching Heirloom decorative hems 5 00 3 16 1 50 7 00 1 16 1 4 2 0 1 16 1 5 4 0 1 16 3 16 NO Hemstitching D...

Page 358: ...y functions 155 retrieving 176 177 saving 171 173 175 selecting 146 sewing 152 stitch selection screens 147 Cleaning LCD screen 312 machine casing 312 race 312 Combining Patterns character decorative...

Page 359: ...ing the bobbin 37 M Machine operation mode key 317 Main power switch 1 12 Mirror image key 79 158 236 Multi color key 238 273 Multi directional sewing 134 N Needle changing the needle 56 changing the...

Page 360: ...ot 86 Straight stitch needle plate 86 Straight stitches 83 Supplemental spool pin 1 37 50 T Tape attaching 93 Tape or elastic attaching 117 Thread fabric thread needle combinations 58 thread tension 6...

Page 361: ......

Page 362: ......

Page 363: ......

Page 364: ...X1_TaconeyE_OM_cover C M Y K...

Reviews: