background image

22

23

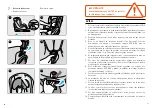
3.3. Harness straps adjustment

1.  Pull the harness adjustment belt 

(H)

 o that the part of the strap that 

covers the lap is not loose, ensuring the harness is taut and the buckle 

closed. Open the harness buckle 

(F)

 by pressing the red button (fig.3.9).  

2.  Loosen the harness straps by pulling them at the point where they cover 

the chest while pressing the harness adjustment button 

(G)

 (fig. 3.10). 

3.4. Headrest adjustment  

A correctly adjusted headrest 

(F)

 ensures that the diagonal part of the safety 

belt is ideally positioned, offering the child the best possible protection. 
The headrest should be adjusted so that a space equivalent to two fingers 

remains between the headrest and the child’s shoulders(fig. 3.11).
To adjust the height of the headrest:
1.   Pull the headrest height adjuster

 (B)

 and the headrest at the same time. 

This will unlock the headrest (fig. 3.8).

2.  Now you will be able to move the headrest to the desired height. When 

the adjuster is released the headrest will remain locked in the chosen 

position.

3.   Place the safety seat on the car seat.
4.   Sit the child in the seat and check the height. Repeat the process until 

the correct height is achieved.

3.5. Recline positions adjustment 

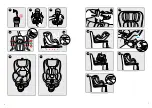
This child restraint system have five recline positions. Before installing 

the child in the seat, select the reclining position by pulling of the lever 

(I) 

situated between the seat and the base.
CAUTION! In rearward facing, the only possible recline position is the R. In 

fordward facing, you can select positions 1, 2, 3, or 4 (fig. 3.12). 

3.6. Reductor cushion installation 

Children whose age range is between birth and six months, can use the 

reducer cushion

 (D)

. This ensures that the child’s back is well protected 

during the trip.
To install/uninstall the seat, open the harness buckle 

(F)

 by pressing the 

harness red button. Separate the shoulder straps from the harness 

(C) 

to 

facilitate the installation/removal of the reducer cushion (fig.3.13).
CAUTION! After the reducer cushion 

(D)

 is installed/uninstalled, remember 

to adjust the harness straps following step 1 of point 3.3.

When the reductor cushion 

(D)

 is installed,fix the headrest cushion el cojín 

passing the elastic belt behind the headrest (fig. 3.15) to get a correct 

installation (fig. 3.16).

3.7. 360° function adjustment

The seat rotative system,  allows to change between rearward facing 

installation and forward facing installation, without uninstall the seat from 

the vehicle (fig.3.17). For it: 
1.  Press the seat rotation locking button

 (L)

 while spin the seat (fig. 3.18). 

Halfway through the route, it will lock again to adopt a position that 

will facilitate the child’s installation in the seat (Figure 3.19). To continue 

with the rotation movement, press the rotation lock button 

(L)

 again, 

adapting the chair to the direction of travel (Fig. 3.20).

CAUTION! To change from forward facing installation to rearward facing 

installation, remember to recline the seat to the 4 position (Fig. 3.21). 
CAUTION! Always, try moving the seat in both directions to check that it is 

correctly fixed to the vehicle.

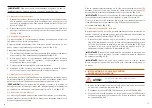
4. REARWARD FACING INSTALLATION

45-87 cm. From birth to  


2 years approx. (0-13 Kg)

NOTICE

1.  Recline the seat to the R position. This is the only possible recline 

position for rearward facing installation (fig. 4.1).  

2.  Unlock the ISOFIX arms 

(M)

 by pulling the strap

 (O)

 (fig. 4.2).

3.  If your vehicle has not been fitted with the ISOFIX latch guides as 

standard, fit the two latch guides

 (S)

 that came with the safety seat (fig. 

4.3).

TIP: The ISOFIX fastening points are located between the surface and the 

backrest of the vehicle seat.
5.  Place the seat in the back seat of the vehicle (fig. 4.4).
6.   Hold the safety seat with both hands and insert the two ISOFIX arms 

(M)  firmly into the insertion guides 

(S)

 until they fasten with a click 

on both sides. The red button will partially change to green on both 

sides(fig. 4.5). 

7.   Shake the seat to check that it is correctly anchored to the vehicle’s 

ISOFIX points.

Summary of Contents for BCES2101A

Page 1: ...1 RONDA iSIZE BCES2101A MANUAL DE USO INSTRUCTIONS MANUAL INSTRUÇÕES DE UTILIZAÇÃO Apto para Suitable for Adequado para 45 105 cm ...

Page 2: ...INSTRUCTION MANUAL Child safety seat i SIZE From 45cm a 105cm Português INSTRUÇÕES DE UTILIZAÇÃO Dispositivo de retenção para crianças i SIZE De 45cm a 105cm 4 13 19 IMPORTANTE Conservar para futuras consultas Procure que las instrucciones puedan conservarse en el sistema de retención infantil durante su ciclo vital WARNING Keep for future reference Please kindly pay attention to the state of the ...

Page 3: ...so general de la silla Car seat general use Vista general Overview Vista geral 2 1 2 Cinturón diagonal Cinturón abdominal Cinto diagonal Cinto abdominal Diagonal belt Abdominal belt B B A A Puestos de instalación en vehículo Installation positions within the vehicle Posto de instalaçao no veículo 1 2 ...

Page 4: ...6 7 3 8 3 9 3 10 3 11 1 2 3 4 R 3 12 3 13 3 14 3 15 3 17 3 16 3 18 3 19 3 20 3 21 ...

Page 5: ...silla en sentido contrario a la marcha Installing the child seat rearward facing Instalação da cadeira no sentido contrário da deslocação do veículo CLICK CLICK OK OK Instalación de la silla en sentido a la marcha Installing the child seat forward facing Instalação da cadeira no sentido da deslocação do veículo ...

Page 6: ...e produzca por la pelvis 7 Por favor lea cuidadosamente las instrucciones porque una instalación incorrecta podría causar serios daños En ese caso el fabricante no tendrá ningún tipo de responsabilidad 8 Este sistema de retención infantil ha sido aprobado con arreglo a la normativa europea ECE R129 y puede ser utilizado en el rango de altura comprendido entre 45 y 105 cm 9 Por favor nunca utilice ...

Page 7: ...emas de retención infantil i Size A Regulador de altura reposacabezas B Reposacabezas C Protectores de hombro D Cojín reductor E Cintas de hombro del arnés F Hebilla del arnés G Botón de ajuste del arnés H Cinta de ajuste del arnés I Palanca de reclinado K Botón de bloqueo de la pata de apoyo L Botón de bloqueo de giro M Brazos ISOFIX N Arco de seguridad O Correa de brazos ISOFIX P Desbloqueo nive...

Page 8: ...on la silla de seguridad fig 4 3 IMPORTANTE Para un correcto funcionamiento asegurese de que la hebilla del arnés no entra en contacto con ningún líquido fig 3 8 3 3 Ajuste de las cintas del arnés 1 Para apretar el arnés tire de la cinta de ajuste del arnés H para evitar que la parte del regazo quede floja asegurándose de que el arnés esté tensado y la hebilla cerrada Para abrir la hebilla del arn...

Page 9: ...O Los puntos de sujeción ISOFIX se encuentran entre la superficie y el respaldo del asiento del vehículo 5 Coloque la silla de seguridad sobre el asiento del vehículo 6 Sujete la silla de seguridad con ambas manos e introduzca los dos brazos del sistema ISOFIX M firmemente en las guías de inserción S hasta que los brazos de bloqueo queden acoplados con un clic en ambos lados El botón rojo cambiará...

Page 10: ...el producto 1 The correct fitting of 3 point belt or the ISOFIX anchoring systems is of vital importance for the safety of your child 2 Under no circumstances should the safety seat be installed in the front seat of the car opposite the direction of travel if the car is equipped with an active airbag 3 This car seat is designed to offer the optimal safety in all installation modes described in thi...

Page 11: ... Shoulder protectors D Reductor cushion E Harness straps F harness buckle G Harness adjustment button H Harness adjustment strap I Reclining lever J Support leg K Support leg lock button L Rotation locking button M ISOFIX arms N Security arc O ISOFIX arms strap P ISOFIX unlock level 1 Q ISOFIX unlock level 2 R Support leg button S ISOFIX insert guides 2 INSTALLATION POSITIONS WHITIN THE VEHICLE No...

Page 12: ...ss C to facilitate the installation removal of the reducer cushion fig 3 13 CAUTION After the reducer cushion D is installed uninstalled remember to adjust the harness straps following step 1 of point 3 3 When the reductor cushion D is installed fix the headrest cushion el cojín passing the elastic belt behind the headrest fig 3 15 to get a correct installation fig 3 16 3 7 360 function adjustment...

Page 13: ...des S until they fasten with a click on both sides The red button will partially change to green on both sides fig 4 5 7 Shake the seat to check that it is correctly anchored to the vehicle s ISOFIX points Uninstalling ISOFIX system 1 To free the ISOFIX anchoring pull the ISOFIX system unlock buttons P and Q in order to free the seat from the vehicle ISOFIX anchoring system fig 4 6 Support leg ins...

Page 14: ... importância para a segurança do seu filho 2 Não se deve instalar a cadeira de segurança em circunstância alguma no assento dianteiro do veículo no sentido contrário ao do andamento se aquele estiver equipado com um Airbag ativo 3 Este assento oferece proteção adequada em todas as posições para as quais foi projetado 4 Este é o sistema de retenção para crianças i Size Universal está aprovado para ...

Page 15: ... VISTA GERAL A Regulador de altura do apoio de cabeça B Apoio de cabeça C Cinta do ombro D Almofada redutora E Cintas do arnês F Fivela do cinto G Botao de ajuste do arnês H Cinta de ajuste do arnês I Alavanca de reclinação J Pé de apoio K Botão regulador do pé L Alavanca de rotação 360 M Braços ISOFIX N Arco de segurança O Cinta de braços ISOFIX P Nível 1 de desbloqueio ISOFIX Q Nível 2 de desblo...

Page 16: ...to Separe as alças dos ombros do arnês C para facilitar a instalação remoção da almofada redutora fig 3 13 ATENÇÃO Após a instalação desinstalação da almofada redutora D lembre se de ajustar as alças do arnês seguindo o passo 1 do ponto 3 3 Quando a almofada redutora D estiver instalada fixe a almofada do apoio para a cabeça passando o cinto elástico atrás do apoio para a cabeça fig 3 15 para obte...

Page 17: ...a os dois braços ISOFIX M firmemente nas guias de inserção S até que elas se prendam com um clique nos dois lados O botão vermelho muda parcialmente para verde dos dois lados fig 4 5 7 Agite o assento para verificar se está corretamente ancorado aos pontos ISOFIX do veículo Desinstalar o sistema ISOFIX 1 Para libertar a fixação ISOFIX puxe os botões de desbloqueio do sistema ISOFIX P e Q para libe...

Page 18: ...stabelecidos no RDL 1 2007 de 16 de novembro Durante um período de 2 anos após a data da compra fica coberta qualquer falta de conformidade existente no momento da entrega do produto É imprescindível que se conserve o talão de compra ou a fatura comprovativa da aquisição do produto durante o período de garantia Devem se seguir cuidadosamente as instruções de utilização facultadas no manual do prod...

Page 19: ...36 BABYAUTO GROUP Parque Empresarial Zuatzu Edificio Donosti 2ª planta Oficina 3 20018 San Sebastián Gipuzkoa Spain t 34 943 833 013 f 34 943 833 004 e info babyauto com babyauto com ...

Reviews: