background image


11 

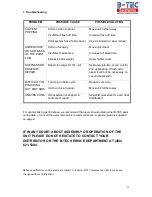
7. Troubleshooting


PROBLEM 


POSSIBLE CAUSE 


POSSIBLE SOLUTION 


SOLVENT 
POPPING  

Unit too close to panel  

Move unit further away  

Insufficient flash off time  

Increase flash off time  

Paint system has a fast reducer 

Use a standard or slow reducer 

UNDER CURE 
OR SOFTNESS 
OF THE PAINT 
FILM  

Unit too far away  

Move unit closer  

Insufficient bake time  

Increase full bake time  

Excessive film weight  

Apply lighter coats  

SOFTNESS ON 
EDGES OF 
REPAIR  

Repair too large for I.R. unit  

Split area into two, move unit for 
2nd application. If flash off is 
used, it will not be necessary on 
second


application  

DIFFICULTY IN 
POLISHING 
OUT DIRT NIBS  

Too long on bake cycle  

Reduce cure time  

Unit too close to panel  

Move unit further away  

UNEVEN CURE   IR cassettes not shaped to 

contours of repair  

Adjust IR cassettes for even heat 
distribution  


For optimal baking performance, we recommend that users should obtain either B-TEC paint 
curing data, or consult the paint companies’ recommendations. A general guide is supplied 
on page 9. 


IF IN ANY DOUBT ABOUT ASSEMBLY OR OPERATION OF THE 
UNIT PLEASE DO NOT HESITATE TO CONTACT YOUR 
DISTRIBUTOR OR THE B-TEC SERVICE DEPARTMENT AT (480) 
621-5304.


Above specifications and diagrams are subject to revision. B-TEC reserves the right to make any 
changes without notification. 


Summary of Contents for IR-B02

Page 1: ...User Manual for Short Wave Infrared Paint Curing Equipment Infrared Model IR B02...

Page 2: ...ated voltage Rated current Rated frequency Rated power input Protection class Degree of protection 220 V 11 A 60 Hz 2000 W I IPX0 Tested according to EN 60335 1 A2 2006 EN 60335 2 30 A2 2007 EN 50366...

Page 3: ...ea 5 2 2 Use 5 2 3 Maintenance and Care 5 2 4 More Information 5 3 Technical Description of the Machine 6 3 1 Technical Information 6 3 2 Wiring Diagram 6 3 3 Spare Parts 7 4 Assembly Installation 8 5...

Page 4: ...t has been built to the highest quality standards to ensure reliability In order to get the best safe use of this equipment please read these instructions thoroughly before commencing assembly or oper...

Page 5: ...ether the grounding is correct Please make sure the machine is well grounded to avoid electric shock If the lamp tube fails to work after starting it may be caused by a loosened outlet plug In such a...

Page 6: ...hnical Information 3 2 Wiring Diagram Input current 11 A Input voltage 220 V 240 V 60 Hz 1PH Short wave quartz halogen infrared tube 2 x 1000 W Max power 2000 W Range of timers 2 x 35 min Baking area...

Page 7: ...Side Panel of Emitter B03 19 15 Heat Dissipating Plate B03 20 6 Handle B03 12 16 Ceramic Connector B01 B 16 7 U shaped Support bracket B01 B 7 17 Large Reflective Panel B03 22 8 Control Box B02 1 18 T...

Page 8: ...dle 4 Attach the power wire 5 Important Remove the stickers from the protection covers 6 Important Take out the red foam cubes behind the tubes Notes Power supply 1 PH 220V 240V 60Hz When adjusting th...

Page 9: ...down and ignore this function 7 Select one or both emitters 9 10 8 The machine stops automatically after the cycle is completed If you want to continue using the unit restart the machine after 5 minut...

Page 10: ...checking that the part you purchased is correct Ensure that you attach the wires correctly 6 Install the protective grill radiating panel and the side panel Use a piece of soft cloth or cotton to clea...

Page 11: ...will not be necessary on second application DIFFICULTY IN POLISHING OUT DIRT NIBS Too long on bake cycle Reduce cure time Unit too close to panel Move unit further away UNEVEN CURE IR cassettes not sh...

Reviews: