background image

Basic Measurements 

28 


3.5    Measuring Frequency and Period 

Frequency measurement range: 5 Hz to 1 MHz. 

Period measurement range: 0.2 s to 1 

μ

s. 

Input signal range: 120 mV AC to 750 V AC RMS. 


The instrument uses the volts input terminals  (INPUT HI and INPUT LO)  to measure frequency  and 

period. The AC voltage range can be changed with the RANGE      and         keys. However, the 

signal voltage must be greater than 10% of the full-scale range. 

Note:    Auto ranging is not available for frequency and period measurement function. 


3.5.1    Trigger Level and Measurement Errors 

Frequency and Period apply  a zero-crossing trigger, meaning that a count is taken when the signal 

crosses the zero level. 

The multimeter uses an interactive counting technique to measure frequency and period. This method 

generates constant measurement resolution for any input frequency.    All frequency counters are 

subject to errors when measuring low voltage, low frequency signals. Both internal noise and external 

noise are also  critical when measuring low  voltage, low frequency  signals.    Measurement errors will 

also occur if you attempt to measure the frequency (or period) of an input following a dc offset voltage 

change.  You must allow the multimeter’s DC input blocking capacitor to fully settle before making 

frequency measurements. 


3.5.2    Gate Time 

Gate time is the amount of time the multimeter uses to sample frequency or period readings. For model 

5492B, all RATE settings (Fast, Med and Slow) yield a gate time of one second.   


3.5.3    Connections 

Assuming  the multimeter  is under factory default conditions, the basic procedure for measuring 

frequency or period is as follows: 

1.  Connect test leads to INPUT HI and LO terminals. 

2.  Select frequency or period measurement functions by pressing 

  or 


respectively. 

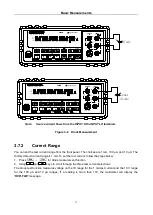
3.  Connect test leads to the source as shown in Figure 3-4: 


CAUTION:  Do not exceed 1000 V peak between INPUT HI and INPUT LO or instrument damage 

may occur. 


4.  The measured reading is displayed. 

Summary of Contents for 5492B

Page 1: ...Model 5492B 5492BGPIB 5 Bench Digital Multimeter USER MANUAL ...

Page 2: ...o an approved three conductor electrical outlet Do not alter the ground connection Without the protective ground connection all accessible conductive parts including control knobs can render an electric shock The power jack and mating plug of the power cable meet IEC safety standards DO NOT OPERATE IN AN EXPLOSIVE ATMOSPHERE Do not operate the instrument in the presence of flammable gases or fumes...

Page 3: ...e entire product WARNING Do not alter the ground connection Without the protective ground connection all accessible conductive parts including control knobs can render an electric shock The power jack and mating plug of the power cable meet IEC safety standards WARNING To avoid electrical shock hazard disconnect power cord before removing covers Refer servicing to qualified personnel CAUTION Befor...

Page 4: ...lectrical Electronic Equipment Applicable in the European Union and other European countries with separate collection systems This product is subject to Directive 2002 96 EC of the European Parliament and the Council of the European Union on waste electrical and electronic equipment WEEE and in jurisdictions adopting that Directive is marked as being put on the market after August 13 2005 and shou...

Page 5: ...ons 19 2 6 4 Power on Defaults 19 2 6 5 Warm up time 21 Chapter 3 Basic Measurements 22 3 1 Overview 22 3 2 Measuring Voltage 22 3 2 1 Connections 22 3 2 2 Crest factor 24 3 3 Measuring Current 24 3 3 1 Connections 24 3 3 2 Front Panel Fuse Replacement 25 3 4 Measuring Resistance 26 3 4 1 Connections 26 3 4 2 Shielding 27 3 5 Measuring Frequency and Period 28 3 5 1 Trigger Level and Measurement Er...

Page 6: ...imit Values 48 4 4 3 Configure Limit Beep 49 4 5 System Operations 49 4 5 1 Beeper Control 50 4 5 2 Save Settings 50 4 5 3 Restore Settings 51 4 5 4 Display Control 51 4 5 5 Key Sound 52 4 5 6 Self test 52 4 5 7 Calibration 53 Chapter 5 Remote Operation 54 5 1 Selecting an Interface 54 5 1 1 USB Virtual COM Interface 54 5 1 2 RS 232 Serial Interface 55 5 1 3 GPIB Interface model 5492BGPIB only 55 ...

Page 7: ...mand Structure 65 6 2 4 Multiple Command Rules 65 6 2 5 Command Path Rules 65 6 3 Command Reference 66 6 3 1 Measurement Commands 66 6 3 2 DISPlay subsystem 70 6 3 3 CALCulate Subsystem 70 6 3 4 SENSe subsystem command 79 6 3 5 SYSTem Subsystem 92 6 3 6 UNIT Subsystem 94 6 3 7 TRIGger Subsystem 97 6 3 8 Common Commands 99 Chapter 7 Troubleshooting Guide 100 7 1 Frequently Asked Questions 100 7 2 E...

Page 8: ...er can operate on 110 V or 220 V with 10 tolerance at 60 Hz or 50 Hz with 5 tolerance respectively Before powering the instrument please check for correct power input setup that corresponds to the line voltage to be used for operation Note the label in the rear label as shown below RATING FUSE 110 V 60 Hz T1AL 250 V 220 V 50 Hz T500mAL 250 V There are two items to check for 1 Check that the correc...

Page 9: ...d fuse located inside the instrument which protects the 12 A input terminal if current exceeds the maximum rating It is a 6 x 32 mm 250V 20 A fast acting high energy ceramic fuse Fuse Box 110 To remove use a flat head screw driver or a coin to insert into the slid and turn counter clockwise to open Similarly to put back the fuse box push the box down and turn clockwise Voltage Indicator Window Fus...

Page 10: ...3 Front Panel Menu Options 2 4 Front Panel Menu Overview 2 5 Rear Panel Summary 2 6 Power up 2 1 Front Panel Overview The front panel of the B K 5492B is shown in Figure 2 1 This figure includes some important abbreviated information that should be reviewed before operating the instrument Figure 1 Front Panel View ...

Page 11: ... Save the changes made on parameter level and return to the sub menu level ESC Cancel the changes made on parameter level and return to the sub menu level 4 Range and measurement speed keys Select a higher range and disable auto ranging Select a lower range and disable auto ranging Toggle between auto ranging and manual ranging Set measurement speed to Fast Set measurement speed to Medium Set meas...

Page 12: ...ng rate MEM Turns on when reading memory is enabled REL Relative reading displayed RMT Multimeter is in remote mode SHIFT Accessing shifted keys SLOW Slow reading rate TRIG Multimeter is waiting for a trigger manual bus or external trigger 2 3 Front Panel Menu Options A MEASurement MENU 1 CONTINUITY 2 FILTER 3 FILT TYPE 4 FILT COUNT 1 CONTINUITY Select the continuity beeper threshold 1 Ω to 1000 Ω...

Page 13: ...Set the number of readings to be saved 2 to 512 3 SAVED RDGS Recall readings stored in memory 4 BEEP Enable or disable the beeper function 5 SAVE CNFG Save the present configuration as one of the 10 user s settings 6 LOAD CNFG Restore factory or one of the 10 user s settings 7 DISPLAY Enable or disable the front panel display 8 KEY SOUND Enable or disable the key sound when you press a key 9 TEST ...

Page 14: ...executed press Recall The messages displayed during menu operation are listed in the following Table 2 1 Table 2 1 Messages Displayed During Menu Operation MESSAGES DESCRIPTION CHANGE SAVED The change made on the parameter level is saved This message will be displayed after you press ENTER to save the changes TOO SMALL The value you specified on the parameter level is too small for the selected co...

Page 15: ... 1 Power line fuse holder The multimeters can be configured for line voltage of 110 220 V 10 AC at line frequency of 50 60 Hz 5 Power line fuse is used for instrument protection 220 V 500 mA or 110 V 1 A Note Please use the same type of fuse as it is in the fuse holder To verify and replace the fuse remove the power cable and pull out the fuse holder See section 1 2 for details 2 optional GPIB IEE...

Page 16: ...ate DC Diode test Digits Range Rate Frequency and Period Digits Range Relative Value Rate Function GPIB Address Language Limits Beeper High limit Low limit mX b Scale factor Offset Percent Reference On No effect On 4 1 2 Fast 0 1 PLC 10 Ω 5 1 2 5 1 2 On 5 Moving average Auto Off 0 0 Medium 10PLC Medium 1 PLC 5 1 2 1 mA Medium 1 PLC 5 1 2 12 V Off 0 0 Slow 1 sec DCV No effect 8 SCPI Off ON 1 1 Off ...

Page 17: ...Rate DC 5 1 2 On 5 Moving average Auto Off 0 0 Medium 1 PLC On 9600 On Auto Immediate No effect 75 Ω 5 1 2 5 1 2 On 5 Moving average Auto Off 0 0 Medium 10PLC Medium 1PLC 2 6 5 Warm up time The 5492B is ready for use after power up sequence boot and self test is completed However to achieve specified accuracy and stability allow the instrument to warm up for half an hour If the instrument has been...

Page 18: ...oltage ranges 120 mV 1 2 V 12 V 120 V 1000 V 750 VAC Maximum resolution 1 μV on 120 mV range 3 2 1 Connections Assuming the multimeter is under factory default conditions the basic procedure for measuring voltage is as follows 1 Connect test leads to INPUT HI and LO terminals 2 Select DC or AC voltage measurement by pressing or respectively 3 Press to toggle between auto and manual ranging Notice ...

Page 19: ...e 10 MΩ on 1000 V and 120 V ranges 10 GΩ on 12 V 1 2 V and 120 mV ranges CAUTION Maximum Input 1010 V peak 1000V MAX AC Voltage Source D C V AC V 2W Fr eq Aut o Tr i g M X B Shi f t C ont R el Period dB m Fast Menu Recall Med Slow Hold CHOICES LEVEL ENTER ESC LOCAL I DC I AC 4W Ω FAST MED SLOW ADRS RMT HOLD TRIG MEM AUTO REL FILT MATH SHIFT 4W ERR POWER T2AL 250V SENSE Ω4W VΩ LO HI 10A 350V MAX 12...

Page 20: ... Select DCI or ACI measurement function by pressing or respectively 3 Press to toggle between auto and manual ranging Notice the AUTO annunciator is displayed with auto ranging For manual range use the RANGE and keys to select a measurement range consistent with expected current Auto range is only available for 12 mA and 120 mA DCI only ranges Manual range must be used for 1 2 A and 12 A ranges Th...

Page 21: ...ERR POWER T2AL 250V SENSE Ω4W VΩ LO HI 10A CATⅡ 300V CATⅠ 1000V 350V MAX mA INPUT R 5 5492B 12 Digit Multimeter For 1 A or higher current measurement 10 A and INPUT LO terminals are used CAUTION Maximum Input 12 A DC or RMS Note Auto range is not available for 1 2 A and 12 A ranges Figure 3 2 DC and AC Current Measurements 3 3 2 Front Panel Fuse Replacement WARNING Make sure the instrument is disc...

Page 22: ... errors when measuring low voltage low frequency signals Both internal noise and external noise are also critical when measuring low voltage low frequency signals Measurement errors will also occur if you attempt to measure the frequency or period of an input following a dc offset voltage change You must allow the multimeter s DC input blocking capacitor to fully settle before making frequency mea...

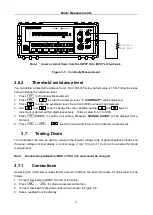
Page 23: ...eriod Measurements 3 6 Measuring Continuity The multimeter uses the 1 kΩ range to measure circuit continuity A threshold resistance level 1 Ω to 1000 Ω should be set The factory default value is 10 Ω The multimeter alerts you with a beep when a reading is below the set level Note Continuity function defaults to FAST 0 1 PLC rate and cannot be changed 3 6 1 Connections Assuming the multimeter is un...

Page 24: ...ter the parameter level the current LEVEL value will be displayed 4 Use and keys to change the cursor position and use and keys to increment or decrement the digits respectively Enter a value from 1 to 1000 5 Press ENTER to confirm your setting Message CHANGE SAVED will be displayed for a moment 6 Press or to exit the menu and return to the continuity measurement 3 7 Testing Diode The multimeter c...

Page 25: ...w Hold CHOICES LEVEL ENTER ESC LOCAL I DC I AC 4W Ω FAST MED SLOW ADRS RMT HOLD TRIG MEM AUTO REL FILT MATH SHIFT 4W ERR POWER R 5 5492B 12 Digit Multimeter Note Source current flows from the INPUT HI to INPUT LO terminals Figure 3 6 Diode Measurement 3 7 2 Current Range You can set the test current range from the front panel The choices are 1 mA 100 μA and 10 μA The factory default current range ...

Page 26: ...e displayed M 1 00000 2 Use the and keys to select the cursor position and use and keys to increment or decrement the selected digits respectively When the cursor position selects the up and down arrow keys can be used to move the decimal place left or right of its current position 3 Press ENTER to confirm the M value and the message CHANGE SAVED will be displayed for a moment and then the present...

Page 27: ... the percent calculation function a reference value must be specified The displayed reading will be expressed as the percent deviation from the reference value The percentage calculation is performed as follows Percent Input Reference Reference 100 Where Input is the normally display actual reading Reference is the user entered constant Percent is the displayed result To configure the percent calc...

Page 28: ...ative value will be converted to dB value before REL is applied If REL is applied after dB function has been selected dB reading will have REL applied to it directly To set the reference voltage perform the following steps 1 Press for dB math operation and the reference value is displayed REF 0 00000 2 Use and keys to select cursor position and use and keys to increment or decrement the digits res...

Page 29: ...tly To set the reference impedance perform the following steps 1 Press the voltage reference value for dB math function will be displayed 2 Press ENTER to confirm the voltage reference value now you have selected the dB math function 3 Press again and the impedance reference value for dBm math function will be displayed REF 0075 Ω 4 Use and keys to select cursor position and use and keys to increm...

Page 30: ...the menu and return to the dB math operation NOTE The reference impedance and input impedance mentioned in this chapter are completely different Input impedance is inherent in the instrument and cannot be changed via foregoing methods dBm is valid for both positive and negative DC voltage The mX b and percent math operations are applied after the dBm or dB math calculations For example if mX b is ...

Page 31: ...that auto ranging is not available for some measurement functions and ranges Manual ranging To select a range simply press or key The instrument changes one range per key press The selected range is displayed momentarily before showing the measured readings If the instrument displays the OVR FLW message on a particular range select a higher range until an in range reading is displayed Use the lowe...

Page 32: ...o select MOVNG AV Moving average or REPEAT filter type 10 Press ENTER to confirm the selection The message CHANGE SAVED will be displayed to show that the change is now in effect The multimeter automatically exits the parameter level and moves up a level to the submenu level 11 Use to move across to the filter count option on the submenu level 4 FILT COUNT will be displayed 12 Press to move down a...

Page 33: ...a filtered reading 4 1 3 Relative The relative operation can be used to null offsets or subtract a baseline reading from present and future readings When relative function is enabled the multimeter uses the present reading as a relative value Subsequent readings will be the difference between the actual input value and the relative value You can define a relative value for each function Once a rel...

Page 34: ... time is specified in parameters based on a number of power line cycles NPLC where 1 PLC for 50 Hz is 20 msec In general the fastest integration time FAST 0 1 PLC set from the front panel or remote interface results in increased reading noise and fewer usable digits while the slowest integration time 10 PLC provides the best common mode and normal mode rejection In between settings are a compromis...

Page 35: ... instrument count 1 Trigger 1 count sample MAN BUS IMMediate Trigger source Initiate Triggering INITiate READ MEASure sample Measurement Delay Wait for Trigger Idle state Figure 4 2 Trigger model Idle The instrument is considered to be in the idle state whenever it is not performing any measurement Wait for Trigger The control source holds up operation until the programmable event occurs and is de...

Page 36: ...strument To set or change the trigger source do the following 1 Press to enter the menu on the menu level A MEAS MENU will be displayed 2 Use or key to move across to the TRIG MENU on the menu level C TRIG MENU will be displayed 3 Press to move down to the command level within the TRIG MENU 1 TRIG MODE will be displayed 4 Press to move down a level to select the trigger source 5 Use or to select I...

Page 37: ...displayed 12 Press to move down a level to set the type of delay mode 13 Using or to select AUTO or MANU Manual delay mode 14 Press ENTER to confirm the choice The message CHANGE SAVED will be displayed to show that the change is now in effect If AUTO mode is selected the multimeter will exit the parameter level and move up a level to the command level 15 If MANU mode is selected a delay time will...

Page 38: ... show that the change is now in effect 7 Press key to exit from the menu 8 When the multimeter returns to the measurement display the HI IN LO status will be displayed along with the reading If the reading is within the range specified by the high and low limits configured in the next section it will show IN If higher than the range it will show HI If lower than the range it will show LO 4 4 2 Set...

Page 39: ...SET M will be displayed 4 Use or key to move across to the LIMIT BEEP command 9 LIMIT BEEP will be displayed 5 Press to move down a level to select the condition in which the meter should make a beep sound when using limit operation The display should show ALARM with the current selection blinking 6 Use and keys to choose between one of the following NEVER Never beep regardless of the limit status...

Page 40: ... command 4 BEEP will be displayed 5 Press to move down a level to set the beeper control 6 Use or key to select ON or OFF 7 Press ENTER to confirm the beeper control The message CHANGE SAVED will be displayed to show that the change is now in effect 8 Press key to exit from the menu 4 5 2 Save Settings The 5492B allows user to save up to 10 instrument settings These settings are saved as files in ...

Page 41: ...efault settings To restore user saved settings select one of the FILE locations that contain the settings you want to restore FILE 0 to FILE 9 7 Press ENTER to restore the selected setting The message FILE LOADING and LOAD SUCCEED will be displayed 8 Press key to exit from the menu 4 5 4 Display Control To speed up measurement rate for remote control the 5492B allows the user to turn off the front...

Page 42: ...e selection The message CHANGE SAVED will be displayed to show that the change is now in effect 8 Press key to exit from the menu 4 5 6 Self test The multimeter has a built in self test routine that is processed during an initial power up of the instrument Additionally two other self test routines can be run from the front panel To do this follow the below steps 1 Press to enter the menu on the me...

Page 43: ... will display if no errors occur during the self test 8 Press key to exit from the menu 4 5 7 Calibration B K Precision recommends a calibration period of once a year Note To prevent corruption of the calibration data stored in non volatile memory of the instrument only authorized service center or qualified individuals may proceed with calibrating the instrument Please contact B K Precision for i...

Page 44: ...one interface at a time for remote communication USB RS232 interfaces are selected as the default factory setting You can select the interface from the front panel menu system The interface selection is stored in non volatile memory and does not change from a power on off or instrument reset 5 1 1 USB Virtual COM Interface The USB device interface on this instrument is a USB virtual COM After inst...

Page 45: ... Relative Humidity Up to 80 for 0 C to 28 C 75 RH for 10 MΩ and above ranges of resistance measurement Up to 70 for 28 C to 40 C Displayed Readings and Reading rates Full Scale displayed reading Slow Med Fast 119 999 119 999 11 999 Reading rates on front panel Reading sec Approximate Measurement Function Slow Med Fast DCV 4 16 57 DCA 4 16 57 ACV 3 4 25 ACA 3 4 25 2 Wire Ω Ranges below 120 kΩ 4 16 ...

Page 46: ... 01 0 004 0 01 0 004 119 999 1 19999 11 9999 119 999 1010 00 2 Med 120 000 mV 1 20000 V 12 0000 V 120 000 V 1000 00 V 1 μV 10 μV 100 μV 1 mV 10 mV 10G 10G 10G 10M 1 10M 1 0 02 0 015 1 0 01 0 008 1 0 01 0 008 0 01 0 008 0 01 0 008 119 999 1 19999 11 9999 119 999 1010 00 2 Fast 120 00 mV 1 2000 V 12 000 V 120 00 V 1000 0 V 10 μV 100 μV 1 mV 10 mV 100 mV 10G 10G 10G 10M 1 10M 1 0 02 0 040 1 0 02 0 02...

Page 47: ... the input terminals at full scale reading 2 Use REL function 3 In 12A range 10 12 A is readable for 20 seconds maximum TRUE RMS AC CHARACTERISTICS AC Voltage Resolution and Full Scale Reading Range Resolution Full Scale Reading Slow Med Fast Slow Med Fast 120 000 mV 1 20000 V 12 0000 V 120 000 V 750 00 V 1 μV 10 μV 100μV 1 mV 10 mV 10 μV 100 μV 1 mV 10 mV 100 mV 119 999 1 19999 11 9999 119 999 75...

Page 48: ...nges Input impedance 1 MΩ 2 in parallel with capacitance 100 pF Maximum DCV 500V for all AC ranges AC Current True RMS AC Coupling Resolution and Full Scale Reading Rate Range Resolution Full Scale Reading Burden Voltage 1 Shunt Resistor Slow 12 0000mA 1 20000 A 12 0000 A 2 0 1 μA 10 μA 100 μA 11 9999 1 19999 11 9999 0 15 V 10 1 Ω 0 3 V 0 1 Ω 0 15 V 10 mΩ Med 12 0000mA 1 20000 A 12 0000 A 2 0 1 μA...

Page 49: ...A 10 μA 10 μA 7 0 10M Rx μA 7 0 10M Rx μA 0 05 0 008 2 0 03 0 004 2 0 03 0 004 2 0 03 0 004 0 03 0 004 0 10 0 004 0 50 0 008 Med 120 000 Ω 1 20000 kΩ 12 0000 kΩ 120 000 kΩ 1 20000 MΩ 12 0000 MΩ 120 000 MΩ 1 mΩ 10 mΩ 100 mΩ 1 Ω 10 Ω 100 Ω 1 kΩ 119 999 1 19999 11 9999 119 999 1 19999 11 9999 119 999 1 mA 1 mA 100 μA 10 μA 10 μA 7 0 10M Rx μA 7 0 10M Rx μA 0 05 0 015 2 0 03 0 008 2 0 03 0 008 2 0 03 ...

Page 50: ... year Fast 1 kΩ 100 mΩ 999 9 1 mA 0 10 0 020 Maximum Input Protection 1000VDC or 750VAC for all ranges Open circuit voltage 13 3 VDC Test Current Approximately 1 mA DC Threshold resistance From 1 Ω to 1000 Ω default of power on is 10 Ω Diode Accuracy of reading of range 23 C 5 C Rate Range Resolution Full Scale Reading Test Current Accuracy 1 year Med 3 0000 V 10 0000 V 10 0000 V 100 μV 100 μV 100...

Page 51: ...cale Reading Accuracy 2 Input Sensitivity Sine Wave 100 mV to 750 V 1 10 μs 1 10 μs 10 ms 10 ms 100 ms 100 ms 200 ms 1 s Slow 0 01 ns 0 1 ns 0 1 μs 1 μs 9 99999 9 99999 99 9999 199 999 0 005 0 005 0 01 0 05 100 mVrms 40 mVrms 40 mVrms 200 mVrms 1 If testing frequency is greater than 1MHz it will be displayed but no specified accuracy is guaranteed 2 Specified accuracy at input 5 of range Maximum C...

Reviews: