background image

Preparing and installing the machine

To activate the unit, connect the power cable to a suitable power outlet. Ensure that fog fluid is present in the 
tank. If so, switch on the device with the on/off switch. 

Now the heating element of the machine will heat up until the necessary temperature has been reached. This
may take up to 5 minutes. 

The remote control will show if the device is ready to produce fog. If the machine is ready, LEDs on the 
remote control will light up. When pressing and holding the button on the remote control, the pump will 
extract liquid from the tank and pump it through the heating system, producing fog. 

It may be possible that the machine does not instantly produce fog, especially if the machine is used for the 
first time. This is because the machine is tested in the factory then drained so the fog liquid is removed from 
the system. When using the machine for the first time, press and hold the remote button when the machine is
ready to produce fog. Some noise from the fog machine pump may be noticeable as it will run without fluid 
for a short while, but this will not harm the components. Gradually, fog clouds will begin to appear from the 
fog nozzle, which will increase each second. 

Installing the system in a standing position 

The WSM Junior is mainly used for party lighting enhancement and can be placed directly on a flat surface 
such as a table, floor or bar. Placement on the floor is recommended, but please beware that the housing 
may become hot. Placement on certain kinds of carpet and similar surfaces is therefore not recommended. 
Please ensure that the device is positioned safely and the power cord is installed properly. Accidents may 
happen if the power cord is hanging freely and can be pulled by small children, which causes the device to 
fall down. Install the device securely and contact your local dealer or a skilled technician for the best 
installation advice for permanent and mobile setups. 

Installing the fixture in a hanging position

The WSM Junior is equipped with an installation bracket which makes it possible to install the device on a 
ceiling, or beam. Mounting hardware is not included but should be available at your local hardware store. 
Please ensure that the right mounting hardware is selected for the material. For example: wooden beams 
require different hardware than a brick wall. 

The WSM Junior can also be installed to a lighting stand or truss system. It may be necessary to install 
clamps or couplers to the device in order to ensure a secure attachment. The device is equipped with an 
eyebolt for a safety cable. If the device is installed in a hanging position, the device must be secured with a 
safety cable. If the primary mounting hardware  fails for any reason, the device should not be able to fall 
more than 30 cm and the safety cable should be able to hold 10x the weight of the unit. 

Spare parts

This unit has no user-serviceable parts inside. When any damage to internal components occurs, contact 
your local dealer or a specialised technician in order to repair the fixture.

Cleaning: 

Clean the housing of the fixture frequently with a damp cloth, to remove dust and/or dirt. 

WARNING: 

Always disconnect the fixture from your wall outlet or other power supply and let the fixture dry 

before reconnecting it. This prevents possible electric shocks.

Check-up

To prevent dangerous situations, make sure your fixture is in optimal condition before using it. Check your 
fixture frequently by using the following check list:
- All screws must be mounted tightly. 
- Check all screws and metal parts for corrosion. No visible corrosion should be present.
- The exterior of your fixture must be in optimal condition. Check your fixture for dents, cracks or missing 
parts. 

The information and illustrations shown in this user manual are subject to change without  notice.

User manual version: 1.0

Creation date + author initials: 03-11-2015 RV Revision date + author initials: -

Summary of Contents for 9000-0021-6270

Page 1: ...ith wired remote control User manual The information and illustrations shown in this user manual are subject to change without notice User manual version 1 0 Creation date author initials 03 11 2015 RV Revision date author initials ...

Page 2: ...e filled with proper fog fluid in order to create the desired fog effect Fluid from the tank is pumped into the heating system which then expands into a fog like substance The expansion causes the pressure to build until clouds of fog are expelled from the nozzle positioned at the front of the machine The WSM Junior uses water based fluids Ayra recommends the use of Ayra fluids which are available...

Page 3: ...cables Handle the power cord and all mains connectors with caution Never remove any warning or informative labels from the unit Never leave cables lying around Do not open the device and do not modify any hardware or software Do not insert objects into air vents of this device Do not connect this device to a dimmer pack Do not switch the system on and off frequently as this will reduce the lifespa...

Page 4: ... device to a power outlet with the wrong type of voltage or using the product with a wrong type of power supply may cause permanent damage to the device Avoid shocks and collisions during use and transport Do not transport the device while in use Avoid brute force during the installation and operation of this device Familiarise yourself with the functions of the device before use Do not allow oper...

Page 5: ...he requirements stated in this directive apply to all manufacturers and producers of electronic equipment in the EU Do not dispose of this product together with regular household rubbish Contact your local government representative for more information about proper disposal and recycling of electronic products in your region By recycling this product properly after use we can work together to enjo...

Page 6: ...d fog needs to be able to be drained from the room Use caution with the amount of fog used Only small amounts of fog are required to accentuate professional lighting and make the beams visible Do not keep producing fog when the visibility drops below 2 meters The use of fog is not hazardous for people or animals if used with caution and proper ventilation Do not use more fog than needed to achieve...

Page 7: ...he device in a hanging position always mount a G clamp or half coupler to the bracket or use bolts to install the bracket directly to a ceiling or beam The information and illustrations shown in this user manual are subject to change without notice User manual version 1 0 Creation date author initials 03 11 2015 RV Revision date author initials ...

Page 8: ...onnect it from the power supply and store it in a dust free environment Always check the unit for possible damage before use If you suspect that something is wrong with the unit do not connect it to a power source When you suspect that your unit is broken or damaged contact your local dealer or a certified technician to inspect the unit The information and illustrations shown in this user manual a...

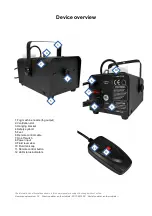
Page 9: ...On off switch 8 Power input 9 Fluid level view 10 Fluid tank cap 11 Remote control button 12 LED status indicators The information and illustrations shown in this user manual are subject to change without notice User manual version 1 0 Creation date author initials 03 11 2015 RV Revision date author initials 1 2 3 4 5 6 7 12 8 9 10 11 ...

Page 10: ...skilled technician for the best installation advice for permanent and mobile setups Installing the fixture in a hanging position The WSM Junior is equipped with an installation bracket which makes it possible to install the device on a ceiling or beam Mounting hardware is not included but should be available at your local hardware store Please ensure that the right mounting hardware is selected fo...

Page 11: ...l turned on but about to be shut down twist the cap off the fluid tank and remove the hose from the tank The fluid tank can be drained for example in the original fog fluid container Now spray fog until the output of the machine drops significantly This way remaining fluid which is trapped inside the heating system will be removed If noise from the pump increases and the fog output becomes low sto...

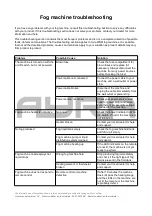
Page 12: ...active Check your power source wall outlet or power strip and make sure there is an accurate voltage provided for the machine Fog machine heater is not active No power Check the power indicator light on the switch If not lit the machine is not turned on Heater broken Contact your local dealer for help and support No fog produced Fog liquid tank empty Check the fog machine fluid tank and fill it up...

Page 13: ...g time 4 to 5 minutes tank capacity 0 3 liter output power 300cft 8 5 m per minute Technical details Power supply 230V 50 Hz Fuse F5AL250V Power consumption 400W max ta 0 40º Celsius Fluid tank capacity 0 3l Exterior surface temp 56 4º Celsius Power factor 0 99 The information and illustrations shown in this user manual are subject to change without notice User manual version 1 0 Creation date aut...

Reviews: