background image

Page 6  

User Guide:  RFM5209-B Data Hub with ReaderService 

IN034F11 www.Axzon.com

4.  Accessing Sensor Data Over Wi-Fi

Please follow the instructions in section 3 to 
ensure the RFM5209 is properly set up as a Wi-Fi 
access point.

4.1.  Connect your phone or PC to Wi-Fi

In your Wi-Fi settings menu on your PC or smart 
phone, select the SSID 

axzondemo 

Wi-Fi  option.  

This will connect your PC or smartphone to the 
Wi-Fi hotspot on the RFM5209.

Wi-Fi Login: 

admin

Wi-Fi Password: 

magnusmagnus

4.2.  Start a web browser

Once the network connection is established, 
please open a web browser on your PC or smart-
phone and enter the following URL:

sensor.demo.axzon.com

Grafana Login: 

admin

Grafana Password: 

admin

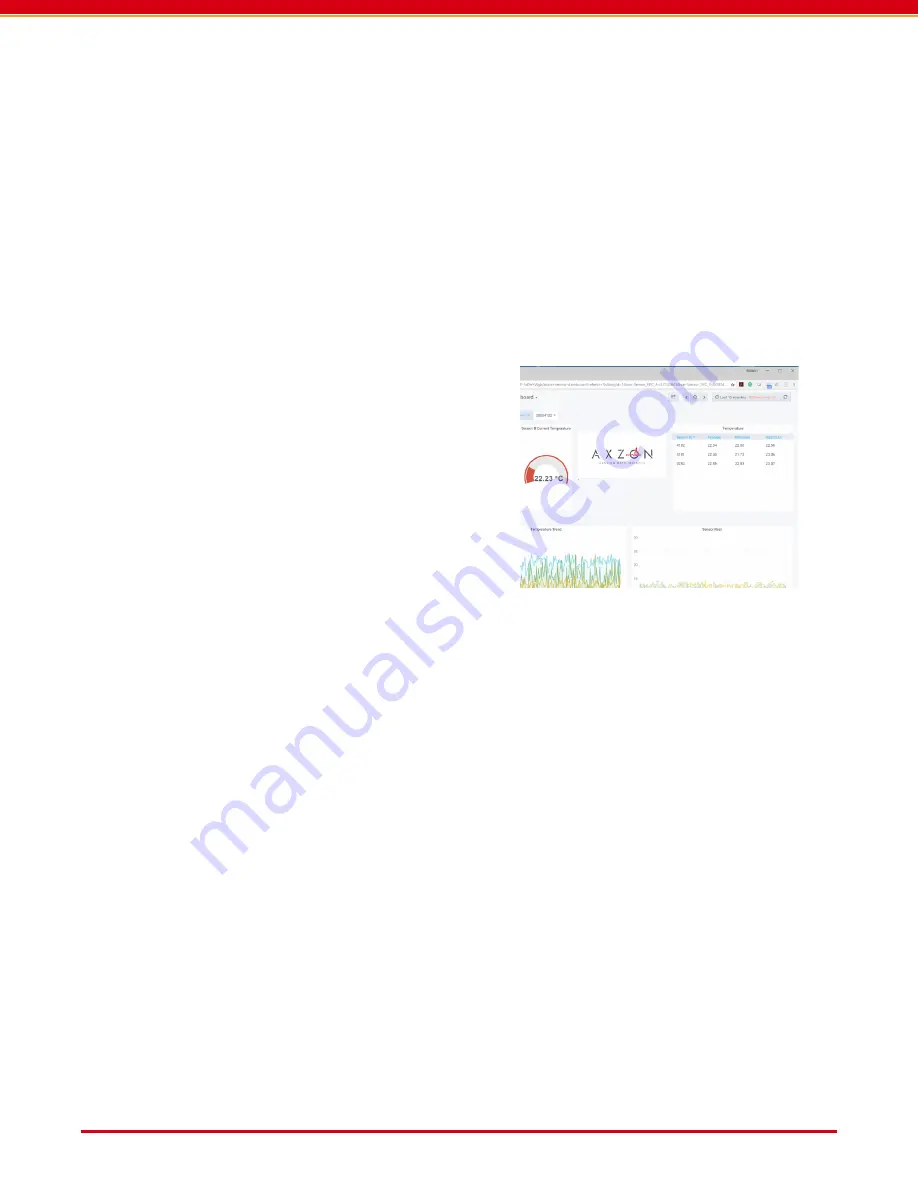
You will see the Axzon Sensor Dashboard.  Chang-
es can be made to the dashboard after logging 
in.

CAUTION: 

It is possible to open the browser on 

the RFM5209 using a mouse and display to ac-
cess the Axzon Sensor Dashboard, but we do not 
recommend this approach.  The memory on the 
RFM5209 is limited.  Serving up web pages slows 

the processing capability significantly.

4.3.  Viewing the sensor data

The browser on your PC or smartphone will show 
the Axzon Sensor Dashboard with two charts.  
The top chart will show temperature data.  The 
bottom chart will show the RF signal strength 
at the sensor.  This is labeled OCRSSI in Axzon 
documentation.  

The dashboard settings can be managed by click-
ing the button at the upper right of the screen.  
You can select the update rate, and the amount 
of data to display.

Collected data is available as an export from the 
Grafana tool.  Please select the desired chart, 
and click the pull-down arrow by the chart title.   
Several export options are contained under the 

more...

 option.  

NOTE:

 ReaderService is able to access the in-

ternal SENSOR-CODE, which is used to measure 
moisture in many cases.  However, the graphing 
program does not show SENSOR_CODE data.  

..

Axzon Sensor Dashboard

4.4.  Data Hub System Shutdown

The RFM5209 Data Hub should be shut down in a 
controlled process.  Pulling the power cable can 
put the system at risk if the system is writing the 
database when the power is removed.

Normal Shutdown:

 Pressing and hold the power 

button for 3 seconds powers down the RFM5209.  
After the blue light goes out the system is safely 

off and the power cord can be removed.

Forced Shutdown:

 Pressing the power button for 

5 seconds forces a shut down process.  We do 
not recommend the forced shutdown as this can 
cause the database to be corrupted. 

WARNING

: Failure to properly shutdown the 

RFM5209 can corrupt the database and render 
it unusable. It can only be repaired by writing a 
full image onto the SSD.

Summary of Contents for RFM5209

Page 1: ...lots to monitor tem perature How is it used The RFM5209 system is connected to one or more separate RF reader s over the network The RF reader s will send data to the RFM5209 data hub for storage in the internal database This sensor data is also available on your own smart phone or tablet device when connected to the data hub s Wi Fi RF Readers and Sensors sold separately The RFM5209 system does n...

Page 2: ...a web browser 6 4 3 Viewing the sensor data 6 4 4 Data Hub System Shutdown 6 5 Troubleshooting and Maintenance Guide 7 5 1 Removing data from the database 7 5 2 When the RF reader disconnects 7 5 3 Axzon sensor dashboard stops 7 5 4 RFM5209 appears to be corrupted 7 6 Using the System 8 6 1 Identifying and Organizing Sensors 8 6 2 Sensor Handling and Placement 8 6 3 Software overview 8 6 4 Maximum...

Page 3: ... users may be tempted to add their own additional software to the system Users are advised against loading additional soft ware on the system Power source The reader ships with an external power supply The BF suffix designation in the part number indicates a USA power supplied is supplied with the system The BE suffix designa tion in the part number indicates that a power supply suitable for use i...

Page 4: ...ystem is provided to access reader configuration settings like its IP address Please see the RF reader com patibility table in section 1 RFNM5108 B Fixed Reader Temperature sensors While no sensors are shipped with the Data Hub the RFM3200 RFM3250 wireless temperature sensors and the RFM2100 moisture sensor are commonly sup plied with the RF systems All sensors employ Axzon Smart Passive Sensing t...

Page 5: ...formation on antenna patterns and sensor placement NOTE The RFM3250 rugged temperature sen sors are designed for use on metal surfaces The RFM3200 flexible temperature sensors are de signed for non metallic surfaces 3 3 Power the RF reader Connect power supply to RF reader and wait for the RF reader to complete its boot process This may take up to one minute depending on the RF reader 3 4 Connect ...

Page 6: ...erature data The bottom chart will show the RF signal strength at the sensor This is labeled OCRSSI in Axzon documentation The dashboard settings can be managed by click ing the button at the upper right of the screen You can select the update rate and the amount of data to display Collected data is available as an export from the Grafana tool Please select the desired chart and click the pull dow...

Page 7: ... to au tomatically reconnect To manually reconnect the reader to the Axzon ReaderService you can execute the connect reader script located on the RFM5209 desktop This operation requires that an external display and mouse be connected to the RFM5209 5 3 Axzon sensor dashboard stops Verify that your PC or smartphone is still con nected to the axzondemo Wi Fi access point If the connection is lost yo...

Page 8: ... power modulation algorithm that dynamically adjusts the reader s output power based on reported OCRSSI values NOTE If readings from a sensor appear erratic and the reported OCRSSI power at that sensor is above 18 then use of the power modulation algorithm is advised 6 Using the System 6 1 Identifying and Organizing Sensors Sensors are typically identified by their EPC or their TID numbers The RFM...

Page 9: ...nge connection button on the upper left of the display The table will list any readers con nected to your computer The table may display other readers connected to your network NOTE We recommend that you use the USB connection option for setting RF reader configu rations 7 2 Connect to the reader Once your reader is visible in the table click it and press the gray connect button at the bottom of t...

Page 10: ...ensor_db device Master sensor record 1 entry per sensor sensor Most recent sensor data by tag 2 entries per sensor OCRSSI Temperature Code sensor_history Full sensor history Access MySQL Workbench IP address 172 16 5 5 Username password axzon_admin Axzon ReaderService Master Architecture REST API Access http sensor demo axzon com 19040 swagger ui html For full documentation on REST API please see ...

Page 11: ...ub with ReaderService Product Brochure Software Options PB047 RFM5140 B RfmApi Product Brochure PB048 RFM5144 B ReaderService Product Brochure Detailed Technical Documents AN009 RFM3250 Epoxy Recommendations IN020 Axzon Sensor EPC Programming Guide IN023 RFM5108 B Fixed RAIN UHF Reader User Guide IN026 RFM5109 B Fixed RAIN UHF Smart Reader with ReaderService User Guide IN027 RFM5140 B Axzon RfmApi...

Page 12: ...USA 10 Quick Start Process STEP 1 Connect the RF antenna Please follow the instructions in RF reader user guide STEP 2 Connect RFM5209 to the RF reader using Ethernet Please follow the instructions in section 3 4 STEP 3 Position sensors in front of the RF antenna Please follow the instructions in section 6 2 STEP 4 Power the RF reader Please follow the instructions in section 3 3 STEP 5 Power the ...

Reviews: