background image

Unpacking

6

Your saw is packed in the box partially assembled. 
This is to ensure that the components are inserted 
in the correct positions. e.g. The blade is fitted, the 
securing bolt for the tilt mechanism is inserted in the 
tilt quadrant with the washer and the locking but-
terfly nut threaded on to the bolt, etc.

Please make careful note of the positions of the vari-
ous components if you have cause to disassemble, 
whilst putting the machine together.

Take all the easily removable items out of the box, 

tip the box up so that the base of the saw is to the 
ground, remove all the polystyrene packaging from 
around the saw (open both sides of the box?) then  
“corner walk” the saw out of the box.  
 
If this is still awkward, split the top of the box, fold the 
box material flat on the floor, and “wriggle” the saw 
off the cardboard. (The best method of moving the 
saw is with a ‘hug’ lift through the neck of the saw, 
holding the saw back against your body and lifting 
by straightening your legs).

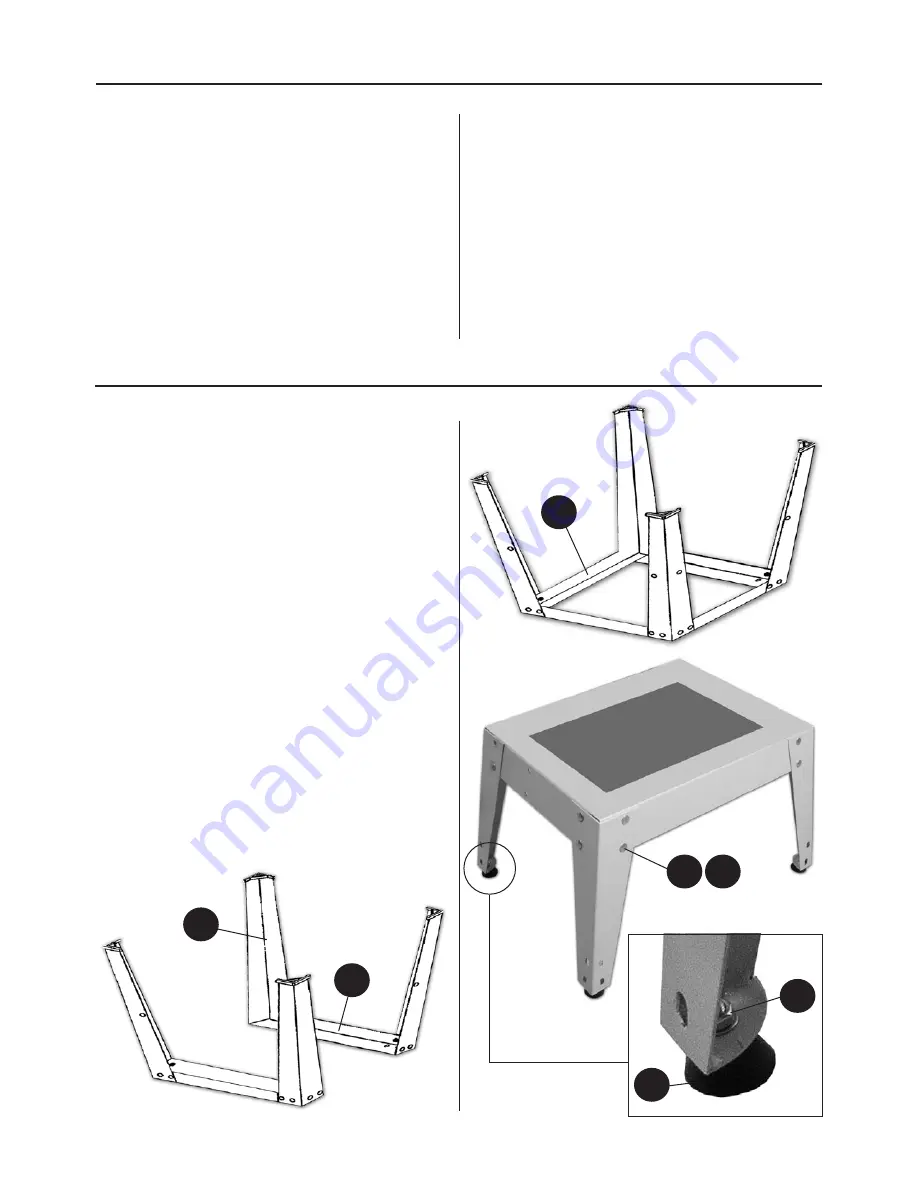
Stand Assembly

Locate and identify the 4 leg brackets (B), the short 
struts (C) and the long struts (D) for the stand, and 
M8 x 18mm coach bolts, washers and nuts(E & G).

Using the M8 coach bolts, nuts and washers bolt 
together two legs (B) and one short strut (C) at the 
top. ‘finger tighten’ at this time, see fig 1.

When the two frames have been assembled,
select one, turn it upside down on a flat surface and
loosely bolt one the long strut (D) in place, see fig 
2. Attach the other frame and bolt to the remaining 
strut (D) for the other side.

When all the components are assembled, turn the 
stand upright. Using the flat surface as a reference, 
tighten up all the nuts, turn the stand on its side and 
insert one of the four thread rubber feet (A) into one 
of the four pre-drilled holes to the ends of the leg 
brackets (B). Tighten in place with a M8 washer and 
nut (G). Repeat for the remaining feet. Upright the 
frame and stand it on the floor,see fig 3.

D

B

C

A

E

G

G

Fig 01

Fig 02

Fig 03

Summary of Contents for HBS350N

Page 1: ...HBS350N 14 Bandsaw Code 508206 AXMINSTER SERIES Hobby...

Page 2: ...Up the Saw 18 19 20 21 Operating Instructions 22 Changing the Saw Blade 22 23 Changing the Blade Speed 24 Routine Maintenance 25 Parts Breakdown List 26 27 28 29 30 31 32 33 Wiring Diagram 34 Blades A...

Page 3: ...ontaining 18 No M8 x 18mm Coach Bolts E 3 No M8 x 25mm Square Head Bolts F 25 No M8 Nuts Washers G 3 No M6 x 15mm Hex Bolts and washers H 2 No Table Clamping Handles I 2 No Butterfly Nuts for fence ex...

Page 4: ...t off as soon as possible with a cloth or paper towel Do not use 230V a c powered machines anywhere within a site area that is flooded or puddled and do not trail extension cables across wet areas Kee...

Page 5: ...amaged and are kept clean and sharp this will maintain their operating performance and lessen the loading on the machine Above all OBSERVE make sure you know what is happening around you and USE YOUR...

Page 6: ...ift through the neck of the saw holding the saw back against your body and lifting by straightening your legs Stand Assembly Locate and identify the 4 leg brackets B the short struts C and the long st...

Page 7: ...ers Insert the bolts through the pre drilled holes in each corner of the base and through the floor stand Fit the washers and nuts on the underside and tighten to secure the assembly When mounting the...

Page 8: ...p 1 Remove the table stabilising bolt and the table insert see figs 03 04 Lift the table 1 slide the blade through the table slot and lower the table guiding the threaded bolts through the holes in th...

Page 9: ...fence guide rail by undoing the two Phillips screws and place safely aside Slot the square headed bolts F into the guide rails T slot and slide on see fig 09 Secure the Fig 09 Fig 10 rail in place by...

Page 10: ...r secure the micro adjuster in position see fig 15 Fig 13 Fig 14 Fig 15 Check the guide fence is set parallel to the blade Any slight discrepancy can be taken out by loosening the four Hex bolts that...

Page 11: ...washers E G Remove the two coach bolts from the right support leg to the rear of the stand assembly place safely aside see fig 23 Line up the four holes in the handle bracket L with the four holes in...

Page 12: ...amp Upper blade guide guard Fence guide rail Lower wheel door Bandsaw stand Stand rubber foot Idler wheel adjusting knob Stabilising bolt Main saw frame Guide fence Mitre fence ON OFF button and switc...

Page 13: ...crews Fence locking lever A Micro adjuster B ON OFF NVR switch assembly A Emergency stop shroud B Mitre fence assembly A Index and pointer B Stabilising bolt Lower door lock A Ider wheel adjusting kno...

Page 14: ...Illustration and Parts Description 14 Upper saw wheel Upper wheel mounting Saw table Table insert Saw Drive pulley Micro door switch Lower saw wheel...

Page 15: ...ing bolt A Lateral adjustment clamping grub screws B Drive pulley A Drive belt tensioning Idler wheel B Idler wheel adjusting knob Micro door switch Lower bearing blade guides A Lower rear thrust bear...

Page 16: ...and Parts Description 16 Rear guide rail Table levelling bolt Motor Table clamping handle 100mm Dust extraction Optional mobility wheel Optional lifting handle bracket Fixing holes for fence extensio...

Page 17: ...Tracking control knob D Fence guide bearing 508207 Optional mobility wheel assembly A Wheel assembly engaged in the up position B Bandsaw stand raised off the ground C Bandsaw being moved to a new lo...

Page 18: ...again Continue until the blade tracks in the centre of the tyres with no appreciable to and fro movement Tension the blade fully A sideways push of about 7 8 lbs 3 kgs in the middle of the blade shoul...

Page 19: ...that the blade is perpendicular to the table If it is not try resetting the table If it is still not correct loosen the table locking handles and adjust the table stop nut until perpendicularity is a...

Page 20: ...the gullets of the saw blade Re tighten the nut see fig 37 Loosen the cap head bolt B that clamps the rear thrust bearing in position and adjust the thrust bearing to approximately 1mm behind the blad...

Page 21: ...eneral instructions and safety precautions that are printed in the preceding pages of this manual 2 Before connecting the machine to the supply check the tool for obvious signs of damage paying partic...

Page 22: ...nly release the tension to change the blade or if the blade is to be removed because the machine is to be mothballed for a lengthy time period The blade in tension over a long period of non use will c...

Page 23: ...ssembly see figs 42 43 Ease the blade over the wheels and locate the blade in the blade guides Apply some tension to the blade Turn the top wheel by hand see fig 44 to ensure the blade will not skip o...

Page 24: ...lt tension removed very carefully reposition the drive belt see fig 51 NOTE Make sure the belt is seated correctly in one of the drive pulley grooves With the belt repositioned turn the Idler wheel ad...

Page 25: ...pacted crud from the tyres apply a little oil to the screw threads of the blade and drive belt tensioners DO NOT USE OIL near the belt The pivots and the slides of the top wheel mounting assembly and...

Page 26: ...Parts Breakdown List 26...

Page 27: ...ar frame 1 33 Upper wheel axle 1 34 Guide board saddle 2 35 Washer 22 1 36 Thin nut M22X1 5 1 37 Lifter wheel 1 38 Semicircle head screw M5 8 1 39 The connecting nut plate 1 40 Switch KJD12 1 41 Semic...

Page 28: ...ing nut 1 102 Nut M12 3 103 Pull off M20X1 5 1 104 Nut M6 2 105 T shaped handle 1 106 dog screw M6 2 107 Eccentric bush 1 108 Eccentric shaft 1 109 Washer 1 110 Six angle locking nail M5X10 1 111 BigW...

Page 29: ...Continues Over 146 The table is rotating frame 2 148 Semicircle head screw M8 60 4 149 Six angle locking nail M6X10 1 150 Table pointer 1 151 T shaped handle M10 1 152 Take 1 153 The work table fixed...

Page 30: ...Parts Breakdown List 30...

Page 31: ...4 16 End cap fence carrier 1 17 Fence carrier 1 18 Eccentric shaft 1 19 Circle ring 1 20 Len 1 21 Screw guide 1 22 End cap fence carrier 1 23 Screw guide 1 24 Lock plate 1 25 Pan head screw M4x10 1 26...

Page 32: ...Parts Breakdown List 32...

Page 33: ...Parts Breakdown List 33 NO Description Q TY 1 Hex bolt M8X16 16 2 Support parts 4 3 Nut M8 20 4 Washer 8 20 5 Rubber legs M8X15 4 6 Connected plate 1 2 7 Connected plate 2 2...

Page 34: ...Wiring Diagram 34...

Page 35: ...a much higher level of accuracy in the tooth formation plus they stay sharp for at least 30 longer than normal milled tooth blades The result is a smoother cut for much longer a really useful step for...

Page 36: ...NC machines for industry and education Small machines for the home engineer Compressors and tools for home or workshop use durable and great value FreeThreeYear Guarantee on Axminster Hobby Trade and...

Reviews: