eBOX627-312-FL U
ser’s Manual
Jumper Setting & Connector
23
3.2
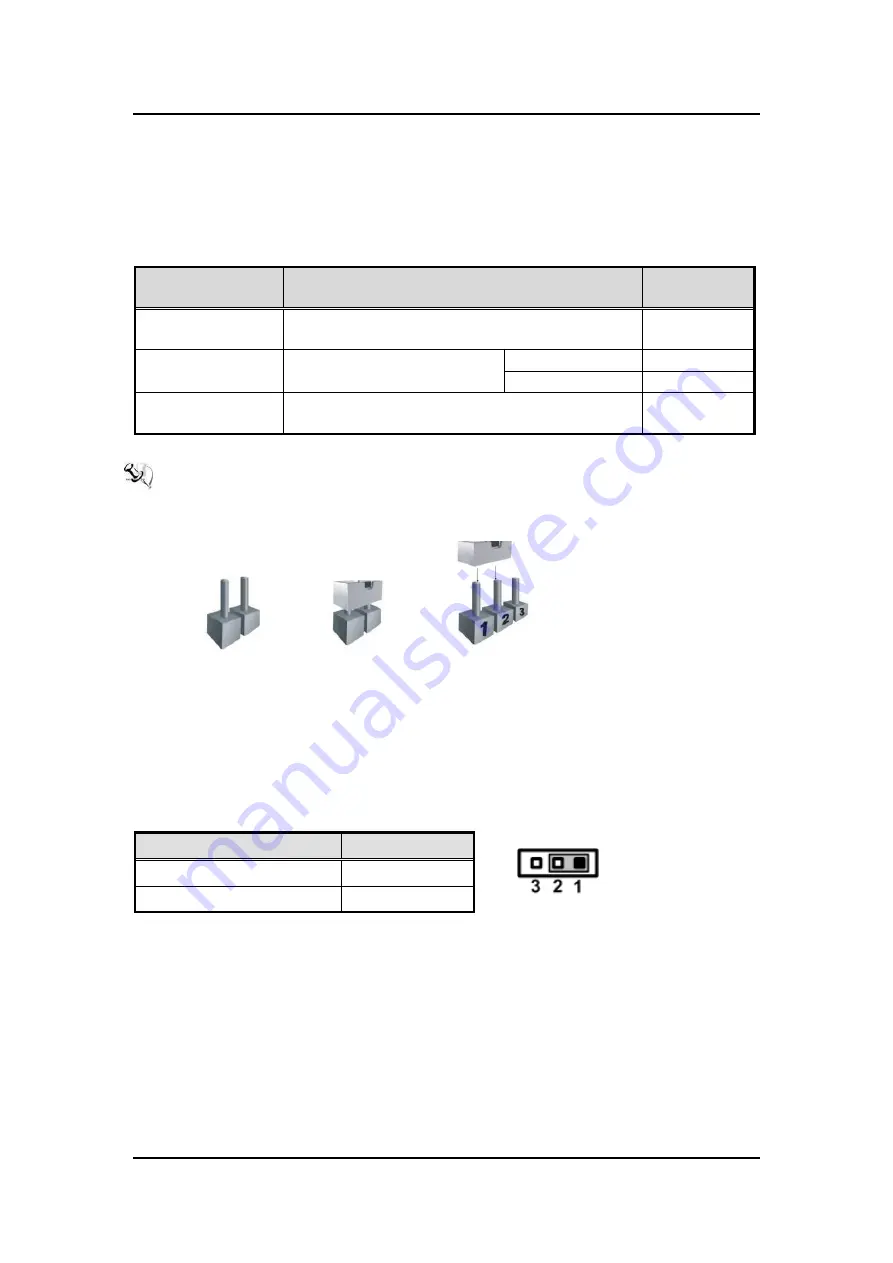
Jumper Setting Summary
Proper jumper settings configure the eBOX627-312-FL to meet your application purpose. We
are herewith listing a summary table of all jumpers and default settings for onboard devices,
respectively.
Jumper and
Switch
Description
Setting
JP3
Restore BIOS Optimal Defaults
Default: Normal Operation
1-2 Close
JP4
COM3 Data/Power Selection
Default: RS-232 Data
CN4 Pin 1: DCD
3-5 Close
CN4 Pin 8: RI
4-6 Close
SSW 1
Auto Power On
Default: Disable
ATX
NOTE:
How to setup Jumpers
The illustration shows how to set up jumpers. When the jumper cap is placed on pins,
the jumper is “close”, if not, that means the jumper is “open”.
[Open] [Closed] [Pin1 -2 Closed]
3.2.1 Restore BIOS Optimal Defaults (JP3)
This is a 1x3-pin (pitch=2.0mm) jumper. Put jumper clip to pin 2-3 for a few seconds then
move it back to pin 1-2. Doing this procedure can restore BIOS optimal defaults.
Function
Setting
Normal (Default)
1-2 close
Restore BIOS optimal defaults
2-3 close
Summary of Contents for eBOX627-312-FL
Page 1: ...eBOX627 312 FL Embedded System User s Manual...
Page 13: ...eBOX627 312 FL User s Manual Introduction 5 1 3 2 Wall mount Bracket Dimension...
Page 14: ...eBOX627 312 FL User s Manual Introduction 6 1 3 3 Din rail mount Bracket Dimension...
Page 15: ...eBOX627 312 FL User s Manual Introduction 7 1 3 4 VESA mount Bracket Dimension...
Page 17: ...eBOX627 312 FL User s Manual Introduction 9 Rear View Rear View drawing...
Page 28: ...eBOX627 312 FL User s Manual Hardware Installation 20 This page is intentionally left blank...
Page 42: ...eBOX627 312 FL User s Manual Jumper Setting Connector 34 This page is intentionally left blank...
Page 68: ...eBOX627 312 FL User s Manual Watchdog Timer 60 This page is intentionally left blank...
Page 72: ...eBOX627 312 FL User s Manual BIOS Flash Utility 64 This page is intentionally left blank...


