background image


1


1. GUI DISPLAY WITH USB MOUSE CONTROL 

1.1 Connect USB Mouse 

Connect your USB mouse to one of the USB ports on the DVR front panel, and check if there’s a mouse icon (

on the screen, indicating the USB mouse is detected properly.   

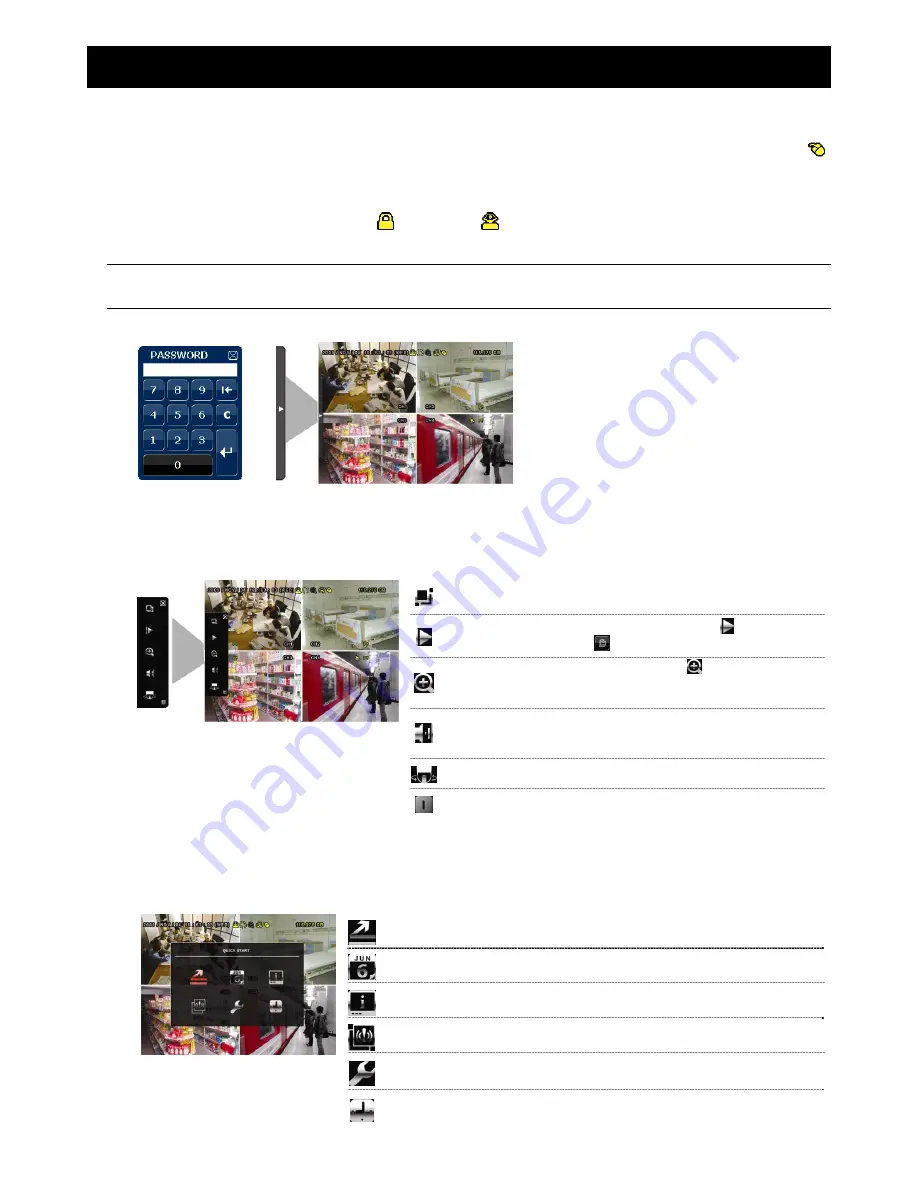
Move your mouse to enter the DVR password with the password keypad. The default administrator password is 

0000

. The status will be changed from 

  (key lock) to 

  (administrator), and the quick menu bar appears on 

the left side of the screen. 

Note: 

There are two user levels for DVR access which can be set in the main menu “SYSTEM”   “TOOLS”. 

For details, please refer to your user manual.


Password Input 

Quick Menu: Close 


1.2 Quick Menu Bar 

Move to the arrow mark to extend the quick menu bar and show the five functions as follows: 

Quick Menu: Open 


Click to show the channel switch panel and select the channel you want. 
For details, please refer to “3.2 Quick Menu Bar” in the user manual. 


Click to display the playback control panel, and click 

to play the latest 

recorded video clip, or click 

  to enter the search list. 


Switch to the channel you want first, and click 

  to enter the zoom-in 

mode. In this mode, click and drag the red frame on the bottom left of the 
screen to move to the place you want to see. To exit this mode, click 

7


Click to select the audio channel you want: 
In the live mode, only the live audio channels can be selected. 
In the playback mode, live and playback audio channels can be selected.


Click to enter the PTZ mode and show the PTZ camera control panel. 


Click to show the power off panel to either halt or reboot the system. 

1.3 Main Menu 

Right-click anywhere on the screen to show the main menu as follows, and right-click again to exit. 

Main Menu 


QUICK START 

Click to set the status display, image settings, and date & 
time. 


DATE SETUP 

Click to set the date display and daylight saving. 


SYSTEM 

Click to set the system configurations. 


EVENT INFORMATION 

Click to enter the event search menu. 


ADVANCED CONFIG 

Click to set CAMERA, DETECTION, ALERT, 
NETWORK, DISPLAY, RECORD and DEVICES. 


SCHEDULE SETTING 

Click to set record timer, detection timer & alarm timer. 


Summary of Contents for DR163Z

Page 1: ...042b_Quick_V1 2 H 264 DVR Quick Start GUI Display with USB Mouse Control Please read instructions thoroughly before operation and retain it for future reference For the actual display operation please refer to your DVR in hand ...

Page 2: ... panel and click to play the latest recorded video clip or click to enter the search list Switch to the channel you want first and click to enter the zoom in mode In this mode click and drag the red frame on the bottom left of the screen to move to the place you want to see To exit this mode click 7 Click to select the audio channel you want In the live mode only the live audio channels can be sel...

Page 3: ... DATA USB BACKUP LOG USB EVENT INFORMATION QUICK SEARCH EVENT SEARCH HDD INFO EVENT LOG ADVANCED CONFIG CAMERA BRIGHTNESS CONTRAST SATURATION HUE COV REC CHANNEL TITLE DETECTION MOTION ALARM AREA ALERT EXT ALERT INT BUZZER KEY BUZZER VLOSS BUZZER MOTION BUZZER ALARM BUZZER HDD BUZZER ALARM DURATION SEC HDD NEARLY FULL GB NETWORK NETWORK SNTP FTP E MAIL DDNS DISPLAY FULL SCREEN DURATION QUAD SCREEN...

Page 4: ...rch the recorded files by four event lists RECORD MOTION ALARM TIME or select FULL to show all the event logs To quickly search the time you want select QUICK SEARCH Set the time range you want and select Start to play the recorded video clip during the specified time 11 CH1 16 1 8 1 4 Press the channel number buttons to select the channel to display 12 P T Z SEQ Press SEQ or at the same time to e...

Page 5: ...cted models only one video output is allowed either connected to a CRT monitor MONITOR or a LCD monitor VGA When both MONITOR and VGA are connected press the left key on the DVR front panel during DVR power on to force the video output via MONITOR For details please refer to 3 5 Video Output Switch 5 VGA Connect to a LCD monitor directly Note For selected models only one video output is allowed ei...

Page 6: ...or Selected Model Only Record mode CIF 3 2 Record Icon 1 Manual Recording By defaults manual recording is on when the DVR is powered on and a HDD is installed 2 Event Recording When the motion detection or alarm is on the motion icon or alarm icon shows on the screen for any motion or alarm event 3 Timer Recording When timer recording is on you will see on the screen 4 HDD Overwritten Be defaults ...

Page 7: ...deo clip recorded during this whole hour Repeat Click to set point A and point B in a video clip and the system will play only the specified range in that clip Backup Click to open the backup menu for video backup Event Search Click to quickly search the recorded files by four event lists RECORD MOTION ALARM TIME or select FULL to show all the event logs To quickly search the time you want select ...

Page 8: ...efault video output setting is AUTO meaning the DVR will automatically detect the video output source When VGA and MONITOR are both connected the default monitor output is VGA To change the video output setting manually To force the video output via MONITOR press the left key on the DVR front panel at DVR power on To force the video output via VGA press the right key on the DVR front panel at DVR ...

Reviews: