background image


SETTING UP ACCOUNT MANAGEMENT BY THE PRODUCT’S 

WEB PAGE 


1.


Type the IP address of the product in the URL field of your 
browser and then press Enter.   


2.


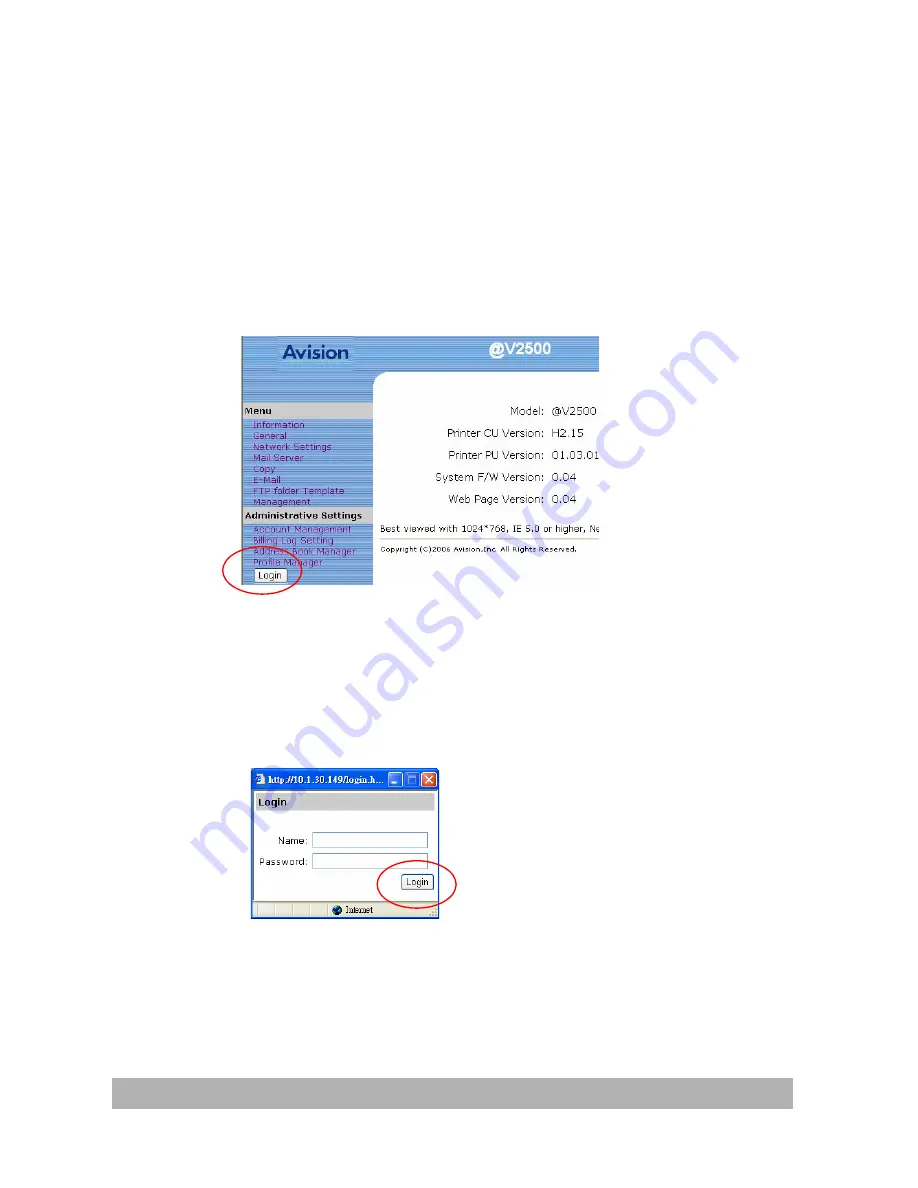
Click the Login button to open the Login screen. 
(The Login button will be changed to the Logout button after 
you have successfully logged in. A user without privilege can 
modify the settings on this web page if you do not click the 
Logout button after finishing your settings.) 


6-2 

Summary of Contents for NETDELIVER @V2500

Page 1: ...NetDeliver MFP User s Manual Regulatory model DF 0605H...

Page 2: ...icates a potentially hazardous situation which if instructions are not followed may result in minor or moderate injury or damage to property Important Indicates operational requirements and restrictio...

Page 3: ...damage the machine and void the warranty y Place the equipment securely on an even flat surface Tilted or uneven surfaces may cause mechanical or paper feeding problems y Retain the box and packing m...

Page 4: ...disclaim any and all rights to those marks The proper names of the Windows operating systems are as follows Warranty The information contained in this document s is subject to change without notice T...

Page 5: ...3 2 Specifying Network Configurations 3 9 Specifying Mail Server 3 15 4 Managing the Address Book 4 1 Managing Your E mail Address Book 4 1 Managing Your Groups 4 9 5 Specifying FTP Folder Template an...

Page 6: ...ing Paper 9 2 Sending Your Document to E mails 9 5 Sending Your Document to Filing Servers 9 9 Making Copies 9 14 10 Troubleshooting 10 1 Information Codes Message 10 1 Clearing a Paper Jam 10 10 Remo...

Page 7: ...ters ftp servers web site or someone else s computer on the network The new way to distribute documents is faster more cost effective and safer than any traditional methods such as fax mail or courier...

Page 8: ...ment Feeder the product allows a stack of 50 page document s to be continuously scanned at one time in reliable quality to increase your efficiency Post Processing The product can be used as a paper s...

Page 9: ...External View THE FRONT VIEW 4 3 1 5 2 6 1 ADF Front Cover 4 Paper Stopper 2 LCD display 5 Document Cover 3 ADF Paper Tray 6 Control Panel 1 3...

Page 10: ...2 3 4 5 6 1 USB Keyboard To connect a USB keyboard 2 Copy To connect a printer 3 LAN NET To connect an Ethernet cable 4 ADF To connect the ADF cable 5 24VDC 2 0A To connect the power cable 6 Power Po...

Page 11: ...rt C Part B Part A Scaling Area Used to reduce document s down to 25 or enlarge up to 400 1 2 3 1 Increase scaling in 1 increment up to 400 2 Decrease scaling in 1 Decrement down to 25 3 Select scalin...

Page 12: ...he default working mode Press to use the filing function Press to setup more settings for copy e mail or filing individually Press to select an e mail address from an address book or select a profile...

Page 13: ...Used to cancel a command or delete a character Part C The Numeric Character Keypad Used to be a simplified keyboard Used to select special characters 1 7...

Page 14: ...your document s Select to enter administrator menu Select to clear current settings and return to panel default settings Select to enter power saving mode The Power LED Used to indicate power on and...

Page 15: ...nd send multi page documents on the document glass continuously or from the auto document feeder batch by batch Select to start copying e mailing or filing in black and white mode Select to start copy...

Page 16: ...the product please setup the product properly on you network for e mail and filing function The following network parameters have to be collected from your network administrator 1 DHCP enable 2 IP Add...

Page 17: ...eway IP The gateway IP address assigned by your network administrator or by DHCP Server or by DHCP Server 5 DNS server The IP address of DNS Server assigned by your network administrator 6 SMTP Server...

Page 18: ...numbers separated by periods Each number can be zero to 255 For example 10 1 30 186 could be an IP address 3 SMTP Stands for Simple Mail Transfer Protocol It is the main communication protocol used t...

Page 19: ...JPEG TIFF or MTIF Multi page TIFF file format and then transmitted to remote recipients simultaneously as an e mail attachment When you send an e mail to someone via the product the product uses Simp...

Page 20: ...e scanned document directly to a designated server or a personal computer on the network in a standard PDF JPEG TIFF or MTIFF file format CIFS is the sharing system of Microsoft Windows What s unique...

Page 21: ...will inquire a user how to manage the document further by following the applications usually made of page programs like ASP PHP JSP etc on the post end server Such an architecture enables a single ser...

Page 22: ...ents To make the best use of the product the following configuration is required To send e mails from the product TCP IP network A SMTP and a optional POP3 server To file document s via intranet FTP H...

Page 23: ...cking Package Contents Unpack the box and check its components If there is any item missing contact your dealer immediately Main Unit Paper Stopper Paper Feed Tray Power Cable Adapter Rubber Support 2...

Page 24: ...witch to the unlocked position Locked Position Unlocked Position Note If you need to move the product for repair or any other reason be sure to lock the product before moving To lock the product pleas...

Page 25: ...neath the product The rubber supports are designed to prevent the product from being slanted downward during operation To install the rubber supports please first turn the machine over and then insert...

Page 26: ...Installing the Paper Feed Tray 1 Attach the Paper Support to the Paper Feed Tray Paper Feed Tray Paper Support 2 Then attach the Paper Feed Tray to the machine 2 5...

Page 27: ...Connecting the Cables CONNECTING THE ADF CABLE Connect the ADF Auto Document Feeder cable attached to the document cover to the ADF port at the back of the product ADF Cable 2 6...

Page 28: ...r Ethernet LAN cable to an available port of your Ethernet Hub 2 Connect the other end to the LAN NET port at the back of the product CONNECTING THE KEYBOARD CABLE Connect the cable of the keyboard to...

Page 29: ...inter cable to the printer 2 Connect the other end to the Copy port of the product Note To make copy through printer please first turn on the printer and then turn on the product Otherwise you may enc...

Page 30: ...TURNING ON THE MACHINE 1 Press the power switch to the 0 position to turn off the product 2 Connect the small end of the power cable to the power port of the product 3 Connect the other end to an appr...

Page 31: ...LCD display prompts the preset ready status Note You can press the Power Saving button on the control panel to switch to the power saving mode If the product is idle for four hours it automatically sh...

Page 32: ...efines the parameters for TCP IP SMTP and POP3 protocols to send your scanned document to e mail addresses z Filing destinations Defines the protocols and destinations to send your scanned document to...

Page 33: ...ator of the product create a new login name and password before using the machine The administrator can either use the control panel or the product s web page to specify the administration information...

Page 34: ...k Settings 4 Mail Server Press the Up Down arrow button or repeatedly to scroll through the top menu level The complete top menu level Administrator screen is shown as below 1 Information 2 General 3...

Page 35: ...d Profile after filing No 4 PowSave Delay Time 240 min 5 Standby Time 180sec 6 Language Eng 7 Default Mode E Mail 8 Save Exit 9 Exit 5 Press the Up Down arrow button or to select an item 6 Press the S...

Page 36: ...tent Or Press the Select button again after pressing the Left Right arrow button or to select an input content 10 Press the Return button back to the Management screen 11 Press the Up Down arrow butto...

Page 37: ...ress book after sending the e mail from the product Choice ON OFF Add Profile after filing Choose yes to add the new profile to current profile list after sending the scanned document to the server fr...

Page 38: ...roduct in the URL field of your browser and then press Enter The address in the URL field automatically changes to http IP address index htm and then the product web page appears For example http 10 1...

Page 39: ...agement to prompt the Management dialog box Select a button or a dropdown list follow on screen instructions click Submit If required and then finally click Update to save your settings Note You must...

Page 40: ...strator can assign these parameters either using the control panel or using the product s web page SPECIFYING NETWORK CONFIGURATION BY THE CONTROL PANEL 1 After turning on the product press Menu butto...

Page 41: ...arrow button or to select Network Settings and then press the Select button The following Network Settings screen appears 1 DHCP Enable 2 IP address 3 Subnet mask 4 Gateway IP 5 DNS server 6 Save Exit...

Page 42: ...rnet Protocol IP address assigned to your machine by your network administrator 3 Subnet Mask The net mask address assigned by your network administrator 4 Gateway IP The gateway IP address assigned b...

Page 43: ...0 135 5 DNS server 10 1 45 23 6 Save Exit 7 Exit Note If you have a DHCP server available on your network and the DHCP has been selected the above IP subnet mask gateway and DNS server will be automat...

Page 44: ...browser and then press Enter to launch the product web 2 Click the Login button to open the Login screen The Login button will be changed to Logout after you have successfully logged in A user without...

Page 45: ...login name and password and then click Network Configuration to prompt the Network Configuration screen 4 Enter or select an input parameter respectively and then finally click Update to save your set...

Page 46: ...n these parameters either using the control panel or using the product s web page SPECIFYING MAIL SERVER BY THE CONTROL PANEL 1 After turning on the product press Menu button on the control panel This...

Page 47: ...ator screen 1 Information 2 General 3 Network Settings 4 Mail Server 4 Press the Up Down arrow button or to select Mail Server and then press the Select button The following Mail Server screen appears...

Page 48: ...The port number of your SMTP Mail Server 3 POP3 Server The IP address of your POP3 server 4 POP3 Port The port number of your POP3 Server 5 External Address Book If you wish to link external e mail a...

Page 49: ...ation Choice 1 Email address default From address 2 Authentication method SMTP POP3 3 Login name Login name for SMTP or POP3 authentication 4 Password Password for SMTP or POP3 authentication 6 Use th...

Page 50: ...d then press Enter to launch the product web 2 Click the Login button to open the Login screen The Login button will be changed to the Logout button after you have successfully logged in A user withou...

Page 51: ...specific login name and password and then click Mail Server to prompt the Mail Server screen 4 Enter or select an input parameter respectively and then finally click Update to save your settings Refe...

Page 52: ...age the address book it is highly recommended that the administrator read this chapter before manage the product Managing Your E mail Address Book ADDING AN E MAIL ADDRESS To add an e mail address 1 S...

Page 53: ...pi resolution 3 Click the Login button to open the Login screen The Login button will be changed to the Logout button after you have successfully logged in A user without privilege can modify the sett...

Page 54: ...achine is shipped with no specific login name and password and then click Address Book Manager to prompt the Address Book Manager screen 5 Click the E mail icon and choose New to prompt the Add a New...

Page 55: ...nd a description and click Add to temporarily save the latest data or Cancel to return to the Address Book Manager screen 7 Click Update to permanently save all the latest change on the product or Exi...

Page 56: ...MODIFYING AN E MAIL ADDRESS To modify an e mail address 1 Repeat Step 1 to Step 3 from the previous section Adding an E mail Address The Address Book Manager dialog appears 4 5...

Page 57: ...prompt the Modify an E Mail Address dialog 3 Modify your address data 4 Click Update to temporarily save the latest data or Cancel to return to the Address Book Manager screen 5 Click Update to perma...

Page 58: ...previous section Adding An E mail Address The Address Book Manager dialog appears 2 Click the E mail icon and choose the address you want to delete from the list Choose Delete to erase the address A w...

Page 59: ...3 Click Update to permanently save all the latest change on the product or Exit to leave without saving any latest change 4 8...

Page 60: ...Managing Your Groups ADDING A NEW GROUP To add new groups 1 Repeat Step 1 to Step 3 from the previous section Adding An E mail Address The Address Book Manager dialog appears 4 9...

Page 61: ...2 Click the Group icon and choose New to prompt the Add a New Group Set dialog 3 Enter your group name 4 10...

Page 62: ...dd a member to the group 5 Click Add to temporarily save the latest data or Cancel to return to the Address Book Manager screen 6 Click Update to permanently save all the latest change on the product...

Page 63: ...MODIFYING GROUP To modify a group 1 Repeat Step 1 to Step 3 from the previous section Adding An E mail Address The Address Book Manager dialog appears 4 12...

Page 64: ...2 Click the Group icon and choose Modify to prompt the Modify a Group Set dialog 4 13...

Page 65: ...rom the group or click the key to add a new member to the group 4 Click Update to temporarily save the latest data or Cancel to return to the Address Book Manager screen 5 Click Update to permanently...

Page 66: ...DELETING GROUP To delete a group 1 Repeat Step 1 to Step 3 from the previous section Adding An E mail Address The Address Book Manager dialog appears 4 15...

Page 67: ...ete Click Delete to erase the group A warning message appears to confirm your deletion Click OK to confirm or Cancel to exit 3 Click Update to permanently save all the latest data on the product or Ex...

Page 68: ...transferring files via the Internet from one computer to another FTP use RFC 959 FTP as their protocol and the default Port is usually 21 Therefore please make sure you have legal FTP account with the...

Page 69: ...name and password first while connecting to the web site In this mode the file saving feature is available only when entering the user name and password permitted by the server in the field of Login n...

Page 70: ...setting for anonymous access to Microsoft Windows 2000 as an example and assumes the AVPP application is installed in the root directory of IIS C Inetpub wwwroot Xcabinet and the directory for files...

Page 71: ...the Xcabinet dialog box select Directory security tab and click Edit for Anonymous Access and Authentication Control Please make sure Anonymous Access is selected in Authentication Methods dialog box...

Page 72: ...ege to access the file system The settings for IIS privilege is as below 1 Like the setting in anonymous access start Internet service manager and select Default Web site and right click C Inetpub www...

Page 73: ...netpub wwwroot Xcabinet you have to make sure the anonymous account is with sufficient privilege You may make the following settings 1 Select C Inetpub wwwroot Xcabinet directory in Windows Explorer a...

Page 74: ...d AVPP cannot add server sub directory from the product 2 When using Apache as HTTP server you need to have a HTTP 1 1 put add in module since the product uses chunked Transfer encoding In addition th...

Page 75: ...rity has been selected The following illustrations show how to check the SSL port and directory security in Windows 2000 Server system To check if SSL port and directory security have been selected 1...

Page 76: ...ommunication field The Secure Communication dialog appears 4 Check if Require secure channel SSL and Ignore client certificates have been selected Or You may simply type netstat in a MS DOS command If...

Page 77: ...5 10...

Page 78: ...ft Windows systems Please set up the shared directory per the network settings for sharing in MS Windows Generally on the shared directory Properties dialog box under the Windows XP select Sharing tab...

Page 79: ...Check the Full Control to have full privileges of the shared directory 5 12...

Page 80: ...a new profile all settings of a template will be automatically copied to your new profile settings Setting up the FTP folder Template parameters can be done either by the control panel or by the produ...

Page 81: ...arrow button or to select FTP Folder Template and then press the Select button The following FTP Folder Template screen appears 1 Protocol 2 Target URL 3 Port 4 File Name 5 Color Output Format 6 B W O...

Page 82: ...image Choice FTP HTTP CIFS HTTPS AVPP Target URL Specify the filing server address and path Important note You must use this CIFS filing format file IP computer name folder name to set CIFS URL Port T...

Page 83: ...rate Low Medium High If you choose ON from Multi level B W Gray the file formats include PDF JPEG TIF MTIF and JPEG EXIF If TIF or MTIFF is selected as your file format the compression rate is limite...

Page 84: ...filing report to the e mail Document Size Choose your document size Choice A4 A5 B5 Legal Letter Auto Deskew Use this option to automatically deskew a document Choice ON OFF 4 Use the Up Down arrow b...

Page 85: ...u frequently use to speed up the filing process In addition if you have already specified the FTP folder template all settings of the template will be automatically copied to your new profile settings...

Page 86: ...eskew ON 3 Enter your profile name and choose your desired protocol Note that the root of the target URL will automatically change due to the protocol you have selected Use or to scroll between items...

Page 87: ...utput format PDF B W output format PDF Resolution 200 Density 4 Subfolder No report to email None 4 After you have completed your entry press to send your document s in black and white or press to sen...

Page 88: ...FF TEXT A4 Note 1 On the control panel you can add new profiles only Modifying or deleting profiles is available on the product s web page 2 You can set up a maximum of 50 profiles The Filing main scr...

Page 89: ...rmation for you to get to grips with applying your profile in real cases Example 1 Illustrating CIFS profile settings Suppose you create a shared folder test in the C disk under the Windows XP which w...

Page 90: ...Right click test folder and select Properties to open test Properties dialog box 5 23...

Page 91: ...tab and select Share this folder Click Permissions button to open Permissions for test dialog box Note The share name and the specified folder name do not necessarily share the same name For clarity w...

Page 92: ...For simplicity suppose you allow the group of Everyone to have full privileges of the test directory Check Full Control Check Full Control 5 25...

Page 93: ...st 2 Protocol CIFS 3 Target URL file 10 1 30 77 Silas test 4 Port 139 5 User Name tess516 6 Password xxxxxx 7 File Name test D n 8 Color Output Format PDF 9 B W Output Format PDF 10 Resolution 200 11...

Page 94: ...tings Suppose you install an IIS server in the C disk under the Windows XP create a new folder for saving files named scanned files under the root directory of IIS as shown below In addition suppose y...

Page 95: ...Start Administrative Tools in Control Panel select Internet Information Services select Default Web site and right click scanned files and select Properties as shown below 5 28...

Page 96: ...When the scanned files properties dialog box appears select Directory Security tab 5 29...

Page 97: ...Select Edit button 5 30...

Page 98: ...Check Anonymous access and then click OK button 5 31...

Page 99: ...When the scanned files Properties dialog box returns select Directory tab and then check Read Write and Directory browsing Finally click Apply button and OK button 5 32...

Page 100: ...In Windows Explorer select C Inetpub wwwroot scanned files and right click to select Properties 5 33...

Page 101: ...When the scanned files Properties dialog box pops up Select Security tab in the scanned files Properties dialog box 5 34...

Page 102: ...For simplicity suppose you allow the group of Internet Guest Account to have full privileges of the directory and check Full Control Check Full Control 5 35...

Page 103: ...st 2 Protocol HTTP 3 Target URL http 10 1 30 77 scanned files 4 Port 80 5 User Name John 6 Password xxxxxx 7 File Name test D n 8 Color output format JPEG 9 B W Output Format TIFF 10 Resolution 200 11...

Page 104: ...owser and then press Enter to launch the product web 2 Click the Login button to open the Login screen The Login button will be changed to the Logout button after you successfully log in A user withou...

Page 105: ...then click FTP FOLDER TEMPLATE to prompt the FTP FOLDER TEMPLATE screen 4 Enter or select an input parameter respectively and then finally click Update to save your settings All of the settings are th...

Page 106: ...e 1 Repeat Step 1 to 2 from the previous chapter Specifying the FTP folder Template by the product s Web page 2 Click Login since the machine is shipped with no specific login name and password and th...

Page 107: ...dialog Note If you have already specified the FTP Folder Template all the settings of the template will be automatically copied to your new profile settings so that you don t need to retype the same s...

Page 108: ...4 Enter your profile information For simplicity suppose you want to use the same settings as the FTP folder template s 5 41...

Page 109: ...5 Click Add to temporarily save the latest data and return to the main screen 6 Click Update to permanently save all the latest change on the product or Exit to leave without saving any change 5 42...

Page 110: ...dify a current profile 1 Repeat Step 1 to 2 from the previous chapter Specifying the FTP folder template by the product s web page 2 Click Login since the machine is shipped with no specific login nam...

Page 111: ...3 Choose the profile you wish to modify and click Modify to prompt Modify Profile dialog as shown below 5 44...

Page 112: ...xample 5 Click Update to temporarily save the latest data or Cancel to exit and then the main screen returns 6 Click Update to permanently save all the latest change on the product or Exit to leave wi...

Page 113: ...vious chapter Specifying the FTP folder Template by the product s Web page 2 Click Login since the machine is shipped with no specific login name and password and then click Profile Manager to prompt...

Page 114: ...e profile A warning message appears to confirm your deletion Click OK to confirm or Cancel to exit 5 Click Update to permanently save all the latest change on the product or Exit to leave without savi...

Page 115: ......

Page 116: ...ve limited use on the Copy E mail or Filing function The Account Management on the control panel allows you only to switch desired servers without entering the product web page again After the adminis...

Page 117: ...your browser and then press Enter 2 Click the Login button to open the Login screen The Login button will be changed to the Logout button after you have successfully logged in A user without privilege...

Page 118: ...the Account Management dialog box 4 Under the Basic Settings tab select a server type from the Type dropdown list type in your server URL in the Server URL field type in your server port in the Port...

Page 119: ...ment are saved in the product memory HTTP LDAP or SMTP means using a HTTP LDAP or SMTP server as a security type and a HTTP LDAP or SMTP server will be assumed to know the name and password entered in...

Page 120: ...dialog box as shown below 6 Click the New Account button to open the New Account dialog box as shown below 7 Set up your user name and password respectively in the Name and Password fields Give an al...

Page 121: ...unction and 50 pieces of documents on the Filing function but does not allow Email function The New Account settings are demonstrated below Note Quota means how many pieces of documents you allow each...

Page 122: ...s to use the same amount of quota for each given function You only need to give new names and passwords for different persons without retyping the rest Click the Edit button if you want to modify some...

Page 123: ...week The access to the Billing Log Setting is blocked by the administrator password It is recommended that an administrator create a password before performing these activities Both Login and Passwor...

Page 124: ...k Settings 4 Mail Server Press the Up Down arrow button or repeatedly to scroll through the top menu level The complete top menu level Administrator screen is shown as below 1 Information 2 General 3...

Page 125: ...ect 4 Send Log Schedule No 5 Time for Sending Log 6 Clear Job Logs 7 Save Exit 8 Exit 5 Press the Up Down arrow button or to select an item 6 Press the Select button to enter the next menu level 7 Pre...

Page 126: ...r enter an e mail address to send your billing result Choice Protocol Email address Server URL Port Login name Password Send Notification to Mail Subject Enter your preferred Email subject Send Log Sc...

Page 127: ...ld of your browser and then press Enter 2 Click the Login button to open the Login screen The Login button is changed to the Logout button after you successfully log in A user without privilege can mo...

Page 128: ...dialog box 4 Click the Send Log to button to prompt the Send Log to screen as shown below 5 From the Protocol dropdown list select Mail Box if you want to send the log by Email or FTP CIFS HTTP if yo...

Page 129: ...to the Billing Log Setting screen 8 Enter your log subject in the Mail Subject field 9 Select a sending log schedule from the Send Log schedule list 10 Select a day for the sending log from the Day fo...

Page 130: ...mended that an administrator create a password before performing these activities Both Login and Password leave blank by default Administering the Product by the Control Panel 1 Press Menu button This...

Page 131: ...w button or to select an input content and then press the Select button 4 Press Save Exit on the LCD screen and then press the Select button to save the changes and exit from the menu 5 To exit from t...

Page 132: ...1 Type the IP address of the product in the URL field of your browser and then press Enter 2 Click the Login button to open the Login screen The Login button will be changed to the Logout button after...

Page 133: ...hine is shipped with no specific login name and password and then click one of the items on the left side For the contents of each item on the left side please see the subsequent section Summary of Ad...

Page 134: ...trol panel After you type the login name and password the following Administrator screen will appear 1 Information 2 General 3 Network Settings 4 Mail Server 5 Copy 6 E Mail 7 FTP Folder Template 8 Ac...

Page 135: ...al 2 B W Copy 3 Color Copy 4 B W E mail 5 Color E mail 6 B W Filing 7 Color Filing 8 B W USB Scan 9 Color USB Scan 10 ADF Scan 11 Job Counting Menu Map Print the menu map on the product Exit Exit the...

Page 136: ...ct Yes if you wish to enable DHCP IP address IP address of the product Subnet mask The subnet mask of the product Gateway IP The IP address of your gateway DNS server IP address of your DNS server Sav...

Page 137: ...server here Choice 1 LDAP server URL Enter your LDAP server URL here 2 Port Enter port number of the LDAP server 3 Login name Enter login name of the LDAP server 4 Password Enter password of the LDAP...

Page 138: ...n LTRHead Bond Recycled Rough This choice depends on printer model connected to the product Watermark Enter the words for watermark Background Remove Remove the background color of your B W document C...

Page 139: ...s you to shift your scanned image to the bottom by the specified distance Choice 0 mm 6 mm 13 mm 19 mm 25 mm Duplex Choose if you wish to use duplex double sided function if duplex is available for yo...

Page 140: ...or MTIFF is selected as a file format the compression rate is defined as RAW only B W Output Format File format for documents to be sent in black and white via E mail from the product Choice 1 Multi...

Page 141: ...1M 3M 5M 10M 30M No Limit Density Choose the density level Choice 1 2 3 4 5 6 7 1 means weakest density and 7 means strongest density Document Size Choose your document size Choice A4 A5 B5 Legal Lett...

Page 142: ...nd path Important note You must use this CIFS filing format file IP computer name folder name to set CIFS URL Port The port number for your filing server Default value ftp 21 http 80 CIFS 139 AVPP 80...

Page 143: ...s RAW only B W Output Format File format for documents to be sent in black and white via filing from the product Choice 1 Multi level B W Gray ON OFF 2 File format PDF PCX MTIFF Multi page TIFF TIFF 3...

Page 144: ...folder under the server Choice ON OFF Report to e mail Enter an e mail address if you wish to send the filing report to the e mail Document Size Choose your document size Choice A4 A5 B5 Legal Letter...

Page 145: ...or enter an e mail address to send your billing result Choice Protocol Email address Server URL Port Login name Password Send Notification to Mail Subject Enter your preferred Email subject Send Log...

Page 146: ...e yes to add the new profile to current profile list after sending the scanned document to the server from the product Choice ON OFF PowSave Delay Time Set how long the machine will automatically ente...

Page 147: ...F or on the glass 2 Press or on the control panel 3 If you are pressing enter an e mail address or select one address from the address book If you are pressing choose your desired profile 4 Press Blac...

Page 148: ...ure that your paper meets the following specifications Document s can range in size from 4 5 by 5 5 inches to 8 5 by 14 inches Legal Document s can range in weight from 16 to 28 lbs 0 002 to 0 006 Doc...

Page 149: ...If you have multiple pages fan your document s to avoid occasional paper jam The ADF holds up to 50 pages at one time 3 Place your document s with the text FACE UP in the ADF and make sure that the t...

Page 150: ...OCUMENT S ON THE GLASS 1 Open the document s cover to reveal the glass 2 Place your document with the text FACE DOWN on the glass and align the document in the upper left corner 3 Close the document c...

Page 151: ...our Document to E mails BASIC OPERATION 1 Place your document s with text FACE UP in the ADF or FACE DOWN on the glass 2 Press the E mail button The following E mail screen will appear To Subj CC BCC...

Page 152: ...il address from the Address Book by pressing the Address book FTP folder on the control panel Use the Up Down arrow button or to select multiple e mail addresses and press the Select button Or you may...

Page 153: ...ly To Address address if you wish to specify a reply address which is different from the From address Color Output Format File format for documents to be sent in colors via E mail from the product Cho...

Page 154: ...document from a selection of 75 100 150 200 300 400 600 dpi A higher resolution reproduces your image with greater details yet it requires more disk space Refer to page 6 3 Separation limit Limit the...

Page 155: ...r filing protocol directory file name and other scanning parameters On how to set up a new profile please refer to the Adding a New Profile on the Control Panel section in Chapter 5 BASIC OPERATION 1...

Page 156: ...he ADF wait for the first 50 pages to finish scanning and then load another 50 pages to finish scanning or more than one page on the flatbed Manual Feed is valid when the LED is lit 3 Choose your desi...

Page 157: ...ctory to save the scanned document Note that the directory will be varied due to different protocol The route starts from the root directory in FTP HTTP HTTPS and CIFS For example ftp http and file ht...

Page 158: ...um High If you choose ON from Multi level B W Gray the file formats include PDF JPEG TIF MTIF and JPEG EXIF If TIF or MTIFF is selected as your file format the compression rate is limited to RAW only...

Page 159: ...r document size Choice A4 A5 B5 Legal Letter Auto Deskew Use this option to automatically deskew a document Choice ON OFF Note If you make a mistake during the process press on the control panel to ca...

Page 160: ...printer has been turned on FIRST Otherwise an error LED will be on from your printer 1 Place your document s with text FACE UP in the ADF or FACE DOWN on the glass 2 Press on the Control Panel 3 Pres...

Page 161: ...when pressing and then on the control panel Basic copy features include the following Changing Scaling Focusing on Speed Fine Adjusting Density Increasing Copy Count Selecting Paper Saver More copy fe...

Page 162: ...to enlarge up to 400 or reduce down to 25 To reduce or enlarge the original document 1 Press on the panel to prompt the Copy screen 2 Reduce document s down to 25 or enlarge up to 400 1 2 3 1 Increase...

Page 163: ...to focus your copy result on text To change your focus on Fine 1 Press on the control panel to prompt the Copy screen 2 Press the Left Right arrow button or to choose your focus and press the Select b...

Page 164: ...the Adjusting Density feature To change your density 1 Press on the panel to prompt the Copy screen 2 Press the down arrow button to move the cursor down to the Density field 3 Press the Left Right a...

Page 165: ...ges are aligned horizontally If you select option the copied pages are aligned vertically Yet please check if your printer supports Paper Saver before using this feature To choose paper saver 1 Press...

Page 166: ...number of copies choose your desired copy count with the numeric keypad or keyboard To increase your copy count 1 Press the key on the control panel to prompt the Copy screen 2 Enter your desired copy...

Page 167: ...ize to make a copy for that particular area only Please note that the paper size ending with a letter R represents a portrait style while the paper size ending without a letter R represents a landscap...

Page 168: ...Media Type option To choose media type 1 Press the key on the control panel and then More Settings key to prompt the More Settings screen 2 Press the down arrow button to move the cursor down to the...

Page 169: ...e background 1 Press the key on the control panel and then More Settings key to prompt the More settings screen 2 Press the down arrow button to move the cursor down to the Background Remove field 3 P...

Page 170: ...this feature to increase your efficiency To sort your document 1 Press the key on the control panel and then More Settings key to prompt the More Settings screen 2 Press the down arrow button to move...

Page 171: ...ase enter text in this option for your scanned document To use water mark 1 Press the key on the control panel and then More Settings key to prompt the More Settings screen 2 Press the down arrow butt...

Page 172: ...For example type CONFIDENTIAL as your water mark The result will look as below Note After you have completed your copying the machine will automatically return to the default settings 9 26...

Page 173: ...mage you can set Edge Erase option To set Edge Erase 1 Press the key on the control panel and then More Settings key to prompt the More Settings screen 2 Press the down arrow button to move the cursor...

Page 174: ...to shift your scanned image to the bottom by the specified distance To set Margin Shift R or Margin Shift B 1 Press the key on the control panel and then More Settings key to prompt the More Settings...

Page 175: ...start your product If the code still appears contact your nearest dealer 10007 Lamp error Restart your product If the code still appears contact your nearest dealer 10009 ADF error ADF paper jam ADF p...

Page 176: ...act your nearest dealer MESSAGE DURING SCANNING AND COPYING LCD Message Action Copy function disables Please download the printer profile Check printer cable or status 1 Check if the printer cable has...

Page 177: ...attempt to connect failed 20545 The destination host is not able to reach Ping the IP address of the product from another PC in DOS prompt For example type Ping 10 1 20 144 in Dos prompt If the produc...

Page 178: ...er help 31000 31020 31030 32000 33000 33010 Unpredicted error Turn on Log File option in ADMIN MANAGEMENT Service mode to record and observe network actions and contact your network administrator or n...

Page 179: ...her help on mail server s authentication mechanism Choose SMTP authentication for Email security or turn off the mail server s authentication and try again 31002 31024 31035 32003 33011 SMTP 500 Synta...

Page 180: ...action not taken mailbox unavailable E g mailbox not found no access Check To address 31039 SMTP 551 User not local please try again Check To address 31026 31040 33003 SMTP 552 Requested mail action...

Page 181: ...or nearest dealer for further help 42001 FTP login name error Check your login name and try again 42002 FTP password incorrect Check your password and try again 43001 FTP can t enter this directory Ma...

Page 182: ...ht to create new subdirectory 54001 CIFS fail to create file Make sure you have full control privilege on this network share 54002 CIFS send data error 61001 63001 63002 64000 HTTP fail to connect Che...

Page 183: ...nal server error Contact your server administrator for further help 64005 HTTP 501 PUT method not implemented That server does not implement HTTP PUT method This product can t store file on this serve...

Page 184: ...event of a paper jam follow the procedures below to remove the paper 1 Gently open the ADF front cover to the left 2 Carefully pull the paper out of the ADF unit 3 Close the ADF front cover The produc...

Page 185: ...Removing the Abnormal Line Image When the scanned image is with abnormal lines on it clean the white area on the glass as indicated below with a clean lintless cloth White Area 10 11...

Page 186: ...te 1 Moisten a clean lintless cloth with isopropyl alcohol 95 2 Gently open the ADF front cover Wipe the feeding rollers from side to side Rotate the rollers forward with your finger and repeat the ab...

Page 187: ...case it is highly recommended to replace the pad module with a new one For ordering the pad module please consult your nearest dealer and follow the procedure below to replace it Disassembling Procedu...

Page 188: ...Assembling Procedure 1 Take out the ADF pad module from the box 2 Press both arms of the ADF snap in pad module inwardly with your two fingers 3 Place it into the holes until it snaps into place 10 14...

Page 189: ...d performance To clean the glass 1 Open the document cover as shown below 2 Dip a soft clean cloth with isopropyl alcohol 95 3 Gently wipe the document glass and the white sheet beneath the document c...

Page 190: ...Appendix Quick Guide Placing Your Documents For multi page transmission Place your document FACE UP in the ADF For single page transmission Place your documents FACE DOWN on the glass b...

Page 191: ...send e mail Press the E Mail key Enter an e mail address with your keyboard or press Address book FTP folder key to select an e mail address from the list i e Press the key to send your document in c...

Page 192: ...27 15 x 33 87 mm External Connections 1 RJ 45 for Network connection 2 USB COPYPORT 3 USB keyboard 4 ADF port Network Connection 10 100 Mbits auto negotiation Networked Workgroup Solution for Stand al...

Page 193: ...400 in 1 increment decrement Pre set Scales Input Capacity Depend on printer Output Capacity Depend on printer Copy Application One scan multiple copies Water mark and Stamp Network Specification Con...

Page 194: ...5 MB 10 MB 30 MB Unlimited Resolution 75 100 150 200 300 400 600 dpi Default Resolution 200 dpi Address Book Volume Max Addresses Group No of Addresses in Each Group 2000 100 99 Multiple Recipients Al...

Page 195: ...ra 4 3 2J Lotus Notes R5 Filing Specification Communication Protocol FTP HTTP HTTPS CIFS AVPP Post Processing Protocols for System Integrator AVPP File Formats B W Gray Color PDF TIFF MTIFF PCX PDF TI...

Page 196: ...Focusing on Photo or Text 9 17 Full Control 5 11 Illustrating CIFS profile settings 5 21 Illustrating HTTP profile settings 5 26 increasing Copy Count 9 20 Internet Communication Features Scan to E m...

Page 197: ...r document s in the adf 9 3 placing your document s on the glass 9 4 post processing 1 15 Power Saving 2 10 Profiles Managing 1 2 Quota 6 6 Scan count 8 6 Scan to E mail 1 1 scan to file 1 14 Scan to...

Reviews: